Quantcast
Channel: Android point
Viewing all 106 articles
Browse latest View live

RecyclerView fast scroll in android

$
0
0

RecyclerView is major used in building any awesome app. In my last article I have discussed about the swipe and delete item of recyclerView. If you have n't seen then Please check here Swipe to delete item of recyclerview.

RecyclerView provides better in term of scrolling any complex items. Now days people are using very complex layout and design of long list. And very difficult to scroll to find a particular item while scrolling. To over come this issue RecyclerView provides the fast scroll. You can find item very easy while scrolling.

Here in this article I am sharing one awesome library that helps you to make this in very simple way.
He made our life very easy and simple. Please give full credit to original author. Here is the Github link.  So lets implement this library in our simple project. Before proceed please check this  video that helps you what are going to implements.


Lets create an android project RecyclerView Fast scroll. Here is added all my dependencies.

build.gradle app level

apply plugin: 'com.android.application'
apply plugin: 'com.neenbedankt.android-apt'

android {
compileSdkVersion 25
buildToolsVersion "25.0.0"
defaultConfig {
applicationId "com.sunil.recyclerviewfastscroll"
minSdkVersion 15
targetSdkVersion 25
versionCode 1
versionName "1.0"
testInstrumentationRunner "android.support.test.runner.AndroidJUnitRunner"
}
buildTypes {
release {
minifyEnabled false
proguardFiles getDefaultProguardFile('proguard-android.txt'), 'proguard-rules.pro'
}
}
}

dependencies {
compile fileTree(dir: 'libs', include: ['*.jar'])
androidTestCompile('com.android.support.test.espresso:espresso-core:2.2.2', {
exclude group: 'com.android.support', module: 'support-annotations'
})
compile 'com.android.support:appcompat-v7:25.0.0'
testCompile 'junit:junit:4.12'

compile 'com.android.support:recyclerview-v7:25.0.0'
compile 'com.android.support:cardview-v7:25.0.0'
compile 'com.android.support:design:25.0.0'

compile 'com.jakewharton:butterknife:8.4.0'
apt 'com.jakewharton:butterknife-compiler:8.4.0'

compile 'com.github.bumptech.glide:glide:3.7.0'
compile 'de.hdodenhof:circleimageview:2.0.0'
compile 'com.simplecityapps:recyclerview-fastscroll:1.0.11'

}

ItemModel.java

public class ItemModel {

private String name;
private String imagePath;

public ItemModel(){

}

public ItemModel(String name, String imagePath) {
this.name = name;
this.imagePath = imagePath;
}

public String getName() {
return name;
}

public void setName(String name) {
this.name = name;
}

public String getImagePath() {
return imagePath;
}

public void setImagePath(String imagePath) {
this.imagePath = imagePath;
}
}

ItemModel.java

import android.support.v7.app.AppCompatActivity;
import android.os.Bundle;
import android.support.v7.widget.DividerItemDecoration;
import android.support.v7.widget.LinearLayoutManager;
import android.support.v7.widget.RecyclerView;

import java.util.ArrayList;
import java.util.Collections;
import java.util.Comparator;
import java.util.List;

import butterknife.BindView;
import butterknife.ButterKnife;

public class MainActivity extends AppCompatActivity {

private final static String TAG = MainActivity.class.getSimpleName();

private String[] names = Constant.name;
private String[] images = Constant.image;

private RecyclerItemAdapter mAdapter;

@BindView(R.id.recyclerView)
RecyclerView recyclerView;


@Override
protected void onCreate(Bundle savedInstanceState) {
super.onCreate(savedInstanceState);
setContentView(R.layout.activity_main);
ButterKnife.bind(this);

initView();

}
private void initView() {
recyclerView.setLayoutManager(new LinearLayoutManager(this));
List listItems = getList();
mAdapter = new RecyclerItemAdapter(this, listItems);
recyclerView.setAdapter(mAdapter);
recyclerView.addItemDecoration(new DividerItemDecoration(this, LinearLayoutManager.VERTICAL));

}

private List getList(){
List list = new ArrayList<>();
for (int index =0; index < names.length; index++){
ItemModel itemModel = new ItemModel();
itemModel.setName(names[index]);
itemModel.setImagePath(images[index]);
list.add(itemModel);
}

if (list.size() > 0) {
Collections.sort(list, new Comparator() {
@Override
public int compare(final ItemModel object1, final ItemModel object2) {
return object1.getName().compareTo(object2.getName());
}
});
}
return list;
}
}

activity_main.xml

<?xml version="1.0" encoding="utf-8"?>
<RelativeLayout xmlns:android="http://schemas.android.com/apk/res/android"
xmlns:tools="http://schemas.android.com/tools"
xmlns:app="http://schemas.android.com/apk/res-auto"
android:id="@+id/activity_main"
android:layout_width="match_parent"
android:layout_height="match_parent"
android:paddingBottom="@dimen/activity_vertical_margin"
android:paddingLeft="@dimen/activity_horizontal_margin"
android:paddingRight="@dimen/activity_horizontal_margin"
android:paddingTop="@dimen/activity_vertical_margin"
tools:context="com.sunil.recyclerviewfastscroll.MainActivity">

<com.simplecityapps.recyclerview_fastscroll.views.FastScrollRecyclerView
android:id="@+id/recyclerView"
android:layout_width="match_parent"
android:layout_height="wrap_content"
app:fastScrollPopupBgColor="@color/colorAccent"
app:fastScrollPopupTextColor="@android:color/primary_text_dark"
app:fastScrollThumbColor="@color/colorAccent">
</com.simplecityapps.recyclerview_fastscroll.views.FastScrollRecyclerView>


<</RelativeLayout>

RecyclerItemAdapter.java

import android.content.Context;
import android.support.annotation.NonNull;
import android.support.v7.widget.RecyclerView;
import android.view.LayoutInflater;
import android.view.View;
import android.view.ViewGroup;
import android.widget.ImageView;
import android.widget.TextView;

import com.bumptech.glide.Glide;
import com.simplecityapps.recyclerview_fastscroll.views.FastScrollRecyclerView;

import java.util.List;

import butterknife.BindView;
import butterknife.ButterKnife;

/**
* Created by sunil on 12/3/16.
*/

public class RecyclerItemAdapter extends RecyclerView.Adapter implements FastScrollRecyclerView.SectionedAdapter {

private List itemModels;
private Context context;

public RecyclerItemAdapter(Context context, List wallTalls) {
this.itemModels = wallTalls;
this.context = context;
}

@Override
public int getItemCount() {
return itemModels.size();
}


@Override
public RecyclerView.ViewHolder onCreateViewHolder(ViewGroup viewGroup, int i) {
View itemView = LayoutInflater.from(viewGroup.getContext()).inflate(R.layout.item_layout, viewGroup, false);
return new ItemViewHolder(itemView);
}

@Override
public void onBindViewHolder(RecyclerView.ViewHolder holder, int position) {
ItemModel model = itemModels.get(position);
initializeViews(model, holder, position);
}


private void initializeViews(ItemModel model, final RecyclerView.ViewHolder holder, int position) {

String imageUrl = model.getImagePath();
if (imageUrl != null && !imageUrl.isEmpty()){
Glide.with(context)
.load(imageUrl)
.into(((ItemViewHolder)holder).imageView);

}
((ItemViewHolder)holder).name.setText(model.getName());
}

@NonNull
@Override
public String getSectionName(int position) {
return Character.toString(itemModels.get(position).getName().charAt(0));
}

public static class ItemViewHolder extends RecyclerView.ViewHolder {

@BindView(R.id.name)
TextView name;
@BindView(R.id.imageView)
ImageView imageView;

public ItemViewHolder(View itemView) {
super(itemView);
ButterKnife.bind(this, itemView);
}
}


}

item_layout.xml

<?xml version="1.0" encoding="utf-8"?>
<RelativeLayout xmlns:android="http://schemas.android.com/apk/res/android"
android:orientation="vertical" android:layout_width="match_parent"
android:layout_height="wrap_content">

<de.hdodenhof.circleimageview.CircleImageView
android:src="@mipmap/ic_launcher"
android:id="@+id/imageView"
android:layout_width="70dp"
android:layout_height="70dp" />

<TextView
android:id="@+id/name"
android:text="name"
android:textStyle="bold"
android:layout_alignBaseline="@id/imageView"
android:layout_margin="10dp"
android:gravity="center_vertical"
android:layout_width="match_parent"
android:layout_height="60dp"
android:layout_toRightOf="@+id/imageView"/>

</RelativeLayout>

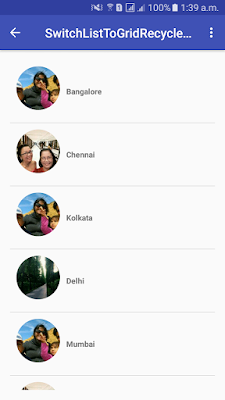
Here is the snap shot.

Thanks for reading this post. I hope this post will help you to understand.

Sticky Header RecyclerView in Android

$
0
0

In my last article we have leaned about to Fast scrolling in recyclerView. If you have not seen Please check this link Fast Scroll RecyclerView.

In this article I am focusing the sticky header in recyclerView. Now days people are using very complex layout and design. In one place they want every things to show up. I mean, I am talking about the Section recyclerView.  In one sections having many items in recyclerView. Now the user wants to section header would be sticky at the time of recyclerView Scrolling.

This article will  helps to you implement this type of requirement. There are many numbers of library available to build this. I really appreciate to those author who make our life easy. So full credit goes to them. In one of them I am picking one library that implements is very simple and easy to help, Here is the detail Sticky Header.

Here is the video uploaded that help to you to understand the sticky header implements.


Lets create an android project for Sticky header in recyclerView.

build.gradle app level

apply plugin: 'com.android.application'
apply plugin: 'com.neenbedankt.android-apt'

android {
compileSdkVersion 25
buildToolsVersion "25.0.0"
defaultConfig {
applicationId "com.sunil.stickyheaderrecyclerview"
minSdkVersion 15
targetSdkVersion 25
versionCode 1
versionName "1.0"
testInstrumentationRunner "android.support.test.runner.AndroidJUnitRunner"
}
buildTypes {
release {
minifyEnabled false
proguardFiles getDefaultProguardFile('proguard-android.txt'), 'proguard-rules.pro'
}
}
}

dependencies {
compile fileTree(dir: 'libs', include: ['*.jar'])
androidTestCompile('com.android.support.test.espresso:espresso-core:2.2.2', {
exclude group: 'com.android.support', module: 'support-annotations'
})
compile 'com.android.support:appcompat-v7:25.0.0'
testCompile 'junit:junit:4.12'

compile 'com.android.support:recyclerview-v7:25.0.0'
compile 'com.android.support:cardview-v7:25.0.0'
compile 'com.android.support:design:25.0.0'

compile 'com.jakewharton:butterknife:8.4.0'
apt 'com.jakewharton:butterknife-compiler:8.4.0'

compile 'com.github.bumptech.glide:glide:3.7.0'
compile 'de.hdodenhof:circleimageview:2.0.0'
compile 'com.android.support:percent:25.0.0'
compile 'com.timehop.stickyheadersrecyclerview:library:0.4.3'
}

ItemModel.java

public class ItemModel {

private String name;
private String imagePath;

public ItemModel(){

}

public ItemModel(String name, String imagePath) {
this.name = name;
this.imagePath = imagePath;
}

public String getName() {
return name;
}

public void setName(String name) {
this.name = name;
}

public String getImagePath() {
return imagePath;
}

public void setImagePath(String imagePath) {
this.imagePath = imagePath;
}
}

MainActivity.java

import android.os.Bundle;
import android.support.v7.app.AppCompatActivity;
import android.support.v7.widget.DividerItemDecoration;
import android.support.v7.widget.LinearLayoutManager;
import android.support.v7.widget.RecyclerView;

import com.timehop.stickyheadersrecyclerview.StickyRecyclerHeadersDecoration;
import com.timehop.stickyheadersrecyclerview.StickyRecyclerHeadersTouchListener;

import java.util.ArrayList;
import java.util.Collections;
import java.util.Comparator;
import java.util.List;

import butterknife.BindView;
import butterknife.ButterKnife;

public class MainActivity extends AppCompatActivity {

private static final String TAG = MainActivity.class.getSimpleName();

private String[] names = Constant.name;
private String[] images = Constant.image;

@BindView(R.id.recyclerView)
RecyclerView recyclerView;

RecyclerHeaderItemAdapter mAdapter ;

@Override
protected void onCreate(Bundle savedInstanceState) {
super.onCreate(savedInstanceState);
setContentView(R.layout.activity_main);
ButterKnife.bind(this);

initView();
}

private void initView() {
recyclerView.setLayoutManager(new LinearLayoutManager(this));
List listItems = getList();
mAdapter = new RecyclerHeaderItemAdapter(this, listItems);
recyclerView.setAdapter(mAdapter);


// Add the sticky headers decoration
final StickyRecyclerHeadersDecoration headersDecor = new StickyRecyclerHeadersDecoration(mAdapter);
recyclerView.addItemDecoration(headersDecor);

// Add decoration for dividers between list items
recyclerView.addItemDecoration(new DividerItemDecoration(this, LinearLayoutManager.VERTICAL));

StickyRecyclerHeadersTouchListener touchListener =
new StickyRecyclerHeadersTouchListener(recyclerView, headersDecor);
recyclerView.addOnItemTouchListener(touchListener);

}

private List getList(){
List list = new ArrayList<>();
for (int index =0; index < names.length; index++){
ItemModel itemModel = new ItemModel();
itemModel.setName(names[index]);
itemModel.setImagePath(images[index]);
list.add(itemModel);
}
if (list.size() > 0) {
Collections.sort(list, new Comparator() {
@Override
public int compare(final ItemModel object1, final ItemModel object2) {
return object1.getName().compareTo(object2.getName());
}
});
}
return list;
}
}

RecyclerItemAdapter.java

public abstract class RecyclerItemAdapter extends RecyclerView.Adapter {

List items = new ArrayList<>();
RecyclerItemAdapter(){
setHasStableIds(true);
}


public void add(ItemModel object) {
items.add(object);
notifyDataSetChanged();
}

public void add(int index, ItemModel object) {
items.add(index, object);
notifyDataSetChanged();
}

public void addAll(Collection collection) {
if (collection != null) {
items.addAll(collection);
notifyDataSetChanged();
}
}

public void addAll(ItemModel... items) {
addAll(Arrays.asList(items));
}

public void clear() {
items.clear();
notifyDataSetChanged();
}

public void remove(ItemModel object) {
items.remove(object);
notifyDataSetChanged();
}

}

RecyclerHeaderItemAdapter.java

public class RecyclerHeaderItemAdapter extends RecyclerItemAdapter implements StickyRecyclerHeadersAdapter {

private List mList ;
private Context context;

RecyclerHeaderItemAdapter(Context context, List list ){
this.mList = list;
this.context = context;
}


@Override
public long getHeaderId(int position) {
if (position == 0) {
return -1;
} else {
return getItemId(position);
}
}

@Override
public RecyclerView.ViewHolder onCreateHeaderViewHolder(ViewGroup parent) {
View view = LayoutInflater.from(parent.getContext()).inflate(R.layout.list_item_header, parent, false);
return new ItemHeaderViewHolder(view);
}

@Override
public void onBindHeaderViewHolder(RecyclerView.ViewHolder holder, int position) {
if (holder instanceof ItemHeaderViewHolder) {
if (getItem(position).getName() != null) {
String header = String.valueOf(getItem(position).getName().charAt(0));
((ItemHeaderViewHolder) holder).header.setText(header);
}
}

}

@Override
public RecyclerView.ViewHolder onCreateViewHolder(ViewGroup parent, int viewType) {
View view = LayoutInflater.from(parent.getContext()).inflate(R.layout.list_item, parent, false);
return new ItemViewHolder(view);
}

@Override
public void onBindViewHolder(RecyclerView.ViewHolder holder, int position) {
ItemModel itemModel = mList.get(position);
((ItemViewHolder)holder).name.setText(itemModel.getName());
String imageUrl = itemModel.getImagePath();
if (imageUrl != null){
Glide.with(context)
.load(imageUrl)
.into(((ItemViewHolder)holder).imageView);
}
}

@Override
public int getItemCount() {
return mList.size();
}

public ItemModel getItem(int position) {
return mList.get(position);
}

@Override
public long getItemId(int position) {
return getItem(position).hashCode();
}


public static class ItemViewHolder extends RecyclerView.ViewHolder {

@BindView(R.id.name)
TextView name;

@BindView(R.id.imageView)
ImageView imageView;

public ItemViewHolder(View itemView) {
super(itemView);
ButterKnife.bind(this, itemView);
}
}

public static class ItemHeaderViewHolder extends RecyclerView.ViewHolder {

@BindView(R.id.header)
TextView header;

public ItemHeaderViewHolder(View itemView) {
super(itemView);
ButterKnife.bind(this, itemView);
}
}

}

activity_main.xml

<?xml version="1.0" encoding="utf-8"?>
<RelativeLayout xmlns:android="http://schemas.android.com/apk/res/android"
xmlns:tools="http://schemas.android.com/tools"
android:id="@+id/activity_main"
android:layout_width="match_parent"
android:layout_height="match_parent"
android:paddingBottom="@dimen/activity_vertical_margin"
android:paddingLeft="@dimen/activity_horizontal_margin"
android:paddingRight="@dimen/activity_horizontal_margin"
android:paddingTop="@dimen/activity_vertical_margin"
tools:context="com.sunil.stickyheaderrecyclerview.MainActivity">

<android.support.v7.widget.RecyclerView
android:id="@+id/recyclerView"
android:layout_width="match_parent"
android:layout_height="wrap_content">
</android.support.v7.widget.RecyclerView>
</RelativeLayout>

list_item.xml

<?xml version="1.0" encoding="utf-8"?>
<RelativeLayout xmlns:android="http://schemas.android.com/apk/res/android"
android:orientation="vertical" android:layout_width="match_parent"
android:layout_height="wrap_content">

<de.hdodenhof.circleimageview.CircleImageView
android:src="@mipmap/ic_launcher"
android:id="@+id/imageView"
android:layout_width="70dp"
android:layout_height="70dp" />

<TextView
android:id="@+id/name"
android:text="name"
android:textStyle="bold"
android:layout_alignBaseline="@id/imageView"
android:layout_margin="10dp"
android:gravity="center_vertical"
android:layout_width="match_parent"
android:layout_height="60dp"
android:layout_toRightOf="@+id/imageView"/>

</RelativeLayout>


Thanks for reading this post. I hope it will helps to understand.

Collapsing and quick return ToolBar RecyclerView in android

$
0
0
In any app ToolBar is the major used it makes our layout and content describe better way as a title. Today in my article we are focusing about animated Tool bar . There are many custom library available to make our toolbar better look and feel. Tool bar introduced in design support library and majorly used in almost app.

In this article we will focus on two different way to make our toolbar animated.
1. Collapsing Toolbar
2. Quick Return Toolbar 

What is collapsing ToolBar? Collapsing ToolbarLayout is the wrapper for Toolbar which implements a collapsing app bar. It is designed to be used as a direct child of AppBarLayout.
Here is uploaded video that help you to understand to implement such collapsing toolbar and quick return toolbar.


Lets create an android project name Collapsing tool bar to implements same as we seen in video.

build.gradle app level

apply plugin: 'com.android.application'
apply plugin: 'com.neenbedankt.android-apt'

android {
compileSdkVersion 25
buildToolsVersion "25.0.1"
defaultConfig {
applicationId "com.sunil.collapsetoolbarrecyclerview"
minSdkVersion 15
targetSdkVersion 25
versionCode 1
versionName "1.0"
testInstrumentationRunner "android.support.test.runner.AndroidJUnitRunner"
}
buildTypes {
release {
minifyEnabled false
proguardFiles getDefaultProguardFile('proguard-android.txt'), 'proguard-rules.pro'
}
}
}

dependencies {
compile fileTree(dir: 'libs', include: ['*.jar'])
androidTestCompile('com.android.support.test.espresso:espresso-core:2.2.2', {
exclude group: 'com.android.support', module: 'support-annotations'
})
compile 'com.android.support:appcompat-v7:25.0.0'
testCompile 'junit:junit:4.12'

compile 'com.android.support:recyclerview-v7:25.0.0'
compile 'com.android.support:cardview-v7:25.0.0'
compile 'com.android.support:design:25.0.0'

compile 'com.jakewharton:butterknife:8.4.0'
apt 'com.jakewharton:butterknife-compiler:8.4.0'

compile 'com.github.bumptech.glide:glide:3.7.0'
compile 'de.hdodenhof:circleimageview:2.0.0'
}

ItemModel.java

public class ItemModel {

private String name;
private String imagePath;

public ItemModel(){

}

public ItemModel(String name, String imagePath) {
this.name = name;
this.imagePath = imagePath;
}

public String getName() {
return name;
}

public void setName(String name) {
this.name = name;
}

public String getImagePath() {
return imagePath;
}

public void setImagePath(String imagePath) {
this.imagePath = imagePath;
}
}

CollapsingToolBarActivity.java

import android.os.Bundle;
import android.support.design.widget.CollapsingToolbarLayout;
import android.support.v7.app.AppCompatActivity;
import android.support.v7.widget.DividerItemDecoration;
import android.support.v7.widget.LinearLayoutManager;
import android.support.v7.widget.RecyclerView;
import android.support.v7.widget.Toolbar;
import android.view.View;
import android.widget.ImageView;

import java.util.ArrayList;
import java.util.List;

import butterknife.BindView;
import butterknife.ButterKnife;

/**
* Created by sunil on 12/8/16.
*/

public class CollapsingToolBarActivity extends AppCompatActivity {

@BindView(R.id.my_recycler_view)
RecyclerView mRecyclerView;
@BindView(R.id.header)
ImageView header;
@BindView(R.id.toolbar_flexible_space)
Toolbar toolbarFlexibleSpace;
@BindView(R.id.collapsing_toolbar)
CollapsingToolbarLayout collapsingToolbar;

String imageUrl[] = Constant.image;
String names[] = Constant.name;

@Override
protected void onCreate(Bundle savedInstanceState) {
super.onCreate(savedInstanceState);
setContentView(R.layout.activity_collapsing);
ButterKnife.bind(this);

initView();
}

private void initView() {

toolbarFlexibleSpace.setTitle("Collapse Tool Bar");
setSupportActionBar(toolbarFlexibleSpace);
getSupportActionBar().setDisplayHomeAsUpEnabled(true);
getSupportActionBar().setDisplayShowHomeEnabled(true);
toolbarFlexibleSpace.setNavigationOnClickListener(new View.OnClickListener() {
@Override
public void onClick(View view) {
CollapsingToolBarActivity.super.onBackPressed();
}
});


List list = getList();
RecyclerAdapter adapter = new RecyclerAdapter(this, list);
mRecyclerView.setLayoutManager(new LinearLayoutManager(this));
mRecyclerView.setAdapter(adapter);
mRecyclerView.addItemDecoration(new DividerItemDecoration(this,LinearLayoutManager.VERTICAL));
}

private List getList() {
List list = new ArrayList<>();
for (int i = 0; i < imageUrl.length; i++) {
ItemModel model = new ItemModel();
model.setName(names[i]);
model.setImagePath(imageUrl[i]);
list.add(model);
}
return list;
}
}

activity_collapsing.xml

<android.support.design.widget.CoordinatorLayout 
xmlns:android="http://schemas.android.com/apk/res/android"
xmlns:app="http://schemas.android.com/apk/res-auto"
android:layout_width="match_parent"
android:layout_height="match_parent">

<android.support.v7.widget.RecyclerView
android:id="@+id/my_recycler_view"
android:layout_width="wrap_content"
android:layout_height="wrap_content"
android:layout_below="@+id/appbar"
android:padding="10dp"
android:scrollbars="vertical"
app:layout_behavior="@string/appbar_scrolling_view_behavior" />

<android.support.design.widget.AppBarLayout
android:layout_width="match_parent"
android:fitsSystemWindows="true"
android:theme="@style/ThemeOverlay.AppCompat.Dark.ActionBar"
android:layout_height="325dp">

<android.support.design.widget.CollapsingToolbarLayout
android:id="@+id/collapsing_toolbar"
android:layout_width="match_parent"
android:layout_height="match_parent"
app:contentScrim="?colorPrimary"
app:expandedTitleMarginStart="48dp"
app:layout_scrollFlags="scroll|exitUntilCollapsed">
<ImageView
android:id="@+id/header"
android:layout_width="match_parent"
android:layout_height="match_parent"
android:background="@drawable/background"
android:fitsSystemWindows="true"
android:scaleType="centerCrop"
app:layout_collapseMode="parallax" />


<android.support.v7.widget.Toolbar
android:id="@+id/toolbar_flexible_space"
android:layout_width="match_parent"
android:layout_height="?attr/actionBarSize"
app:layout_collapseMode="pin">

</android.support.v7.widget.Toolbar>
</android.support.design.widget.CollapsingToolbarLayout>
</android.support.design.widget.AppBarLayout>
</android.support.design.widget.CoordinatorLayout>

QuickReturnToolBarActivity.java

import android.os.Bundle;
import android.support.design.widget.AppBarLayout;
import android.support.v7.app.AppCompatActivity;
import android.support.v7.widget.DividerItemDecoration;
import android.support.v7.widget.LinearLayoutManager;
import android.support.v7.widget.RecyclerView;
import android.support.v7.widget.Toolbar;
import android.view.View;

import java.util.ArrayList;
import java.util.List;

import butterknife.BindView;
import butterknife.ButterKnife;

/**
* Created by sunil on 12/8/16.
*/

public class QuickReturnToolBarActivity extends AppCompatActivity {

@BindView(R.id.toolbar)
Toolbar toolbar;
@BindView(R.id.appbar)
AppBarLayout appbar;
@BindView(R.id.my_recycler_view)
RecyclerView mRecyclerView;

String imageUrl[] = Constant.image;
String names[] = Constant.name;

@Override
protected void onCreate(Bundle savedInstanceState) {
super.onCreate(savedInstanceState);
setContentView(R.layout.activitt_quick_retrun);
ButterKnife.bind(this);

initView();
}

private void initView() {

toolbar.setTitle("Quick Return Tool Bar");
setSupportActionBar(toolbar);

getSupportActionBar().setDisplayHomeAsUpEnabled(true);
getSupportActionBar().setDisplayShowHomeEnabled(true);
toolbar.setNavigationOnClickListener(new View.OnClickListener() {
@Override
public void onClick(View view) {
QuickReturnToolBarActivity.super.onBackPressed();
}
});


List list = getList();
RecyclerAdapter adapter = new RecyclerAdapter(this, list);
mRecyclerView.setLayoutManager(new LinearLayoutManager(this));
mRecyclerView.setAdapter(adapter);
mRecyclerView.addItemDecoration(new DividerItemDecoration(this, LinearLayoutManager.VERTICAL));
}

private List getList() {
List list = new ArrayList<>();
for (int i = 0; i < imageUrl.length; i++) {
ItemModel model = new ItemModel();
model.setName(names[i]);
model.setImagePath(imageUrl[i]);
list.add(model);
}
return list;
}
}

activitt_quick_retrun.xml

<?xml version="1.0" encoding="utf-8"?>
<android.support.design.widget.CoordinatorLayout xmlns:android="http://schemas.android.com/apk/res/android"
xmlns:app="http://schemas.android.com/apk/res-auto"
android:layout_width="match_parent"
android:layout_height="match_parent">

<android.support.design.widget.AppBarLayout
android:id="@+id/appbar"
android:theme="@style/ThemeOverlay.AppCompat.Dark.ActionBar"
android:layout_width="match_parent"
android:layout_height="wrap_content">

<android.support.v7.widget.Toolbar
android:id="@+id/toolbar"
android:titleTextColor="#fff"
android:layout_width="match_parent"
android:layout_height="?attr/actionBarSize"
app:layout_scrollFlags="scroll|enterAlways" />
</android.support.design.widget.AppBarLayout>

<android.support.v7.widget.RecyclerView
android:id="@+id/my_recycler_view"
android:layout_width="match_parent"
android:layout_height="match_parent"
app:layout_behavior="@string/appbar_scrolling_view_behavior" />

</android.support.design.widget.CoordinatorLayout>


Thanks for reading this post. I hope this article will hell to understand.

Switch View type List to Grid RecyclerView in android

$
0
0

In this article I am focusing about to switch view type from list view type to grid view type in recyclerView. We have seen many product type app that feature available for users. Users can switch the view of listed product in formate of List items to in formate of grid view type and vice versa.

RecyclerView provides very easy way to switch any view type. If the sounds is not good and not understandable please check this video that help you to what I am talking about.
In this video I am showing by clicking by user on menu side to change the view type form list to grid or vice versa.


Lets create an android project to implements this kind of stuff. 

build.gradle app level

    compile 'com.android.support:recyclerview-v7:25.0.0'
compile 'com.android.support:cardview-v7:25.0.0'
compile 'com.android.support:design:25.0.0'
compile 'com.jakewharton:butterknife:8.4.0'
apt 'com.jakewharton:butterknife-compiler:8.4.0'
compile 'com.github.bumptech.glide:glide:3.7.0'
compile 'de.hdodenhof:circleimageview:2.0.0'

ItemModel.java

    public class ItemModel {

private String name;
private String imagePath;

public ItemModel(){

}

public ItemModel(String name, String imagePath) {
this.name = name;
this.imagePath = imagePath;
}

public String getName() {
return name;
}

public void setName(String name) {
this.name = name;
}

public String getImagePath() {
return imagePath;
}

public void setImagePath(String imagePath) {
this.imagePath = imagePath;
}
}

MainActivity.java

import android.os.Bundle;
import android.support.v7.app.AppCompatActivity;
import android.support.v7.widget.DividerItemDecoration;
import android.support.v7.widget.GridLayoutManager;
import android.support.v7.widget.LinearLayoutManager;
import android.support.v7.widget.RecyclerView;
import android.view.Menu;
import android.view.MenuInflater;
import android.view.MenuItem;

import java.util.ArrayList;
import java.util.List;

import butterknife.BindView;
import butterknife.ButterKnife;

public class MainActivity extends AppCompatActivity {


String imageUrl[] = Constant.image;
String names[] = Constant.name;

@BindView(R.id.my_recycler_view)
RecyclerView mRecyclerView;
private RecyclerAdapter mAdapter;

@Override
protected void onCreate(Bundle savedInstanceState) {
super.onCreate(savedInstanceState);
setContentView(R.layout.activity_main);
ButterKnife.bind(this);

initView();
}

private void initView() {

getSupportActionBar().setDisplayHomeAsUpEnabled(true);
getSupportActionBar().setDisplayShowHomeEnabled(true);

List list = getList();
mAdapter = new RecyclerAdapter(this, list);
mRecyclerView.setLayoutManager(new LinearLayoutManager(this));
mRecyclerView.setAdapter(mAdapter);
mRecyclerView.addItemDecoration(new DividerItemDecoration(this, LinearLayoutManager.VERTICAL));
}

private List getList() {
List list = new ArrayList<>();
for (int i = 0; i < imageUrl.length; i++) {
ItemModel model = new ItemModel();
model.setName(names[i]);
model.setImagePath(imageUrl[i]);
list.add(model);
}
return list;
}


@Override
public boolean onCreateOptionsMenu(Menu menu) {
MenuInflater inflater = getMenuInflater();
inflater.inflate(R.menu.switch_menu, menu);
return true;
}

@Override
public boolean onOptionsItemSelected(MenuItem item) {
int id = item.getItemId();
switch (id) {
case android.R.id.home:
finish();
break;
case R.id.switch_view:
supportInvalidateOptionsMenu();
boolean isSwitched = mAdapter.toggleItemViewType();
mRecyclerView.setLayoutManager(isSwitched ? new LinearLayoutManager(this) : new GridLayoutManager(this, 2));
mAdapter.notifyDataSetChanged();
break;
}

return super.onOptionsItemSelected(item);
}
}

activity_main.xml

<?xml version="1.0" encoding="utf-8"?>
<RelativeLayout xmlns:android="http://schemas.android.com/apk/res/android"
xmlns:tools="http://schemas.android.com/tools"
android:id="@+id/activity_main"
android:layout_width="match_parent"
android:layout_height="match_parent"
android:paddingBottom="@dimen/activity_vertical_margin"
android:paddingLeft="@dimen/activity_horizontal_margin"
android:paddingRight="@dimen/activity_horizontal_margin"
android:paddingTop="@dimen/activity_vertical_margin"
tools:context="com.sunil.switchlisttogridrecyclerview.MainActivity">


<android.support.v7.widget.RecyclerView
android:id="@+id/my_recycler_view"
android:layout_width="wrap_content"
android:layout_height="wrap_content"
android:scrollbars="vertical"/>

</RelativeLayout>

RecyclerAdapter.java

import android.content.Context;
import android.support.v7.widget.RecyclerView;
import android.view.LayoutInflater;
import android.view.View;
import android.view.ViewGroup;
import android.widget.ImageView;
import android.widget.TextView;

import com.bumptech.glide.Glide;

import java.util.List;

import butterknife.BindView;
import butterknife.ButterKnife;

/**
* Created by sunil on 12/10/16.
*/

public class RecyclerAdapter extends RecyclerView.Adapter {

private List itemModels;
private Context context;
private static final int LIST_ITEM = 0;
private static final int GRID_ITEM = 1;
boolean isSwitchView = true;

public RecyclerAdapter(Context context, List itemModels) {
this.itemModels = itemModels;
this.context = context;
}

@Override
public int getItemCount() {
return itemModels.size();
}


@Override
public RecyclerView.ViewHolder onCreateViewHolder(ViewGroup viewGroup, int i) {

View itemView;
if (i == LIST_ITEM){
itemView = LayoutInflater.from(viewGroup.getContext()).inflate( R.layout.item_layout, null);
}else{
itemView = LayoutInflater.from(viewGroup.getContext()).inflate(R.layout.item_view_grid, null);
}
return new ItemViewHolder(itemView);
}

@Override
public void onBindViewHolder(RecyclerView.ViewHolder holder, int position) {
ItemModel model = itemModels.get(position);
initializeViews(model, holder, position);
}

@Override
public int getItemViewType (int position) {
if (isSwitchView){
return LIST_ITEM;
}else{
return GRID_ITEM;
}
}

public boolean toggleItemViewType () {
isSwitchView = !isSwitchView;
return isSwitchView;
}


private void initializeViews(ItemModel model, final RecyclerView.ViewHolder holder, int position) {

String imageUrl = model.getImagePath();
if (imageUrl != null && !imageUrl.isEmpty()){
Glide.with(context)
.load(imageUrl)
.into(((ItemViewHolder)holder).imageView);

}
((ItemViewHolder)holder).name.setText(model.getName());
}

public static class ItemViewHolder extends RecyclerView.ViewHolder {

@BindView(R.id.name)
TextView name;
@BindView(R.id.imageView)
ImageView imageView;

public ItemViewHolder(View itemView) {
super(itemView);
ButterKnife.bind(this, itemView);
}
}
}

item_layout.xml

<?xml version="1.0" encoding="utf-8"?>
<RelativeLayout xmlns:android="http://schemas.android.com/apk/res/android"
android:orientation="vertical"
android:layout_width="match_parent"
android:layout_height="wrap_content"
android:padding="10dp">

<de.hdodenhof.circleimageview.CircleImageView
android:src="@mipmap/ic_launcher"
android:id="@+id/imageView"
android:layout_width="70dp"
android:layout_height="70dp" />

<TextView
android:id="@+id/name"
android:text="name"
android:textStyle="bold"
android:layout_alignBaseline="@id/imageView"
android:layout_margin="10dp"
android:gravity="center_vertical"
android:layout_width="match_parent"
android:layout_height="60dp"
android:layout_toRightOf="@+id/imageView"/>
</RelativeLayout>

item_layout_grid.xml

<?xml version="1.0" encoding="utf-8"?>
<RelativeLayout xmlns:android="http://schemas.android.com/apk/res/android"
android:orientation="vertical"
android:layout_width="match_parent"
android:layout_height="wrap_content"
android:padding="0dp">

<RelativeLayout
android:padding="10dp"
android:layout_centerHorizontal="true"
android:layout_width="match_parent"
android:layout_height="wrap_content"
android:gravity="center_horizontal">

<de.hdodenhof.circleimageview.CircleImageView
android:src="@mipmap/ic_launcher"
android:id="@+id/imageView"
android:layout_width="70dp"
android:layout_height="70dp" />

<TextView
android:id="@+id/name"
android:text="name"
android:textStyle="bold"
android:layout_margin="10dp"
android:layout_width="wrap_content"
android:layout_height="wrap_content"
android:layout_below="@+id/imageView"/>

</RelativeLayout>
</RelativeLayout>

Thanks for reading this post. I hope this article will help you.

Realm database replacing sqlite in android

$
0
0
In the last article we have learned about the database wrapper Green Dao that the best ORM for android application. If you have not read this article before, please check here Green Dao.

Android provides base component for storing data into database is SQLite. It is based on sql query based. So it will make our code lengthy and difficult to used in large app.  Green Dao is ORM based wrapper for Android database, but some how it also not completed to catch all minds.

Now Realm came into market for runtime database. The best thing realm is that can be used many platform like Android, iOS, Java etc. It is based on ORM realm Object basis. Its easy to use and easy to manage any of project.

In this article I am showing to add any object Item into database table and retrieve those objects and show on recyclerView by using realm. And if it is required to delete from realm then delete them.
Here is uploaded video that helps to understand the realm feature and what is am focusing in this article.


Thanks for watching this video. Lets create a sample android app to achieve this.


build.gradle project level


// Top-level build file where you can add configuration options common to all sub-projects/modules.

buildscript {
repositories {
jcenter()
}
dependencies {
classpath 'com.android.tools.build:gradle:2.2.2'
classpath 'com.neenbedankt.gradle.plugins:android-apt:1.8'
classpath "io.realm:realm-gradle-plugin:2.2.1"
// this is the realm plugin you need to add this dependency in project level as I added
// NOTE: Do not place your application dependencies here; they belong
// in the individual module build.gradle files
}
}

allprojects {
repositories {
jcenter()
}
}

task clean(type: Delete) {
delete rootProject.buildDir
}

build.gradle app level


apply plugin: 'realm-android'
// Add this plugin on top of your plugin listed.

MainApplication.java


import android.app.Application;

import io.realm.Realm;
import io.realm.RealmConfiguration;

/**
* Created by sunil on 12/14/16.
*/

public class MainApplication extends Application {

@Override
public void onCreate() {
super.onCreate();
// Initialize Realm. Should only be done once when the application starts.
Realm.init(this);
}
}

Note.java


public class Note extends RealmObject {

private long id;
private String tittle;
private String comment;
private String noteDate;

public long getId() {
return id;
}

public void setId(long id) {
this.id = id;
}

public String getTittle() {
return tittle;
}

public void setTittle(String tittle) {
this.tittle = tittle;
}

public String getComment() {
return comment;
}

public void setComment(String comment) {
this.comment = comment;
}

public String getNoteDate() {
return noteDate;
}

public void setNoteDate(String noteDate) {
this.noteDate = noteDate;
}
}

NoteManager.java


import java.util.ArrayList;
import java.util.List;

import io.realm.Realm;
import io.realm.RealmQuery;
import io.realm.RealmResults;

/**
* Created by sunil on 12/14/16.
*/

public class NoteManager {

public static void addNote(Realm realm, Note noteData){
realm.beginTransaction();
Note note = realm.createObject(Note.class);
note.setId(getCount(realm)+1);
note.setTittle(noteData.getTittle());
note.setComment(noteData.getComment());
note.setNoteDate(noteData.getNoteDate());
realm.commitTransaction();
}

public static List getAllNotes(Realm realm){
List noteList = new ArrayList<>();
RealmQuery query = realm.where(Note.class);
RealmResults results = query.findAll();
for (int index =0; index < results.size(); index++){
Note note = results.get(index);
noteList.add(note);
}
return noteList;

}

public static Note getNoteByID( Realm realm , long id){
Note note = realm.where(Note.class).equalTo("id", id).findFirst();
return note;
}

private static long getCount(Realm realm){
long count = realm.where(Note.class).count();
return count;
}

public static void updateNote(Realm realm, Note noteData){

Note note = realm.where(Note.class).equalTo("id", noteData.getId()).findFirst();
realm.beginTransaction();
note.setTittle(noteData.getTittle());
note.setComment(noteData.getComment());
note.setNoteDate(noteData.getNoteDate());
realm.commitTransaction();
}


public static void deleteNote(Realm realm, final Long id){
realm.executeTransaction(new Realm.Transaction() {
@Override
public void execute(Realm realm) {
RealmResults result = realm.where(Note.class).equalTo("id", id).findAll();
result.deleteAllFromRealm();
}
});
}
}

MainActivity.java


import android.content.Intent;
import android.os.Bundle;
import android.support.v7.app.AppCompatActivity;
import android.support.v7.widget.LinearLayoutManager;
import android.support.v7.widget.RecyclerView;
import android.view.View;
import android.widget.Button;
import android.widget.RelativeLayout;
import android.widget.TextView;

import java.util.ArrayList;
import java.util.List;

import butterknife.BindView;
import butterknife.ButterKnife;
import butterknife.OnClick;
import io.realm.Realm;

public class MainActivity extends AppCompatActivity implements NoteAdapter.OnInteractionDelete{

@BindView(R.id.no_data)
TextView noData;
@BindView(R.id.recyclerView)
RecyclerView recyclerView;
@BindView(R.id.button_create)
Button buttonCreate;
@BindView(R.id.activity_main)
RelativeLayout activityMain;

Realm realm;
NoteAdapter adapter;

private List list ;

@Override
protected void onCreate(Bundle savedInstanceState) {
super.onCreate(savedInstanceState);
setContentView(R.layout.activity_main);
ButterKnife.bind(this);

realm = Realm.getDefaultInstance();

recyclerView.setLayoutManager(new LinearLayoutManager(this));
}


@Override
protected void onResume() {
super.onResume();
list = new ArrayList<>();
list = NoteManager.getAllNotes(realm);
if (list == null && list.size() == 0) {
noData.setVisibility(View.VISIBLE);
recyclerView.setVisibility(View.GONE);
} else {
noData.setVisibility(View.GONE);
recyclerView.setVisibility(View.VISIBLE);
adapter = new NoteAdapter(this, list, this);
recyclerView.setAdapter(adapter);

}
}

@OnClick(R.id.button_create)
public void createNoteClick() {
Intent intent = new Intent(MainActivity.this, NoteDetailActivity.class);
intent.putExtra("Create", true);
startActivity(intent);
}

@Override
public void onDeleteClick(final int position) {
Note note = list.get(position);
Long id = note.getId();
NoteManager.deleteNote(realm, id);
list.remove(note);
adapter.notifyItemRemoved(position);
adapter.notifyItemRangeChanged(position, adapter.getItemCount());
}
}

activity_main.xml


<?xml version="1.0" encoding="utf-8"?>
<RelativeLayout xmlns:android="http://schemas.android.com/apk/res/android"
xmlns:tools="http://schemas.android.com/tools"
android:id="@+id/activity_main"
android:layout_width="match_parent"
android:layout_height="match_parent"
android:paddingBottom="@dimen/activity_vertical_margin"
android:paddingLeft="@dimen/activity_horizontal_margin"
android:paddingRight="@dimen/activity_horizontal_margin"
android:paddingTop="@dimen/activity_vertical_margin"
tools:context="com.sunil.realmandroidapp.MainActivity">

<TextView
android:id="@+id/no_data"
android:text="@string/no_note"
android:layout_centerInParent="true"
android:gravity="center"
android:visibility="gone"
android:layout_width="match_parent"
android:layout_height="wrap_content" />

<android.support.v7.widget.RecyclerView
android:id="@+id/recyclerView"
android:layout_width="match_parent"
android:layout_marginBottom="20dp"
android:layout_height="wrap_content">
</android.support.v7.widget.RecyclerView>

<Button
android:id="@+id/button_create"
android:layout_alignParentBottom="true"
android:background="@color/colorPrimary"
android:layout_width="match_parent"
android:text="@string/Create_Note"
android:textColor="#ffff"
android:layout_height="wrap_content" />
</RelativeLayout>

NoteDetailActivity.java


import android.os.Bundle;
import android.support.annotation.Nullable;
import android.support.design.widget.TextInputLayout;
import android.support.v7.app.AppCompatActivity;
import android.widget.Button;
import android.widget.EditText;

import java.util.Calendar;

import butterknife.BindView;
import butterknife.ButterKnife;
import butterknife.OnClick;
import io.realm.Realm;

/**
* Created by sunil on 12/14/16.
*/

public class NoteDetailActivity extends AppCompatActivity {

@BindView(R.id.title)
EditText title;
@BindView(R.id.titleLayout)
TextInputLayout titleLayout;
@BindView(R.id.description)
EditText description;
@BindView(R.id.descriptionLayout)
TextInputLayout descriptionLayout;
@BindView(R.id.age)
EditText dateEditText;
@BindView(R.id.dateLayout)
TextInputLayout dateLayout;
@BindView(R.id.save)
Button save;

Realm realm;

private boolean isCreate;
private Long noteId;
private Note mNote;

@Override
protected void onCreate(@Nullable Bundle savedInstanceState) {
super.onCreate(savedInstanceState);
setContentView(R.layout.activity_note_detail);
ButterKnife.bind(this);

realm = Realm.getDefaultInstance();

Bundle bundle = getIntent().getExtras();
if (bundle != null) {
isCreate = bundle.getBoolean("Create");
noteId = bundle.getLong("NoteID");
}
if (!isCreate) {
save.setText("Save");
mNote = NoteManager.getNoteByID(realm, noteId);
if (mNote != null) {
title.setText(mNote.getTittle());
description.setText(mNote.getComment());
dateEditText.setText(mNote.getNoteDate() + "");
}
} else {
save.setText("Add");
Calendar c = Calendar.getInstance();
System.out.println("Current time => " + c.getTime());
dateEditText.setText(c.getTime()+"");
}
}

@OnClick(R.id.save)
public void saveClick(){
if (isCreate){
// insert note
if (!valid()){
return;
}else{
Note note = new Note();
note.setTittle(title.getText().toString());
note.setComment(description.getText().toString());
note.setNoteDate(dateEditText.getText().toString());
NoteManager.addNote(realm, note);
finish();
}

}else{
// update note
if (!valid()){
return;
}else{
mNote.setTittle(title.getText().toString());
mNote.setComment(description.getText().toString());
mNote.setNoteDate(dateEditText.getText().toString());
NoteManager.updateNote(realm, mNote);
finish();
}
}
}

private boolean valid(){
boolean isValid;
if (Utility.nullCheck(titleLayout, "Title")){
isValid = false;
}
else if (Utility.nullCheck(descriptionLayout, "Comment")){
isValid = false;
}
else if (Utility.nullCheck(dateLayout, "Date")){
isValid = false;
}else{
isValid = true;
}
return isValid;
}
}

activity_note_detail.xml


<?xml version="1.0" encoding="utf-8"?>
<RelativeLayout xmlns:android="http://schemas.android.com/apk/res/android"
android:orientation="vertical" android:layout_width="match_parent"
android:layout_height="match_parent"
android:padding="8dp">

<android.support.design.widget.TextInputLayout
android:id="@+id/titleLayout"
android:layout_width="match_parent"
android:layout_height="wrap_content"
android:layout_centerHorizontal="true"
android:layout_marginTop="10dp">

<EditText
android:id="@+id/title"
android:layout_width="match_parent"
android:layout_height="wrap_content"
android:ems="10"
android:hint="Title"/>
</android.support.design.widget.TextInputLayout>

<android.support.design.widget.TextInputLayout
android:id="@+id/descriptionLayout"
android:layout_width="match_parent"
android:layout_height="wrap_content"
android:layout_below="@+id/titleLayout"
android:layout_centerHorizontal="true"
android:layout_marginTop="10dp">

<EditText
android:id="@+id/description"
android:layout_width="match_parent"
android:layout_height="wrap_content"
android:ems="10"
android:hint="Comment"/>
</android.support.design.widget.TextInputLayout>

<android.support.design.widget.TextInputLayout
android:id="@+id/dateLayout"
android:layout_width="match_parent"
android:layout_height="wrap_content"
android:layout_below="@+id/descriptionLayout"
android:layout_centerHorizontal="true"
android:layout_marginTop="10dp">

<EditText
android:id="@+id/age"
android:layout_width="match_parent"
android:layout_height="wrap_content"
android:ems="10"
android:hint="Date"/>
</android.support.design.widget.TextInputLayout>

<Button
android:id="@+id/save"
android:text="@string/add"
android:background="@color/colorPrimary"
android:textColor="#fff"
android:layout_alignParentBottom="true"
android:layout_width="match_parent"
android:layout_height="wrap_content" />

</RelativeLayout>

NoteAdapter.java


import android.app.Activity;
import android.content.Context;
import android.support.v7.widget.RecyclerView;
import android.view.LayoutInflater;
import android.view.View;
import android.view.ViewGroup;
import android.widget.ImageView;
import android.widget.TextView;

import java.util.List;

import butterknife.BindView;
import butterknife.ButterKnife;

/**
* Created by sunil on 12/14/16.
*/

public class NoteAdapter extends RecyclerView.Adapter {

private List noteList;
private Context context;
OnInteractionDelete mListener;

public NoteAdapter(Context context, List notes, Activity activity) {
this.noteList = notes;
this.context = context;
this.mListener = (OnInteractionDelete) activity;
}

@Override
public int getItemCount() {
return noteList.size();
}

@Override
public void onBindViewHolder(NoteViewHolder noteViewHolder, final int i) {
Note note = noteList.get(i);
noteViewHolder.title.setText(note.getTittle());
noteViewHolder.description.setText(note.getComment());
noteViewHolder.date.setText(note.getNoteDate()+"");
noteViewHolder.delete.setOnClickListener(new View.OnClickListener() {
@Override
public void onClick(View view) {
mListener.onDeleteClick(i);
}
});
}

@Override
public NoteViewHolder onCreateViewHolder(ViewGroup viewGroup, int i) {
View itemView = LayoutInflater.from(viewGroup.getContext()).inflate(R.layout.list_item_note, viewGroup, false);
return new NoteViewHolder(itemView);
}

public static class NoteViewHolder extends RecyclerView.ViewHolder {

@BindView(R.id.title)
TextView title;
@BindView(R.id.description)
TextView description;
@BindView(R.id.date)
TextView date;
@BindView(R.id.delete)
ImageView delete;


public NoteViewHolder(View itemView) {
super(itemView);
ButterKnife.bind(this, itemView);
}
}

public interface OnInteractionDelete{
void onDeleteClick(int position);
}
}

list_item_note.xml


<?xml version="1.0" encoding="utf-8"?>
<RelativeLayout xmlns:android="http://schemas.android.com/apk/res/android"
xmlns:app="http://schemas.android.com/apk/res-auto"
android:orientation="vertical"
android:layout_width="match_parent"
android:layout_height="wrap_content"
android:padding="8dp">

<android.support.v7.widget.CardView
android:id="@+id/cardView"
app:cardUseCompatPadding="true"
app:cardCornerRadius="0dp"
android:layout_width="match_parent"
android:layout_height="wrap_content">

<RelativeLayout
android:id="@+id/main_container"
android:layout_width="match_parent"
android:layout_height="wrap_content"
android:padding="5dp">

<TextView
android:id="@+id/title"
android:layout_width="match_parent"
android:layout_height="wrap_content"
android:textStyle="bold"
android:textSize="16sp"
android:layout_marginBottom="3dp"
android:text="@string/title"/>

<ImageView
android:id="@+id/delete"
android:src="@drawable/ic_delete_black_24dp"
android:layout_alignParentRight="true"
android:layout_width="wrap_content"
android:layout_height="wrap_content" />

<TextView
android:id="@+id/description"
android:layout_width="match_parent"
android:layout_height="wrap_content"
android:layout_below="@+id/delete"
android:textSize="13sp"
android:text="@string/comment"/>

<TextView
android:id="@+id/date"
android:layout_width="match_parent"
android:layout_height="wrap_content"
android:layout_below="@+id/delete"
android:textSize="13sp"
android:gravity="right"
android:text="@string/date"/>

</RelativeLayout>


</android.support.v7.widget.CardView>

</RelativeLayout>


Thanks for reading this article. I hope it will help you to understand.

Single and Multiple Item selection in RecyclerView Android

$
0
0

RecyclerView is major used in building any android app. So I have focused many featured of recyclerView in my last articles that we can implement. In this article I am focusing one common feature to used to single or multiple item selection in recyclerView.

There are many ways user can select items in recyclerView. I am giving some example that used almost times. Here are the details:

1. Single Selection Item (Radio Button).
2. Max limit items selection (Checkbox) .
3. Multiple Items selection.

Here is uploaded video with all three featured that what am talking with above three. Please check this video to understand before implement.


Thanks for watching this video. Lets create an android project to implements this feature.


build.gradle app level


compile 'com.android.support:recyclerview-v7:25.0.0'
compile 'com.android.support:cardview-v7:25.0.0'
compile 'com.android.support:design:25.0.0'
compile 'com.jakewharton:butterknife:8.4.0'
apt 'com.jakewharton:butterknife-compiler:8.4.0'

ItemModel.java


public class ItemModel {

private int id;
private String name;
private boolean isSelected;


public int getId() {
return id;
}

public void setId(int id) {
this.id = id;
}

public String getName() {
return name;
}

public void setName(String name) {
this.name = name;
}

public boolean isSelected() {
return isSelected;
}

public void setSelected(boolean selected) {
isSelected = selected;
}
}

MainActivity.java


public class MainActivity extends AppCompatActivity {

@Override
protected void onCreate(Bundle savedInstanceState) {
super.onCreate(savedInstanceState);
setContentView(R.layout.activity_main);
ButterKnife.bind(this);
}

@OnClick(R.id.single_selection)
public void singleSelectionClicked(){

Intent intent = new Intent(MainActivity.this, RecyclerViewActivity.class);
intent.putExtra("TAG", "single");
startActivity(intent);
}

@OnClick(R.id.max_selection)
public void maxSelectionClicked(){
Intent intent = new Intent(MainActivity.this, RecyclerViewActivity.class);
intent.putExtra("TAG", "max");
startActivity(intent);
}

@OnClick(R.id.multi_selection)
public void multiSelectionClicked(){
Intent intent = new Intent(MainActivity.this, RecyclerViewActivity.class);
intent.putExtra("TAG", "multiple");
startActivity(intent);
}
}

RecyclerViewActivity.java


import android.os.Bundle;
import android.support.v7.app.AppCompatActivity;
import android.support.v7.widget.LinearLayoutManager;
import android.support.v7.widget.RecyclerView;
import android.view.MenuItem;
import android.widget.Button;
import android.widget.Toast;

import com.sunil.multiselectionrecyclerview.adapters.MultiMaxSelectionAdapter;
import com.sunil.multiselectionrecyclerview.adapters.MultiSelectionAdapter;
import com.sunil.multiselectionrecyclerview.adapters.SingleSelectionAdapter;

import java.util.ArrayList;
import java.util.List;

import butterknife.BindView;
import butterknife.ButterKnife;
import butterknife.OnClick;

/**
* Created by sunil on 12/17/16.
*/

public class RecyclerViewActivity extends AppCompatActivity {

@BindView(R.id.recyclerView)
RecyclerView mRecyclerView;
@BindView(R.id.selected)
Button selected;

private String tag;
String names[] = Constant.name;

SingleSelectionAdapter adapterSingle;
MultiMaxSelectionAdapter adapterMultiMax;
MultiSelectionAdapter adapterMulti;

@Override
protected void onCreate(Bundle savedInstanceState) {
super.onCreate(savedInstanceState);
setContentView(R.layout.activity_recyclerview);
ButterKnife.bind(this);

initView();
}

private void initView() {

Bundle bundle = getIntent().getExtras();
if (bundle != null) {
tag = bundle.getString("TAG");
}

getSupportActionBar().setDisplayHomeAsUpEnabled(true);
getSupportActionBar().setDisplayShowHomeEnabled(true);

List list = getList();
mRecyclerView.setLayoutManager(new LinearLayoutManager(this));
if (tag.equalsIgnoreCase("Single")) {
adapterSingle = new SingleSelectionAdapter(this, list);
mRecyclerView.setAdapter(adapterSingle);
} else if (tag.equalsIgnoreCase("max")) {
adapterMultiMax = new MultiMaxSelectionAdapter(this, list);
mRecyclerView.setAdapter(adapterMultiMax);
} else if (tag.equalsIgnoreCase("multiple")) {
adapterMulti = new MultiSelectionAdapter(this, list);
mRecyclerView.setAdapter(adapterMulti);
}
}

private List getList() {
List list = new ArrayList<>();
for (int i = 0; i < names.length; i++) {
ItemModel model = new ItemModel();
model.setName(names[i]);
model.setId(i);
list.add(model);
}
return list;
}

@OnClick(R.id.selected)
public void selectedClick() {
if (tag.equalsIgnoreCase("Single")) {
if (adapterSingle.selectedPosition() != -1) {
ItemModel itemModel = adapterSingle.getSelectedItem();
String cityName = itemModel.getName();
showToast("Selected City is: " + cityName);
} else {
showToast("Please select any city");
}
}else if (tag.equalsIgnoreCase("max")){
List list = adapterMultiMax.getSelectedItem();
if (list.size() > 0){
StringBuilder sb = new StringBuilder();
for (int index = 0; index < list.size(); index++){
ItemModel model = list.get(index);
sb.append(model.getName()+"\n");
}
showToast(sb.toString());
}else{
showToast("Please select any city");
}
}
else if (tag.equalsIgnoreCase("multiple")){
List list = adapterMulti.getSelectedItem();
if (list.size() > 0){
StringBuilder sb = new StringBuilder();
for (int index = 0; index < list.size(); index++){
ItemModel model = list.get(index);
sb.append(model.getName()+"\n");
}
showToast(sb.toString());
}else{
showToast("Please select any city");
}
}
}

private void showToast(String message){
Toast.makeText(this, message, Toast.LENGTH_LONG).show();
}

@Override
public boolean onOptionsItemSelected(MenuItem item) {
switch (item.getItemId()) {
case android.R.id.home:
finish();
return true;
default:
return super.onOptionsItemSelected(item);
}
}
}

activity_recyclerview.xml


<?xml version="1.0" encoding="utf-8"?>
<RelativeLayout xmlns:android="http://schemas.android.com/apk/res/android"
android:layout_width="match_parent"
android:layout_height="match_parent">

<android.support.v7.widget.RecyclerView
android:id="@+id/recyclerView"
android:layout_marginBottom="50dp"
android:layout_width="match_parent"
android:layout_height="wrap_content">
</android.support.v7.widget.RecyclerView>

<Button
android:id="@+id/selected"
android:text="Selected Items"
android:textColor="#fff"
android:background="@color/colorPrimary"
android:layout_alignParentBottom="true"
android:layout_width="match_parent"
android:layout_height="wrap_content" />

</RelativeLayout>

SingleSelectionAdapter.java


import android.content.Context;
import android.support.v7.widget.RecyclerView;
import android.view.LayoutInflater;
import android.view.View;
import android.view.ViewGroup;
import android.widget.RadioButton;
import android.widget.TextView;

import com.sunil.multiselectionrecyclerview.ItemModel;
import com.sunil.multiselectionrecyclerview.R;

import java.util.List;

import butterknife.BindView;
import butterknife.ButterKnife;

/**
* Created by sunil on 12/17/16.
*/

public class SingleSelectionAdapter extends RecyclerView.Adapter {

private List itemModels;
private Context context;
private int lastCheckedPosition = -1;

public SingleSelectionAdapter(Context context, List itemModels) {
this.itemModels = itemModels;
this.context = context;
}

@Override
public int getItemCount() {
return itemModels.size();
}


@Override
public RecyclerView.ViewHolder onCreateViewHolder(ViewGroup viewGroup, int i) {
View itemView = LayoutInflater.from(viewGroup.getContext()).inflate(R.layout.list_item_single, viewGroup, false);
return new ItemViewHolder(itemView);
}

@Override
public void onBindViewHolder(RecyclerView.ViewHolder holder, int position) {
ItemModel model = itemModels.get(position);
initializeViews(model, holder, position);
}


private void initializeViews(final ItemModel model, final RecyclerView.ViewHolder holder, int position) {
((ItemViewHolder)holder).name.setText(model.getName());
if (model.getId() == lastCheckedPosition){
((ItemViewHolder)holder).radioButton.setChecked(true);
}else{
((ItemViewHolder)holder).radioButton.setChecked(false);
}
((ItemViewHolder)holder).radioButton.setOnClickListener(new View.OnClickListener() {
@Override
public void onClick(View v) {
lastCheckedPosition = model.getId();
notifyItemRangeChanged(0, itemModels.size());

}
});
}

public ItemModel getSelectedItem(){
ItemModel model = itemModels.get(lastCheckedPosition);
return model;
}
public int selectedPosition(){
return lastCheckedPosition;
}

public static class ItemViewHolder extends RecyclerView.ViewHolder {

@BindView(R.id.name)
TextView name;
@BindView(R.id.radio)
RadioButton radioButton;

public ItemViewHolder(View itemView) {
super(itemView);
ButterKnife.bind(this, itemView);

}
}
}

list_item_single.xml


<?xml version="1.0" encoding="utf-8"?>
<LinearLayout xmlns:android="http://schemas.android.com/apk/res/android"
xmlns:app="http://schemas.android.com/apk/res-auto"
android:orientation="vertical"
android:layout_width="match_parent"
android:layout_margin="5dp"
android:layout_height="wrap_content">

<android.support.v7.widget.CardView
android:id="@+id/cardView"
app:cardCornerRadius="0dp"
app:cardUseCompatPadding="true"
android:layout_width="match_parent"
android:layout_height="wrap_content">

<RelativeLayout
android:padding="15dp"
android:layout_width="match_parent"
android:layout_height="wrap_content">

<TextView
android:padding="5dp"
android:id="@+id/name"
android:text="Name"
android:textSize="16sp"
android:layout_width="match_parent"
android:layout_height="wrap_content" />

<RadioButton
android:padding="5dp"
android:id="@+id/radio"
android:layout_alignBaseline="@+id/name"
android:layout_alignParentRight="true"
android:layout_width="wrap_content"
android:layout_height="wrap_content" />

</RelativeLayout>

</android.support.v7.widget.CardView>

</LinearLayout>

MultiMaxSelectionAdapter.java


import android.content.Context;
import android.support.v7.widget.RecyclerView;
import android.view.LayoutInflater;
import android.view.View;
import android.view.ViewGroup;
import android.widget.CheckBox;
import android.widget.CompoundButton;
import android.widget.TextView;
import android.widget.Toast;

import com.sunil.multiselectionrecyclerview.ItemModel;
import com.sunil.multiselectionrecyclerview.R;

import java.util.ArrayList;
import java.util.List;

import butterknife.BindView;
import butterknife.ButterKnife;

/**
* Created by sunil on 12/17/16.
*/

public class MultiMaxSelectionAdapter extends RecyclerView.Adapter {

private List itemModels;
private Context context;
int numberOfCheckboxesChecked = 0;

public MultiMaxSelectionAdapter(Context context, List itemModels) {
this.itemModels = itemModels;
this.context = context;
}

@Override
public int getItemCount() {
return itemModels.size();
}


@Override
public RecyclerView.ViewHolder onCreateViewHolder(ViewGroup viewGroup, int i) {
View itemView = LayoutInflater.from(viewGroup.getContext()).inflate(R.layout.list_item_multi, viewGroup, false);
return new ItemViewHolder(itemView);
}

@Override
public void onBindViewHolder(RecyclerView.ViewHolder holder, int position) {
ItemModel model = itemModels.get(position);
initializeViews(model, holder, position);
}


private void initializeViews(final ItemModel model, final RecyclerView.ViewHolder holder, int position) {
((ItemViewHolder)holder).name.setText(model.getName());
((ItemViewHolder)holder).checkBox.setChecked(model.isSelected());
((ItemViewHolder)holder).checkBox.setTag(new Integer(position));
((ItemViewHolder)holder).checkBox.setOnClickListener(new View.OnClickListener() {
@Override
public void onClick(View view) {
CheckBox cb = (CheckBox)view;
int clickedPos = ((Integer)cb.getTag()).intValue();
if (cb.isChecked() && numberOfCheckboxesChecked >= 3){
cb.setChecked(false);
Toast.makeText(context, "Max allowed three checkbox only", Toast.LENGTH_LONG).show();
}else {
if (cb.isChecked()) {
numberOfCheckboxesChecked++;
} else {
numberOfCheckboxesChecked--;
}
itemModels.get(clickedPos).setSelected(cb.isChecked());
notifyDataSetChanged();
}
}
});
}

public List getSelectedItem(){
List itemModelList = new ArrayList<>();
for (int i =0; i < itemModels.size(); i++){
ItemModel itemModel = itemModels.get(i);
if (itemModel.isSelected()){
itemModelList.add(itemModel);
}
}
return itemModelList;
}

public static class ItemViewHolder extends RecyclerView.ViewHolder {

@BindView(R.id.name)
TextView name;
@BindView(R.id.checkbox)
CheckBox checkBox;

public ItemViewHolder(View itemView) {
super(itemView);
ButterKnife.bind(this, itemView);

}
}
}

list_item_multi.gradle


<?xml version="1.0" encoding="utf-8"?>
<LinearLayout xmlns:android="http://schemas.android.com/apk/res/android"
xmlns:app="http://schemas.android.com/apk/res-auto"
android:orientation="vertical"
android:layout_width="match_parent"
android:layout_margin="5dp"
android:layout_height="wrap_content">

<android.support.v7.widget.CardView
android:id="@+id/cardView"
app:cardCornerRadius="0dp"
app:cardUseCompatPadding="true"
android:layout_width="match_parent"
android:layout_height="wrap_content">

<RelativeLayout
android:padding="15dp"
android:layout_width="match_parent"
android:layout_height="wrap_content">

<TextView
android:padding="5dp"
android:id="@+id/name"
android:text="Name"
android:textSize="16sp"
android:layout_width="match_parent"
android:layout_height="wrap_content" />

<CheckBox
android:padding="5dp"
android:id="@+id/checkbox"
android:layout_alignBaseline="@+id/name"
android:layout_alignParentRight="true"
android:layout_width="wrap_content"
android:layout_height="wrap_content" />

</RelativeLayout>

</android.support.v7.widget.CardView>

</LinearLayout>

MultiSelectionAdapter.java


public class MultiSelectionAdapter extends RecyclerView.Adapter {

private List itemModels;
private Context context;

public MultiSelectionAdapter(Context context, List itemModels) {
this.itemModels = itemModels;
this.context = context;
}

@Override
public int getItemCount() {
return itemModels.size();
}


@Override
public RecyclerView.ViewHolder onCreateViewHolder(ViewGroup viewGroup, int i) {
View itemView = LayoutInflater.from(viewGroup.getContext()).inflate(R.layout.list_item_multi, viewGroup, false);
return new ItemViewHolder(itemView);
}

@Override
public void onBindViewHolder(RecyclerView.ViewHolder holder, int position) {
ItemModel model = itemModels.get(position);
initializeViews(model, holder, position);
}


private void initializeViews(final ItemModel model, final RecyclerView.ViewHolder holder, int position) {
((ItemViewHolder)holder).name.setText(model.getName());
((ItemViewHolder)holder).checkBox.setChecked(model.isSelected());
((ItemViewHolder)holder).checkBox.setTag(new Integer(position));
((ItemViewHolder)holder).checkBox.setOnClickListener(new View.OnClickListener() {
@Override
public void onClick(View view) {
CheckBox cb = (CheckBox)view;
int clickedPos = ((Integer)cb.getTag()).intValue();
itemModels.get(clickedPos).setSelected(cb.isChecked());
notifyDataSetChanged();
}
});
}

public List getSelectedItem(){
List itemModelList = new ArrayList<>();
for (int i =0; i < itemModels.size(); i++){
ItemModel itemModel = itemModels.get(i);
if (itemModel.isSelected()){
itemModelList.add(itemModel);
}
}
return itemModelList;
}

public static class ItemViewHolder extends RecyclerView.ViewHolder {

@BindView(R.id.name)
TextView name;
@BindView(R.id.checkbox)
CheckBox checkBox;

public ItemViewHolder(View itemView) {
super(itemView);
ButterKnife.bind(this, itemView);

}
}
}


Thanks for reading this post. I hope it will helps you.

NavigationView Drawer Expandable menu Item in ANdroid

$
0
0

NavigationView Drawer is very common used today building any app. It provides to show Menu with navigation feature. NavigationView introduces in design support library to gives better navigation for users.  IN many of app you have seen with custom view on top of header view that contain the user information and below on header with menu items listed. Users can select any item to navigate view accordingly.

In this article I am focusing something different for navigation view without menu item. Most of the app that can see they used expandable menu with submenu. User can expand menu items and click on submenu items to navigate view. If you want to show app version information in footer, then you can add with footer in NavigationView.

Here is uploaded video that helps to understand what I am talking. Please this video.


Lets create an android project to implements this feature.

build.gradle app level


compile 'com.android.support:recyclerview-v7:25.0.0'
compile 'com.android.support:cardview-v7:25.0.0'
compile 'com.android.support:design:25.0.0'
compile 'com.jakewharton:butterknife:8.4.0'
apt 'com.jakewharton:butterknife-compiler:8.4.0'
compile 'com.thoughtbot:expandablerecyclerview:1.0'
compile 'com.github.bumptech.glide:glide:3.7.0'
compile 'de.hdodenhof:circleimageview:2.0.0'

MainActivity.java


import android.app.FragmentTransaction;
import android.os.Bundle;
import android.support.design.widget.NavigationView;
import android.support.v4.view.GravityCompat;
import android.support.v4.widget.DrawerLayout;
import android.support.v7.app.ActionBar;
import android.support.v7.app.AppCompatActivity;
import android.support.v7.widget.DividerItemDecoration;
import android.support.v7.widget.LinearLayoutManager;
import android.support.v7.widget.RecyclerView;
import android.support.v7.widget.Toolbar;
import android.view.MenuItem;
import android.widget.FrameLayout;

import java.util.ArrayList;
import java.util.List;

import butterknife.BindView;
import butterknife.ButterKnife;

public class MainActivity extends AppCompatActivity implements RecyclerAdapter.ItemClickChild{

@BindView(R.id.recyclerView)
RecyclerView recyclerView;
@BindView(R.id.nav_view)
NavigationView navView;
@BindView(R.id.drawer_layout)
DrawerLayout drawerLayout;

String names[] = Constant.name;
String subNames[] = Constant.subName;

@BindView(R.id.toolbar)
Toolbar toolbar;

@BindView(R.id.frame)
FrameLayout frame;

TitleFragment fragment;


@Override
protected void onCreate(Bundle savedInstanceState) {
super.onCreate(savedInstanceState);
setContentView(R.layout.activity_main);
ButterKnife.bind(this);

setSupportActionBar(toolbar);
final ActionBar actionar = getSupportActionBar();
actionar.setDisplayHomeAsUpEnabled(true);
actionar.setHomeAsUpIndicator(R.drawable.ic_menu);

List list = getList();
RecyclerAdapter adapter = new RecyclerAdapter(this, list, this);
recyclerView.setLayoutManager(new LinearLayoutManager(this));
recyclerView.setAdapter(adapter);
recyclerView.addItemDecoration(new DividerItemDecoration(this, LinearLayoutManager.VERTICAL));
recyclerView.setAdapter(adapter);

setFragment();
}

private void setFragment() {
fragment = new TitleFragment();
FragmentTransaction fragmentTransaction = getFragmentManager().beginTransaction();
fragmentTransaction.replace(R.id.frame, fragment, "TitleFragment").commit();
}

private List getList() {
List list = new ArrayList<>();
for (int i = 0; i < names.length; i++) {
List subTitles = new ArrayList<>();
for (int j = 0; j < subNames.length; j++) {
SubTitle subTitle = new SubTitle(subNames[j]);
subTitles.add(subTitle);
}
TitleMenu model = new TitleMenu(names[i], subTitles, null);
list.add(model);
}
return list;
}

@Override
public boolean onOptionsItemSelected(MenuItem item) {
int id = item.getItemId();
if (id == android.R.id.home) {
drawerLayout.openDrawer(GravityCompat.START);
return true;
}

return super.onOptionsItemSelected(item);
}

@Override
public void onChildClick(int position) {
String name = subNames[position];
drawerLayout.closeDrawers();
fragment.setTitle(name);
}
}

activity_main.xml


<android.support.v4.widget.DrawerLayout xmlns:android="http://schemas.android.com/apk/res/android"
xmlns:app="http://schemas.android.com/apk/res-auto"
android:id="@+id/drawer_layout"
android:layout_height="match_parent"
android:layout_width="match_parent"
android:fitsSystemWindows="true">

<include layout="@layout/layout_toolabr"
android:id="@+id/toolbar_container"/>

<FrameLayout
android:id="@+id/frame"
android:layout_width="match_parent"
android:layout_height="match_parent">
</FrameLayout>

<android.support.design.widget.NavigationView
android:id="@+id/nav_view"
android:layout_height="match_parent"
android:layout_width="wrap_content"
android:layout_gravity="start"
android:fitsSystemWindows="true">

<RelativeLayout
android:layout_width="match_parent"
android:layout_height="wrap_content">

<include layout="@layout/nav_header"
android:id="@+id/header"/>

<android.support.v7.widget.RecyclerView
android:layout_below="@+id/header"
android:id="@+id/recyclerView"
android:layout_marginBottom="25dp"
android:layout_width="match_parent"
android:layout_height="wrap_content">
</android.support.v7.widget.RecyclerView>

</RelativeLayout>

<TextView
android:padding="5dp"
android:id="@+id/footer"
android:layout_width="match_parent"
android:layout_height="wrap_content"
android:text="copyright @ sunil gupta"
android:gravity="center"
android:textColor="@color/red_icon_color"
android:layout_gravity="bottom"/>

</android.support.design.widget.NavigationView>
</android.support.v4.widget.DrawerLayout>

RecyclerAdapter.java


import android.app.Activity;
import android.content.Context;
import android.view.LayoutInflater;
import android.view.View;
import android.view.ViewGroup;

import com.thoughtbot.expandablerecyclerview.ExpandableRecyclerViewAdapter;
import com.thoughtbot.expandablerecyclerview.models.ExpandableGroup;

import java.util.List;

/**
* Created by sunil on 12/23/16.
*/

public class RecyclerAdapter extends ExpandableRecyclerViewAdapter {

private Context context;
private ItemClickChild mListener;
public RecyclerAdapter(Context context, List groups, Activity activity) {
super(groups);
this.context = context;
mListener = (ItemClickChild) activity;
}

@Override
public TitleViewHolder onCreateGroupViewHolder(ViewGroup parent, int viewType) {
View view = LayoutInflater.from(parent.getContext())
.inflate(R.layout.list_item_title, parent, false);
return new TitleViewHolder(view);
}

@Override
public SubTitleViewHolder onCreateChildViewHolder(ViewGroup parent, int viewType) {
View view = LayoutInflater.from(parent.getContext())
.inflate(R.layout.item_subtitle, parent, false);
return new SubTitleViewHolder(view);
}

@Override
public void onBindChildViewHolder(SubTitleViewHolder holder, int flatPosition,
ExpandableGroup group, final int childIndex) {

final SubTitle subTitle = ((TitleMenu) group).getItems().get(childIndex);
holder.setSubTitletName(subTitle.getName());
holder.itemView.setOnClickListener(new View.OnClickListener() {
@Override
public void onClick(View view) {
mListener.onChildClick(childIndex);
}
});
}

@Override
public void onBindGroupViewHolder(TitleViewHolder holder, int flatPosition, ExpandableGroup group) {
holder.setGenreTitle(context, group);
}

public interface ItemClickChild{
void onChildClick(int position);
}
}

TitleFragment.java


import android.app.Fragment;
import android.os.Bundle;
import android.support.annotation.Nullable;
import android.support.v4.graphics.ColorUtils;
import android.view.LayoutInflater;
import android.view.View;
import android.view.ViewGroup;
import android.widget.LinearLayout;
import android.widget.TextView;

import butterknife.BindView;
import butterknife.ButterKnife;

/**
* Created by sunil on 12/24/16.
*/

public class TitleFragment extends Fragment {

View rootView;

@BindView(R.id.title_name)
TextView titleName;

@BindView(R.id.main_content)
LinearLayout mainContent;

@Nullable
@Override
public View onCreateView(LayoutInflater inflater, ViewGroup container, Bundle savedInstanceState) {
rootView = inflater.inflate(R.layout.fragment_title, container, false);
ButterKnife.bind(this, rootView);
return rootView;
}

public void setTitle(String title) {
titleName.setText(title);
if (title.equalsIgnoreCase("google")){
mainContent.setBackgroundColor(getResources().getColor(R.color.red_icon_color));
} else if (title.equalsIgnoreCase("Motorola")){
mainContent.setBackgroundColor(getResources().getColor(R.color.green_icon_color));
} else if (title.equalsIgnoreCase("Samsung")){
mainContent.setBackgroundColor(getResources().getColor(R.color.yellow_icon_color));
} else if (title.equalsIgnoreCase("Lenevo")){
mainContent.setBackgroundColor(getResources().getColor(R.color.blue_icon_color));
}

}
}

fragment_title.xml


<?xml version="1.0" encoding="utf-8"?>
<Linearlayout xmlns:android="http://schemas.android.com/apk/res/android"
android:orientation="vertical" android:layout_width="match_parent"
android:layout_height="match_parent"
android:id="@+id/main_content"
android:gravity="center">

<TextView
android:gravity="center"
android:text="Title"
android:textStyle="bold"
android:id="@+id/title_name"
android:layout_width="match_parent"
android:layout_height="wrap_content" />

</LinearLayout>

Thanks for reading this post. I hope it will help you.

Retrofit 2.1 with RxAndroid

$
0
0
Retrofit is very known library to handle the network operation in Android. It is very powerful library to work with network related API call. It used OkHttp request in networking operation.

Earlier we used Async Task was having some drawback that retrofit has covered all. Here are the some drawback points in async Task.

1. Handling multiple request.
2. Cacheing data
3. Error handling

These all taking cared in Retrofit. But if talk about RxAndroid (Reactive Android) which works on based on Observable and Subscription. It makes our life very easy and make Retrofit very powerful if we used together. Rx Team and Retrofit team are doing a great job together.  Rx Java is ocean to work with Java that will not enough one day to understand. But day by day It attracting the Android developers that works very pathetic way with Android. Thats why It will be going used many and more places in the upcoming feature.

Thanks to both team to makes our life easy and networking operation makes more easy and stable to used this to make awesome apps.

Here is uploaded video that gives to understand to retrofit api call in android. Please check once to view before source code.

Lets create an android project to implement this.

build.gradle app level


compile 'com.squareup.retrofit2:adapter-rxjava:2.1.0'
compile 'com.squareup.retrofit2:converter-gson:2.1.0'
compile 'com.squareup.retrofit2:retrofit:2.1.0'
compile 'io.reactivex:rxandroid:1.2.0'
compile 'io.reactivex:rxjava:1.1.8'
compile "com.jakewharton:butterknife:8.1.0"
apt 'com.jakewharton:butterknife-compiler:8.0.1'
compile 'org.greenrobot:eventbus:3.0.0'
compile "com.android.support:recyclerview-v7:24.2.0"
compile "com.android.support:cardview-v7:24.2.0"

APIService.java


import com.google.gson.Gson;
import com.google.gson.GsonBuilder;
import com.sunil.rxjavaretrofitandroid.Friends;

import java.security.cert.CertificateException;
import java.util.concurrent.TimeUnit;

import javax.net.ssl.HostnameVerifier;
import javax.net.ssl.SSLContext;
import javax.net.ssl.SSLSession;
import javax.net.ssl.SSLSocketFactory;
import javax.net.ssl.TrustManager;
import javax.net.ssl.X509TrustManager;

import okhttp3.OkHttpClient;
import retrofit2.Retrofit;
import retrofit2.adapter.rxjava.RxJavaCallAdapterFactory;
import retrofit2.converter.gson.GsonConverterFactory;
import retrofit2.http.GET;
import rx.Observable;

/**
* Created by sunil on 12/25/16.
*/

public interface APIService {

static final String BASE_URL = "https://demo4532688.mockable.io/";

@GET("getmyfriends")
Observable getMyFriends();

class Creator {

private static OkHttpClient okHttpClient1 = getUnsafeOkHttpClient();

public static APIService newApiClient() {

Gson gson = new GsonBuilder()
.setDateFormat("yyyy-MM-dd'T'HH:mm:ss.SSS'Z'")
.create();
Retrofit retrofit = new Retrofit.Builder()
.baseUrl(BASE_URL)
.client(okHttpClient1)
.addConverterFactory(GsonConverterFactory.create(gson))
.addCallAdapterFactory(RxJavaCallAdapterFactory.create())
.build();
return retrofit.create(APIService.class);
}

private static OkHttpClient getUnsafeOkHttpClient() {
try {
// Create a trust manager that does not validate certificate chains
final TrustManager[] trustAllCerts = new TrustManager[]{
new X509TrustManager() {
@Override
public void checkClientTrusted(java.security.cert.X509Certificate[] chain, String authType) throws CertificateException {
}

@Override
public void checkServerTrusted(java.security.cert.X509Certificate[] chain, String authType) throws CertificateException {
}

@Override
public java.security.cert.X509Certificate[] getAcceptedIssuers() {
return new java.security.cert.X509Certificate[]{};
}
}
};

// Install the all-trusting trust manager
final SSLContext sslContext = SSLContext.getInstance("SSL");
sslContext.init(null, trustAllCerts, new java.security.SecureRandom());
// Create an ssl socket factory with our all-trusting manager
final SSLSocketFactory sslSocketFactory = sslContext.getSocketFactory();
OkHttpClient.Builder builder = new OkHttpClient.Builder();
// builder.addInterceptor(logging);

builder.sslSocketFactory(sslSocketFactory);
builder.hostnameVerifier(new HostnameVerifier() {
@Override
public boolean verify(String hostname, SSLSession session) {
return true;
}
});

OkHttpClient okHttpClient = builder.
connectTimeout(60, TimeUnit.SECONDS)
.readTimeout(60, TimeUnit.SECONDS)
.writeTimeout(60, TimeUnit.SECONDS)
.addInterceptor(new MyOkHttpInterceptor()).build();
return okHttpClient;
} catch (Exception e) {
throw new RuntimeException(e);
}
}
}
}

MyOkHttpInterceptor.java


import android.util.Log;
import java.io.IOException;
import okhttp3.Interceptor;
import okhttp3.Request;
import okhttp3.RequestBody;
import okhttp3.Response;
import okio.Buffer;

/**
* Created by sunil on 12/25/16.
*/

public class MyOkHttpInterceptor implements Interceptor {
private final String TAG = MyOkHttpInterceptor.class.getSimpleName();
@Override
public Response intercept(Chain chain) throws IOException {
Request request = chain.request();

String body = "NA";
if(chain.request().body()!=null){
body = bodyToString(chain.request().body());
}

String myString = request.url() + " ->" + request.headers().toString()+"\n Params --->"+body+"\n";

Log.d(TAG, myString);
return chain.proceed(request);
}

private String bodyToString(final RequestBody request){
try {
final RequestBody copy = request;
final Buffer buffer = new Buffer();
copy.writeTo(buffer);
return buffer.readUtf8();
}
catch (final IOException e) {
return "did not work";
}
}

}

APIManager.java


import android.content.Context;
import com.sunil.rxjavaretrofitandroid.Friends;
import com.sunil.rxjavaretrofitandroid.event.FriendsEvent;
import org.greenrobot.eventbus.EventBus;
import java.io.IOException;
import retrofit2.adapter.rxjava.HttpException;
import rx.Observable;
import rx.Observer;
import rx.android.schedulers.AndroidSchedulers;
import rx.schedulers.Schedulers;

/**
* Created by kuliza-195 on 12/25/16.
*/

public class APIManager {

private APIService mAPIService;

public APIManager(Context context) {
mAPIService = getAPIServiceEndPoint();

}

public APIService getAPIServiceEndPoint() {
if (mAPIService == null) {
mAPIService = APIService.Creator.newApiClient();
}
return mAPIService;
}


public void getFriends() {

Observable friendResponseObservable = mAPIService.getMyFriends()
.subscribeOn(Schedulers.newThread())
.observeOn(AndroidSchedulers.mainThread());

friendResponseObservable.subscribe(new Observer() {
@Override
public void onCompleted() {

}

@Override
public void onError(Throwable e) {
//handle error
if (e instanceof HttpException) {
// We had non-2XX http error
}
if (e instanceof IOException) {
// A network or conversion error happened
}

// We don't know what happened. We need to simply convert to an unknown error
}

@Override
public void onNext(Friends response) {
//handle response
EventBus.getDefault().post(new FriendsEvent(response));
}
});


}

}

MainActivity.java


import android.os.Bundle;
import android.support.v7.app.AppCompatActivity;
import android.support.v7.widget.LinearLayoutManager;
import android.support.v7.widget.RecyclerView;
import android.view.MenuItem;
import android.view.View;
import android.widget.ProgressBar;
import android.widget.Toast;

import com.sunil.rxjavaretrofitandroid.adapter.FriendsAdapter;
import com.sunil.rxjavaretrofitandroid.api.APIManager;
import com.sunil.rxjavaretrofitandroid.event.FriendsEvent;

import org.greenrobot.eventbus.EventBus;
import org.greenrobot.eventbus.Subscribe;

import butterknife.BindView;
import butterknife.ButterKnife;
import rx.Subscription;

public class MainActivity extends AppCompatActivity {

@BindView(R.id.recyclerView1)
RecyclerView mRecyclerView;
@BindView(R.id.progressbar)
ProgressBar progressbar;

private APIManager mAPIManager;
private Subscription mSubscription;

@Override
protected void onCreate(Bundle savedInstanceState) {
super.onCreate(savedInstanceState);
setContentView(R.layout.activity_main);
ButterKnife.bind(this);

setActionBarWithBackButton();

progressbar.setVisibility(View.GONE);
mRecyclerView.setLayoutManager(new LinearLayoutManager(this));
mAPIManager = new APIManager(this);

loadFriends();
}

protected void setActionBarWithBackButton() {
getSupportActionBar().setDisplayHomeAsUpEnabled(true);
getSupportActionBar().setHomeAsUpIndicator(getResources().getDrawable(R.drawable.navigate_back));
}

@Override
protected void onStart() {
super.onStart();
if (!EventBus.getDefault().isRegistered(this)) {
EventBus.getDefault().register(this);
}

}

@Override
protected void onStop() {
super.onStop();
if (mSubscription != null)
mSubscription.unsubscribe();
EventBus.getDefault().unregister(this);
}

public void loadFriends() {
// use loader
progressbar.setVisibility(View.VISIBLE);
mAPIManager.getFriends();
}

@Subscribe
public void OnEvent(FriendsEvent response) {
// cancel loader
progressbar.setVisibility(View.GONE);
if (response.getFriends() != null) {
if (response.getFriends().getUser().size() < 1) {
Toast.makeText(this, "No Data available", Toast.LENGTH_LONG).show();
} else {
showFriends(response.getFriends());
}
}
}

public void showFriends(Friends friends) {
FriendsAdapter adapter = new FriendsAdapter(friends.getUser());
mRecyclerView.setAdapter(adapter);
}

@Override
public boolean onOptionsItemSelected(MenuItem item) {
switch (item.getItemId()) {
case android.R.id.home:
finish();
break;
}
return true;
}
}


activity_main.xml


<?xml version="1.0" encoding="utf-8"?>
<RelativeLayout xmlns:android="http://schemas.android.com/apk/res/android"
xmlns:tools="http://schemas.android.com/tools"
android:id="@+id/activity_main"
android:layout_width="match_parent"
android:layout_height="match_parent"
android:paddingBottom="@dimen/activity_vertical_margin"
android:paddingLeft="@dimen/activity_horizontal_margin"
android:paddingRight="@dimen/activity_horizontal_margin"
android:paddingTop="@dimen/activity_vertical_margin"
tools:context="com.sunil.rxjavaretrofitandroid.MainActivity">


<android.support.v7.widget.RecyclerView
android:id="@+id/recyclerView1"
android:layout_width="match_parent"
android:layout_height="wrap_content">
</android.support.v7.widget.RecyclerView>

<ProgressBar
android:id="@+id/progressbar"
android:layout_centerInParent="true"
android:layout_width="wrap_content"
android:layout_height="wrap_content" />

</RelativeLayout>

FriendsAdapter.java


public class FriendsAdapter extends RecyclerView.Adapter{

private List mListFriends;

public FriendsAdapter(List friendsList){
mListFriends = friendsList;
}

@Override
public FriendsViewHolder onCreateViewHolder(ViewGroup parent, int viewType) {
View itemView = LayoutInflater.from(parent.getContext())
.inflate(R.layout.item_friends, parent, false);
return new FriendsViewHolder(itemView);
}

@Override
public void onBindViewHolder(FriendsViewHolder holder, int position) {
Friends.User friends = mListFriends.get(position);
holder.nameTextView.setText(friends.getName());
holder.emailTextView.setText(friends.getEmail());
}

@Override
public int getItemCount() {
return mListFriends.size();
}

class FriendsViewHolder extends RecyclerView.ViewHolder {

@BindView(R.id.name)
TextView nameTextView;
@BindView(R.id.email)
TextView emailTextView;

public FriendsViewHolder(View itemView) {
super(itemView);
ButterKnife.bind(this, itemView);
}
}
}

Thanks for reading this post. I hope it will help you. Please give your valuable comment below.

Show current Location on Google Map in android

$
0
0
Google Map is very strong and powerful to show map in world wide. It is majorly used in the app for showing anything near by you.  In this article I am focusing about the to show the current location of the user on Google Map. And if the user want to share his/her current location then they can share with any fiends with any installed app.

So Lets focus on how to integrate the google map in android studio project. First of all you need to go to Google Console to get the API key.  API key for debug purpose you can get the debug key but at the time of app launch you need to get the release key with any SHA1 finger print. Then need to enable the Google map v2 for android feature. Add your API key in AndroidManifest File.

For the current location We can used the Fused location by Google API client. It is very fast and give accurate result. Here is uploaded video that helps to before used source code. Please check it once.


Lets create android project to show the current location on Google Map.

build.gradle app level


compile 'com.google.android.gms:play-services-maps:9.8.0'
compile 'com.google.android.gms:play-services-location:9.8.0'
compile "com.jakewharton:butterknife:8.1.0"
apt 'com.jakewharton:butterknife-compiler:8.0.1'


GoogleMapLocationActivity.java


mport android.Manifest;
import android.annotation.TargetApi;
import android.app.Activity;
import android.app.AlertDialog;
import android.content.DialogInterface;
import android.content.Intent;
import android.content.pm.PackageManager;
import android.graphics.Color;
import android.location.Location;
import android.os.Build;
import android.os.Bundle;
import android.support.annotation.NonNull;
import android.support.annotation.Nullable;
import android.support.v4.app.ActivityCompat;
import android.support.v4.content.ContextCompat;
import android.support.v7.app.ActionBar;
import android.support.v7.app.AppCompatActivity;
import android.util.Log;
import android.view.Menu;
import android.view.MenuItem;
import android.widget.Toast;


import com.google.android.gms.common.ConnectionResult;
import com.google.android.gms.common.api.GoogleApiClient;
import com.google.android.gms.common.api.GoogleApiClient.ConnectionCallbacks;
import com.google.android.gms.location.LocationListener;
import com.google.android.gms.location.LocationRequest;
import com.google.android.gms.location.LocationServices;
import com.google.android.gms.maps.CameraUpdateFactory;
import com.google.android.gms.maps.GoogleMap;
import com.google.android.gms.maps.MapFragment;
import com.google.android.gms.maps.OnMapReadyCallback;
import com.google.android.gms.maps.model.BitmapDescriptorFactory;
import com.google.android.gms.maps.model.LatLng;
import com.google.android.gms.maps.model.Marker;
import com.google.android.gms.maps.model.MarkerOptions;
import com.google.android.gms.maps.model.PolylineOptions;

import butterknife.BindView;
import butterknife.ButterKnife;

/**
* Created by sunil on 12/31/16.
*/

public class GoogleMapLocationActivity extends AppCompatActivity implements
OnMapReadyCallback, GoogleApiClient.ConnectionCallbacks,GoogleApiClient.OnConnectionFailedListener, LocationListener {

MapFragment mapFragment;

private GoogleApiClient mGoogleApiClient;
private GoogleMap mGoogleMap;
private boolean mRequestingLocationUpdates = false;
private LatLng mLatLng;
private PolylineOptions mPolylineOptions;
private Marker mCurrLocationMarker;

@Override
protected void onCreate(Bundle savedInstanceState) {
super.onCreate(savedInstanceState);
setContentView(R.layout.activity_googlemap_location);
ButterKnife.bind(this);

mapFragment = (MapFragment) getFragmentManager().findFragmentById(R.id.map);
mapFragment.getMapAsync(this);
setsupActionBar();


}


@Override
public void onPause() {
super.onPause();
//stop location updates when Activity is no longer active
if (mGoogleApiClient != null) {
LocationServices.FusedLocationApi.removeLocationUpdates(mGoogleApiClient, this);
}
}


private void setsupActionBar() {
ActionBar actionBar = getSupportActionBar();
actionBar.setDisplayShowHomeEnabled(true);
getSupportActionBar().setHomeAsUpIndicator(getResources().getDrawable(R.drawable.navigate_back));
}

private synchronized void buildGoogleApiClient() {
mGoogleApiClient = new GoogleApiClient.Builder(this)
.addConnectionCallbacks(this)
.addOnConnectionFailedListener(this)
.addApi(LocationServices.API)
.build();
mGoogleApiClient.connect();
}

@Override
public void onConnected(@Nullable Bundle bundle) {
LocationRequest mLocationRequest = createLocationRequest();
if (ContextCompat.checkSelfPermission(this, Manifest.permission.ACCESS_FINE_LOCATION) == PackageManager.PERMISSION_GRANTED) {
LocationServices.FusedLocationApi.requestLocationUpdates(mGoogleApiClient, mLocationRequest, this);
initializePolyline();
}
}


@Override
public void onConnectionSuspended(int i) {

}

@Override
public void onConnectionFailed(@NonNull ConnectionResult connectionResult) {

}


private LocationRequest createLocationRequest() {
LocationRequest mLocationRequest = new LocationRequest();
mLocationRequest.setInterval(10000);
mLocationRequest.setFastestInterval(5000);
mLocationRequest.setPriority(LocationRequest.PRIORITY_HIGH_ACCURACY);
return mLocationRequest;
}

@Override
public void onMapReady(GoogleMap googleMap) {
mGoogleMap = googleMap;
//Initialize Google Play Services
if (android.os.Build.VERSION.SDK_INT >= Build.VERSION_CODES.M) {
if (ContextCompat.checkSelfPermission(this,
Manifest.permission.ACCESS_FINE_LOCATION) == PackageManager.PERMISSION_GRANTED) {
//Location Permission already granted
buildGoogleApiClient();
mGoogleMap.setMyLocationEnabled(true);
} else {
//Request Location Permission
checkLocationPermission();
}
}
else {
buildGoogleApiClient();
mGoogleMap.setMyLocationEnabled(true);
}


}

@Override
public void onLocationChanged(Location location) {
mLatLng = new LatLng(location.getLatitude(), location.getLongitude());
updateCamera();
addMarker(mLatLng);
}

private void updateCamera() {
mGoogleMap.animateCamera(CameraUpdateFactory.newLatLngZoom(mLatLng, 16));
updatePolyline();
}

private void initializePolyline() {
mGoogleMap.clear();
mPolylineOptions = new PolylineOptions();
mPolylineOptions.color(Color.BLUE).width(10);
mGoogleMap.addPolyline(mPolylineOptions);

}

private void updatePolyline() {
mPolylineOptions.add(mLatLng);
mGoogleMap.clear();
mGoogleMap.addPolyline(mPolylineOptions);
}
private void addMarker(LatLng latLng){
if (mCurrLocationMarker != null) {
mCurrLocationMarker.remove();
}
MarkerOptions markerOptions = new MarkerOptions();
markerOptions.position(latLng);
markerOptions.title("Current Position");
markerOptions.icon(BitmapDescriptorFactory.defaultMarker(BitmapDescriptorFactory.HUE_MAGENTA));
mCurrLocationMarker = mGoogleMap.addMarker(markerOptions);

}


public boolean onCreateOptionsMenu(Menu menu) {
getMenuInflater().inflate(R.menu.main, menu);
return true;
}

@Override
public boolean onOptionsItemSelected(MenuItem item) {
// Handle presses on the action bar items
switch (item.getItemId()) {
case R.id.share_locations:

Intent i = new Intent(android.content.Intent.ACTION_SEND);
String location = mLatLng.latitude + "," + mLatLng.longitude;
i.setType("text/plain");
i.putExtra(Intent.EXTRA_SUBJECT, "Current Location");
i.putExtra(Intent.EXTRA_TEXT, " http://maps.google.com/maps?q=loc:" + location);

try {
startActivity(Intent.createChooser(i, "Share Location"));
} catch (android.content.ActivityNotFoundException ex) {
Toast.makeText(this, "Not found any app", Toast.LENGTH_LONG).show();
}

return true;
default:
return super.onOptionsItemSelected(item);
}
}

public static final int MY_PERMISSIONS_REQUEST_LOCATION = 99;
private void checkLocationPermission() {
if (ContextCompat.checkSelfPermission(this, Manifest.permission.ACCESS_FINE_LOCATION)
!= PackageManager.PERMISSION_GRANTED) {

// Should we show an explanation?
if (ActivityCompat.shouldShowRequestPermissionRationale(this,
Manifest.permission.ACCESS_FINE_LOCATION)) {

// Show an explanation to the user *asynchronously* -- don't block
// this thread waiting for the user's response! After the user
// sees the explanation, try again to request the permission.
new AlertDialog.Builder(this)
.setTitle("Location Permission Needed")
.setMessage("This app needs the Location permission, please accept to use location functionality")
.setPositiveButton("OK", new DialogInterface.OnClickListener() {
@Override
public void onClick(DialogInterface dialogInterface, int i) {
//Prompt the user once explanation has been shown
ActivityCompat.requestPermissions(GoogleMapLocationActivity.this,
new String[]{Manifest.permission.ACCESS_FINE_LOCATION},
MY_PERMISSIONS_REQUEST_LOCATION );
}
})
.create()
.show();


} else {
// No explanation needed, we can request the permission.
ActivityCompat.requestPermissions(this,
new String[]{Manifest.permission.ACCESS_FINE_LOCATION},
MY_PERMISSIONS_REQUEST_LOCATION );
}
}
}

@Override
public void onRequestPermissionsResult(int requestCode, String permissions[], int[] grantResults) {
switch (requestCode) {
case MY_PERMISSIONS_REQUEST_LOCATION: {
// If request is cancelled, the result arrays are empty.
if (grantResults.length > 0 && grantResults[0] == PackageManager.PERMISSION_GRANTED) {

// permission was granted, yay! Do the
// location-related task you need to do.
if (ContextCompat.checkSelfPermission(this,
Manifest.permission.ACCESS_FINE_LOCATION) == PackageManager.PERMISSION_GRANTED) {

if (mGoogleApiClient == null) {
buildGoogleApiClient();
}
mGoogleMap.setMyLocationEnabled(true);
}

} else {

// permission denied, boo! Disable the
// functionality that depends on this permission.
Toast.makeText(this, "permission denied", Toast.LENGTH_LONG).show();
}
return;
}

// other 'case' lines to check for other
// permissions this app might request
}
}
}

activity_googlemap_location.xml


<?xml version="1.0" encoding="utf-8"?>
<LinearLayout xmlns:android="http://schemas.android.com/apk/res/android"
android:orientation="vertical" android:layout_width="match_parent"
android:layout_height="match_parent">

<fragment
android:id="@+id/map"
android:layout_width="match_parent"
android:layout_height="match_parent"
android:name="com.google.android.gms.maps.MapFragment"/>

</LinearLayout>


Thanks for reading this post. I hope this will help to you understand.

Show Current location on MapBox in android

$
0
0
In my last article I have explained how to show current location on Google Map. If you have not seen before. I would recommend to check this post Show current location on Google Map.

In this article I am focusing about to show the current location on MapBox. MapBox is customized map into native application on multiple platforms. It makes map very style and animated as you want like.

Today in this article I am trying to integrate to show current location on map box. Here is uploaded video to show the current location on  Google Map and MapBox. Please check once.


Lets create an android project on android studio to implements to show current location on MapBox.

build.gradle app level


compile ('com.mapbox.mapboxsdk:mapbox-android-sdk:4.2.1@aar'){
transitive=true
}

MapBoxLocationActivity.java


import android.Manifest;
import android.app.AlertDialog;
import android.content.DialogInterface;
import android.content.Intent;
import android.content.pm.PackageManager;
import android.location.Location;
import android.os.Build;
import android.os.Bundle;
import android.support.annotation.NonNull;
import android.support.annotation.Nullable;
import android.support.v4.app.ActivityCompat;
import android.support.v4.content.ContextCompat;
import android.support.v7.app.ActionBar;
import android.support.v7.app.AppCompatActivity;
import android.view.Menu;
import android.view.MenuItem;
import android.widget.Toast;

import com.google.android.gms.common.ConnectionResult;
import com.google.android.gms.common.api.GoogleApiClient;
import com.google.android.gms.location.LocationListener;
import com.google.android.gms.location.LocationRequest;
import com.google.android.gms.location.LocationServices;
import com.mapbox.mapboxsdk.MapboxAccountManager;
import com.mapbox.mapboxsdk.annotations.MarkerOptions;
import com.mapbox.mapboxsdk.camera.CameraPosition;
import com.mapbox.mapboxsdk.camera.CameraUpdateFactory;
import com.mapbox.mapboxsdk.geometry.LatLng;
import com.mapbox.mapboxsdk.maps.MapView;
import com.mapbox.mapboxsdk.maps.MapboxMap;
import com.mapbox.mapboxsdk.maps.OnMapReadyCallback;

import butterknife.BindView;
import butterknife.ButterKnife;

/**
* Created by sunil on 1/1/17.
*/

public class MapBoxLocationActivity extends AppCompatActivity implements GoogleApiClient.ConnectionCallbacks,GoogleApiClient.OnConnectionFailedListener, LocationListener {

@BindView(R.id.mapview)
MapView mMapView;

private GoogleApiClient mGoogleApiClient;
private LatLng mLatLng;
private MarkerOptions mMarker;
private MapboxMap mMapBoxMap;

@Override
protected void onCreate(Bundle savedInstanceState) {
super.onCreate(savedInstanceState);
MapboxAccountManager.start(this, getString(R.string.access_token));
setContentView(R.layout.activity_mapbox_location);
ButterKnife.bind(this);

setsupActionBar();

mMapView.onCreate(savedInstanceState);
mMapView.getMapAsync(new OnMapReadyCallback() {
@Override
public void onMapReady(MapboxMap mapboxMap) {
mMapBoxMap = mapboxMap;
if (android.os.Build.VERSION.SDK_INT >= Build.VERSION_CODES.M) {
if (ContextCompat.checkSelfPermission(MapBoxLocationActivity.this,
Manifest.permission.ACCESS_FINE_LOCATION) == PackageManager.PERMISSION_GRANTED) {
//Location Permission already granted
buildGoogleApiClient();
} else {
//Request Location Permission
checkLocationPermission();
}
}
else {
buildGoogleApiClient();
}
}
});
}


// Add the mapView lifecycle to the activity's lifecycle methods
@Override
public void onResume() {
super.onResume();
mMapView.onResume();
}

@Override
public void onPause() {
super.onPause();
mMapView.onPause();
if (mGoogleApiClient != null) {
LocationServices.FusedLocationApi.removeLocationUpdates(mGoogleApiClient, this);
}
}

@Override
public void onLowMemory() {
super.onLowMemory();
mMapView.onLowMemory();
}

@Override
protected void onDestroy() {
super.onDestroy();
mMapView.onDestroy();
}

@Override
protected void onSaveInstanceState(Bundle outState) {
super.onSaveInstanceState(outState);
mMapView.onSaveInstanceState(outState);
}


private void setsupActionBar() {
ActionBar actionBar = getSupportActionBar();
actionBar.setDisplayShowHomeEnabled(true);
getSupportActionBar().setHomeAsUpIndicator(getResources().getDrawable(R.drawable.navigate_back));
}

private synchronized void buildGoogleApiClient() {
mGoogleApiClient = new GoogleApiClient.Builder(this)
.addConnectionCallbacks(this)
.addOnConnectionFailedListener(this)
.addApi(LocationServices.API)
.build();
mGoogleApiClient.connect();
}

private LocationRequest createLocationRequest() {
LocationRequest mLocationRequest = new LocationRequest();
mLocationRequest.setInterval(10000);
mLocationRequest.setFastestInterval(5000);
mLocationRequest.setPriority(LocationRequest.PRIORITY_HIGH_ACCURACY);
return mLocationRequest;
}


private void updateCamera() {
mMapView.setCameraDistance(10);
CameraPosition position = new CameraPosition.Builder()
.target(mLatLng) // Sets the new camera position
.zoom(15) // Sets the zoom
.bearing(180) // Rotate the camera
.tilt(30) // Set the camera tilt
.build(); // Creates a CameraPosition from the builder

mMapBoxMap.animateCamera(CameraUpdateFactory
.newCameraPosition(position), 7000);
}

private void updateMarker() {
mMapBoxMap.clear();
mMarker = new MarkerOptions()
.position(mLatLng)
.title("Location")
.snippet("Welcome to you");
mMapBoxMap.addMarker(mMarker);
}

private void addMarker() {
mMarker = new MarkerOptions()
.position(mLatLng)
.title("Location")
.snippet("Welcome to you");
mMapBoxMap.addMarker(mMarker);
}


@Override
public void onConnected(@Nullable Bundle bundle) {
LocationRequest mLocationRequest = createLocationRequest();
if (ContextCompat.checkSelfPermission(this, Manifest.permission.ACCESS_FINE_LOCATION) == PackageManager.PERMISSION_GRANTED) {
LocationServices.FusedLocationApi.requestLocationUpdates(mGoogleApiClient, mLocationRequest, this);
}
}

@Override
public void onConnectionSuspended(int i) {

}

@Override
public void onLocationChanged(Location location) {
mLatLng = new LatLng(location.getLatitude(), location.getLongitude());
updateCamera();
if (mMarker != null) {
updateMarker();
}else{
addMarker();
}
}

@Override
public void onConnectionFailed(@NonNull ConnectionResult connectionResult) {

}


public static final int MY_PERMISSIONS_REQUEST_LOCATION = 99;
private void checkLocationPermission() {
if (ContextCompat.checkSelfPermission(this, Manifest.permission.ACCESS_FINE_LOCATION)
!= PackageManager.PERMISSION_GRANTED) {

// Should we show an explanation?
if (ActivityCompat.shouldShowRequestPermissionRationale(this,
Manifest.permission.ACCESS_FINE_LOCATION)) {

// Show an explanation to the user *asynchronously* -- don't block
// this thread waiting for the user's response! After the user
// sees the explanation, try again to request the permission.
new AlertDialog.Builder(this)
.setTitle("Location Permission Needed")
.setMessage("This app needs the Location permission, please accept to use location functionality")
.setPositiveButton("OK", new DialogInterface.OnClickListener() {
@Override
public void onClick(DialogInterface dialogInterface, int i) {
//Prompt the user once explanation has been shown
ActivityCompat.requestPermissions(MapBoxLocationActivity.this,
new String[]{Manifest.permission.ACCESS_FINE_LOCATION},
MY_PERMISSIONS_REQUEST_LOCATION );
}
})
.create()
.show();


} else {
// No explanation needed, we can request the permission.
ActivityCompat.requestPermissions(this,
new String[]{Manifest.permission.ACCESS_FINE_LOCATION},
MY_PERMISSIONS_REQUEST_LOCATION );
}
}
}

@Override
public void onRequestPermissionsResult(int requestCode, String permissions[], int[] grantResults) {
switch (requestCode) {
case MY_PERMISSIONS_REQUEST_LOCATION: {
// If request is cancelled, the result arrays are empty.
if (grantResults.length > 0 && grantResults[0] == PackageManager.PERMISSION_GRANTED) {

// permission was granted, yay! Do the
// location-related task you need to do.
if (ContextCompat.checkSelfPermission(this,
Manifest.permission.ACCESS_FINE_LOCATION) == PackageManager.PERMISSION_GRANTED) {

if (mGoogleApiClient == null) {
buildGoogleApiClient();
}
}

} else {

// permission denied, boo! Disable the
// functionality that depends on this permission.
Toast.makeText(this, "permission denied", Toast.LENGTH_LONG).show();
}
return;
}

// other 'case' lines to check for other
// permissions this app might request
}
}

public boolean onCreateOptionsMenu(Menu menu) {
getMenuInflater().inflate(R.menu.main, menu);
return true;
}

@Override
public boolean onOptionsItemSelected(MenuItem item) {
// Handle presses on the action bar items
switch (item.getItemId()) {
case R.id.share_locations:

Intent i = new Intent(android.content.Intent.ACTION_SEND);
String location = mLatLng.getLatitude()+ "," + mLatLng.getLongitude();
i.setType("text/plain");
i.putExtra(Intent.EXTRA_SUBJECT, "Current Location");
i.putExtra(Intent.EXTRA_TEXT, " http://maps.google.com/maps?q=loc:" + location);

try {
startActivity(Intent.createChooser(i, "Share Location"));
} catch (android.content.ActivityNotFoundException ex) {
Toast.makeText(this, "Not found any app", Toast.LENGTH_LONG).show();
}
return true;
default:
return super.onOptionsItemSelected(item);
}
}
}

activity_mapbox_location.xml


<?xml version="1.0" encoding="utf-8"?>
<LinearLayout xmlns:android="http://schemas.android.com/apk/res/android"
xmlns:app="http://schemas.android.com/apk/res-auto"
android:orientation="vertical"
android:layout_width="match_parent"
android:layout_height="match_parent">

<com.mapbox.mapboxsdk.maps.MapView
android:id="@+id/mapview"
android:layout_width="match_parent"
android:layout_height="match_parent" />

</LinearLayout>

AndroidManifest.xml


<uses-permission android:name="android.permission.INTERNET">
<uses-permission android:name="android.permission.ACCESS_NETWORK_STATE">
<uses-permission android:name="android.permission.WRITE_EXTERNAL_STORAGE">
<uses-permission android:name="android.permission.ACCESS_COARSE_LOCATION">
<uses-permission android:name="android.permission.ACCESS_FINE_LOCATION">
<uses-permission android:name="android.permission.ACCESS_WIFI_STATE">

add this line inside the application tag in manifest file.It will handle the marshmallow permission.

<service android:name="com.mapbox.mapboxsdk.telemetry.TelemetryService" />


Thanks for reading this post. I hope it helps you to understand.

Create PDF file of current screen and share in Android

$
0
0
In this tutorial I am focusing about to create the pdf file of current screen. To implements this so many external library available to create the pdf file and stored in sd card. Android also provide the component to create pdf. I will gone through and found API level 19 does that.

Today in this article I will implement to create the pdf file of current screen and stored into sd card. PdfDocument class will help to create pdf .This class enables generating a PDF document from native Android content. You create a new document and then for every page you want to add you start a page, write content to the page, and finish the page. After you are done with all pages, you write the document to an output stream and close the document. After a document is closed you should not use it anymore. Note that pages are created one by one, i.e. you can have only a single page to which you are writing at any given time. This class is not thread safe.

Here is uploaded video that helps you to understand. Please check once.


Lets create an android studio project to implement this.

MainActivity.java


import android.Manifest;
import android.content.DialogInterface;
import android.content.Intent;
import android.content.pm.PackageManager;
import android.graphics.Point;
import android.graphics.pdf.PdfDocument;
import android.net.Uri;
import android.os.Build;
import android.os.Bundle;
import android.os.Environment;
import android.support.v4.app.ActivityCompat;
import android.support.v4.content.ContextCompat;
import android.support.v7.app.AlertDialog;
import android.support.v7.app.AppCompatActivity;
import android.util.Log;
import android.view.Menu;
import android.view.MenuItem;
import android.view.View;
import android.widget.Button;
import android.widget.TextView;
import android.widget.Toast;

import java.io.File;
import java.io.FileOutputStream;
import java.io.IOException;

public class MainActivity extends AppCompatActivity implements View.OnClickListener {

private TextView mTextView;
private Button btnCreatePdf;
@Override
protected void onCreate(Bundle savedInstanceState) {
super.onCreate(savedInstanceState);
setContentView(R.layout.activity_main);

mTextView = (TextView)findViewById(R.id.textview);
btnCreatePdf = (Button)findViewById(R.id.create_pdf);
mTextView.setText(getString(R.string.dummy_text_content));
btnCreatePdf.setOnClickListener(this);

}

@Override
public void onClick(View view) {
if (view.getId() == R.id.create_pdf){

if (android.os.Build.VERSION.SDK_INT >= Build.VERSION_CODES.M) {
if (ContextCompat.checkSelfPermission(this,
Manifest.permission.WRITE_EXTERNAL_STORAGE) == PackageManager.PERMISSION_GRANTED) {
// Permission already granted
createPdfFle();
} else {
//Request Location Permission
checkWritePermission();
}
}
else {
createPdfFle();
}

}
}

private void createPdfFle(){
new Thread() {
public void run() {
// Get the directory for the app's private pictures directory.
final File file = new File(Environment.getExternalStorageDirectory(), "PdfTest.pdf");

if (file.exists ()) {
file.delete ();
}

FileOutputStream out = null;
try {
out = new FileOutputStream(file);

PdfDocument document = new PdfDocument();
Point windowSize = new Point();
getWindowManager().getDefaultDisplay().getSize(windowSize);
PdfDocument.PageInfo pageInfo = new PdfDocument.PageInfo.Builder(windowSize.x, windowSize.y, 1).create();
PdfDocument.Page page = document.startPage(pageInfo);
View content = getWindow().getDecorView();
content.draw(page.getCanvas());
document.finishPage(page);
document.writeTo(out);
document.close();
out.flush();

runOnUiThread(new Runnable() {
@Override
public void run() {
Toast.makeText(MainActivity.this, "File created: "+file.getAbsolutePath(), Toast.LENGTH_LONG).show();
}
});
} catch (Exception e) {
Log.d("TAG_PDF", "File was not created: "+e.getMessage());
} finally {
try {
out.close();
} catch (IOException e) {
e.printStackTrace();
}
}
}
}.start();
}

public static final int MY_PERMISSIONS_REQUEST_WRITE = 99;
private void checkWritePermission() {
if (ContextCompat.checkSelfPermission(this, Manifest.permission.WRITE_EXTERNAL_STORAGE)
!= PackageManager.PERMISSION_GRANTED) {

// Should we show an explanation?
if (ActivityCompat.shouldShowRequestPermissionRationale(this,
Manifest.permission.WRITE_EXTERNAL_STORAGE)) {

// Show an explanation to the user *asynchronously* -- don't block
// this thread waiting for the user's response! After the user
// sees the explanation, try again to request the permission.
new AlertDialog.Builder(this)
.setTitle("Write Storage Permission Needed")
.setMessage("This app needs the Write Storage permission, please accept to use to write functionality")
.setPositiveButton("OK", new DialogInterface.OnClickListener() {
@Override
public void onClick(DialogInterface dialogInterface, int i) {
//Prompt the user once explanation has been shown
ActivityCompat.requestPermissions(MainActivity.this,
new String[]{Manifest.permission.WRITE_EXTERNAL_STORAGE},
MY_PERMISSIONS_REQUEST_WRITE );
}
})
.create()
.show();


} else {
// No explanation needed, we can request the permission.
ActivityCompat.requestPermissions(this,
new String[]{Manifest.permission.WRITE_EXTERNAL_STORAGE},
MY_PERMISSIONS_REQUEST_WRITE );
}
}
}

@Override
public void onRequestPermissionsResult(int requestCode, String permissions[], int[] grantResults) {
switch (requestCode) {
case MY_PERMISSIONS_REQUEST_WRITE: {
// If request is cancelled, the result arrays are empty.
if (grantResults.length > 0 && grantResults[0] == PackageManager.PERMISSION_GRANTED) {

// permission was granted, yay! Do the
// location-related task you need to do.
if (ContextCompat.checkSelfPermission(this,
Manifest.permission.WRITE_EXTERNAL_STORAGE) == PackageManager.PERMISSION_GRANTED) {
createPdfFle();
}

} else {

// permission denied, boo! Disable the
// functionality that depends on this permission.
Toast.makeText(this, "permission denied", Toast.LENGTH_LONG).show();
}
return;
}
}
}

private void sharePdfFile(){
String emailAddress[] = {getString(R.string.email)}; // email: test@gmail.com

Uri uri = Uri.fromFile(new File(Environment.getExternalStorageDirectory(), "PdfTest.pdf"));
Intent emailIntent = new Intent(Intent.ACTION_SEND);
emailIntent.putExtra(Intent.EXTRA_EMAIL, emailAddress);
emailIntent.putExtra(Intent.EXTRA_SUBJECT, "Share Pdf");
emailIntent.putExtra(Intent.EXTRA_TEXT, "Hi, Please get pdf");
emailIntent.setType("application/pdf");
emailIntent.putExtra(Intent.EXTRA_STREAM, uri);

startActivity(Intent.createChooser(emailIntent, "Send email using:"));
}

public boolean onCreateOptionsMenu(Menu menu) {
getMenuInflater().inflate(R.menu.main, menu);
return true;
}

@Override
public boolean onOptionsItemSelected(MenuItem item) {
// Handle presses on the action bar items
switch (item.getItemId()) {
case R.id.share_pdf:
sharePdfFile();
return true;
default:
return super.onOptionsItemSelected(item);
}
}

}


activity_main.xml


<?xml version="1.0" encoding="utf-8"?>
<ScrollView xmlns:android="http://schemas.android.com/apk/res/android"
xmlns:tools="http://schemas.android.com/tools"
android:layout_width="match_parent"
android:fillViewport="true"
android:layout_height="match_parent">
<RelativeLayout
android:id="@+id/activity_main"
android:layout_width="match_parent"
android:layout_height="match_parent"
android:paddingBottom="@dimen/activity_vertical_margin"
android:paddingLeft="@dimen/activity_horizontal_margin"
android:paddingRight="@dimen/activity_horizontal_margin"
android:paddingTop="@dimen/activity_vertical_margin"
tools:context="com.sunil.pdf.createpdfandroidapp.MainActivity">

<TextView
android:id="@+id/textview"
android:layout_width="match_parent"
android:layout_marginBottom="50dp"
android:layout_height="match_parent"
android:text="Hello World!" />

<RelativeLayout
android:id="@+id/button_container"
android:layout_alignParentBottom="true"
android:layout_width="match_parent"
android:layout_height="wrap_content">

<Button
android:id="@+id/create_pdf"
android:text="Create PDF"
android:textColor="#fff"
android:background="@color/colorPrimary"
android:layout_width="match_parent"
android:layout_height="wrap_content" />

</RelativeLayout>
</RelativeLayout>
</ScrollView>

Thanks for reading this post. I hope it will help you.


Fast Splash Screen in Android

$
0
0

In this tutorial I am focusing about Splash screen. Splash screen is majorly used in any app. But most importantly How we can make splash screen to load fast. I have seen some of app like Flip-cart,  they used this kind of splash screen.

So I thought it good to share with all of you. In earlier we used to set the layout on Activity. In  this case I found that it takes little bit time to load. In between while loading the splash It shows back background for a while of time. So I think it makes wrong impression for user to show a black background for a while.

Here is uploaded video to check how fast loading splash. Please check this.


Lets make a fast loading splash screen without setting any layout on Activity. We can achieve this by using style. We can set the style on activity Manifest.

splash_background.xml


<?xml version="1.0" encoding="utf-8"?>
<layer-list xmlns:android="http://schemas.android.com/apk/res/android">

<item android:drawable="@color/colorPrimary" />

<item>
<bitmap android:src="@drawable/ic_stars_red_500_48dp"
android:gravity="center" />

</item>

</layer-list>

style.xml


<style name="Splash" parent="Theme.AppCompat.Light.DarkActionBar">
<item name="android:windowBackground">@drawable/splash_background</item>
</style>


MainApplication.java


public class MainApplication extends Application {

@Override
public void onCreate() {
super.onCreate();
SystemClock.sleep(1500);
}
}

AndroidManifest.xml


<activity android:name=".SplashActivity"
android:theme="@style/Splash">
<intent-filter>
<action android:name="android.intent.action.MAIN" />

<category android:name="android.intent.category.LAUNCHER" />
</intent-filter>
</activity>
Thanks for reading this article. 

Custom SeekBar (Discrete SeekBar) in android

$
0
0
SeekBar is very good user Interface to present to set any value between from minimum to maximum range. But the things is that how can we satisfy to users to give or show them with best user interface experience because this time is only Material time . So in this article I am talking about to custom seek bar implementation.

If we talk about Material Design seek bar, I found one library that suitable to provides Discrete Seek bar. This library is providing amazing  user interface for custom seek bar.
Here is the DiscreteSeekBar link. Please give full credit to him that made our life easy.

In this article I am focusing four different ways that we can use this discrete seek bar in our projects. For example below here

1. Normal Seek bar
2. Multiple of 100 (ex 100, 200, 300..etc) to select from 0 to 10000.
3. Multiple of 100 from range 500 to 10000 in between.
4. Interval kind of multiple of 100 from 500 to 1000 (exp 500, 600..etc)and then after multiple of 1000 from 1000 to 100000 (exp. 1000, 2000, 3000...etc)

Here is uploaded video that show this all four type implemented. Please check this video once.


Lets create an android project to implement this.


MainActivity.java


import android.os.Bundle;
import android.support.v7.app.AppCompatActivity;
import android.widget.TextView;

import org.adw.library.widgets.discreteseekbar.DiscreteSeekBar;

import butterknife.BindView;
import butterknife.ButterKnife;

public class MainActivity extends AppCompatActivity {

@BindView(R.id.title_normal)
TextView titleNormal;
@BindView(R.id.discrete_normal)
DiscreteSeekBar discreteNormal;
@BindView(R.id.title_multiple)
TextView titleMultiple;
@BindView(R.id.discrete_multiple)
DiscreteSeekBar discreteMultiple;
@BindView(R.id.title_range_multiple)
TextView titleRangeMultiple;
@BindView(R.id.discrete_multiple_range)
DiscreteSeekBar discreteMultipleRange;
@BindView(R.id.title_interval_range_multiple)
TextView titleIntervalRangeMultiple;
@BindView(R.id.discrete_interval_multiple_range)
DiscreteSeekBar discreteIntervalMultipleRange;

@Override
protected void onCreate(Bundle savedInstanceState) {
super.onCreate(savedInstanceState);
setContentView(R.layout.activity_main);
ButterKnife.bind(this);

initSeekBar(); // normal seek bar bar 0 to 100
initMultipleOfSeekBar(); // multiple of 100 form 0 to 10000
initMultipleRangeOfSeekBar(); // multiple of 100 form 500 to 10000
initIntervalMultipleRangeOfSeekBar(); // multiple of 100 form 500 to 1000 and after multiple of 1000 from 1000 to 10000

}

private void initIntervalMultipleRangeOfSeekBar() {
discreteIntervalMultipleRange.setMin(0);
discreteIntervalMultipleRange.setMax(14);
discreteIntervalMultipleRange.setNumericTransformer(new DiscreteSeekBar.NumericTransformer() {
@Override
public int transform(int value) {
if (value <= 5) {
return (value * 100) + 500;
}else {
return (value - 4) * 1000;
}
}
});

discreteIntervalMultipleRange.setOnProgressChangeListener(new DiscreteSeekBar.OnProgressChangeListener() {
@Override
public void onProgressChanged(DiscreteSeekBar seekBar, int value, boolean fromUser) {
if (fromUser) {
int updatedValue = 0;
if (value <= 5) {
updatedValue = (value * 100) + 500;
}else{
updatedValue = (value - 4) * 1000;
}
titleIntervalRangeMultiple.setText("Interval Multiple Range SeekBar- Value: " + updatedValue);
}
}

@Override
public void onStartTrackingTouch(DiscreteSeekBar seekBar) {

}

@Override
public void onStopTrackingTouch(DiscreteSeekBar seekBar) {

}
});
}

private void initMultipleRangeOfSeekBar() {

discreteMultipleRange.setMin(0);
discreteMultipleRange.setMax(95);
discreteMultipleRange.setNumericTransformer(new DiscreteSeekBar.NumericTransformer() {
@Override
public int transform(int value) {
return (value * 100) + 500;
}
});

discreteMultipleRange.setOnProgressChangeListener(new DiscreteSeekBar.OnProgressChangeListener() {
@Override
public void onProgressChanged(DiscreteSeekBar seekBar, int value, boolean fromUser) {
if (fromUser) {
int updatedValue = (value * 100) + 500;
titleRangeMultiple.setText("Multiple Range SeekBar- Value: " + updatedValue);
}
}

@Override
public void onStartTrackingTouch(DiscreteSeekBar seekBar) {

}

@Override
public void onStopTrackingTouch(DiscreteSeekBar seekBar) {

}
});
}

private void initMultipleOfSeekBar() {
discreteMultiple.setMin(0);
discreteMultiple.setMax(100); //result should be in multiple of 100
discreteMultiple.setNumericTransformer(new DiscreteSeekBar.NumericTransformer() {
@Override
public int transform(int value) {
return value * 100;
}
});

discreteMultiple.setOnProgressChangeListener(new DiscreteSeekBar.OnProgressChangeListener() {
@Override
public void onProgressChanged(DiscreteSeekBar seekBar, int value, boolean fromUser) {
titleMultiple.setText("Multiple SeekBar- Value: " + value * 100);
}

@Override
public void onStartTrackingTouch(DiscreteSeekBar seekBar) {

}

@Override
public void onStopTrackingTouch(DiscreteSeekBar seekBar) {

}
});
}

private void initSeekBar() {
discreteNormal.setOnProgressChangeListener(new DiscreteSeekBar.OnProgressChangeListener() {
@Override
public void onProgressChanged(DiscreteSeekBar seekBar, int value, boolean fromUser) {
titleNormal.setText("Normal SeekBar- Value: " + value);
}

@Override
public void onStartTrackingTouch(DiscreteSeekBar seekBar) {

}

@Override
public void onStopTrackingTouch(DiscreteSeekBar seekBar) {

}
});
}
}

activity_main.xml


<?xml version="1.0" encoding="utf-8"?>
<RelativeLayout xmlns:android="http://schemas.android.com/apk/res/android"
xmlns:tools="http://schemas.android.com/tools"
xmlns:app="http://schemas.android.com/apk/res-auto"
android:id="@+id/activity_main"
android:layout_width="match_parent"
android:layout_height="match_parent"
android:paddingBottom="@dimen/activity_vertical_margin"
android:paddingLeft="@dimen/activity_horizontal_margin"
android:paddingRight="@dimen/activity_horizontal_margin"
android:paddingTop="@dimen/activity_vertical_margin"
tools:context="com.sunil.customseekbarandroid.MainActivity">

<RelativeLayout
android:id="@+id/relative_normal"
android:layout_width="match_parent"
android:layout_height="wrap_content">

<TextView
android:text="Normal SeekBar"
android:id="@+id/title_normal"
android:gravity="center"
android:textSize="15sp"
android:layout_marginBottom="20dp"
android:textColor="@color/colorPrimary"
android:layout_width="match_parent"
android:layout_height="wrap_content" />

<org.adw.library.widgets.discreteseekbar.DiscreteSeekBar
android:layout_below="@+id/title_normal"
android:id="@+id/discrete_normal"
android:layout_width="match_parent"
android:layout_height="wrap_content"
app:dsb_min="0"
app:dsb_max="100"
app:dsb_value="0"
/>

<RelativeLayout
android:layout_below="@+id/discrete_normal"
android:layout_marginBottom="20dp"
android:layout_width="match_parent"
android:padding="5dp"
android:layout_height="wrap_content">

<TextView
android:text="Min:1"
android:gravity="left"
android:textSize="12sp"
android:layout_marginLeft="10dp"
android:textColor="@color/colorPrimary"
android:layout_width="match_parent"
android:layout_height="wrap_content" />

<TextView
android:text="Max:100"
android:gravity="right"
android:textSize="12sp"
android:layout_marginRight="10dp"
android:textColor="@color/colorPrimary"
android:layout_width="match_parent"
android:layout_height="wrap_content" />


</RelativeLayout>

</RelativeLayout>

<RelativeLayout
android:id="@+id/multiple_seekbar"
android:layout_below="@+id/relative_normal"
android:layout_width="match_parent"
android:layout_height="wrap_content">

<TextView
android:text="Multiple of SeekBar"
android:id="@+id/title_multiple"
android:gravity="center"
android:textSize="15sp"
android:layout_marginBottom="20dp"
android:textColor="@color/colorPrimary"
android:layout_width="match_parent"
android:layout_height="wrap_content" />

<org.adw.library.widgets.discreteseekbar.DiscreteSeekBar
android:layout_below="@+id/title_multiple"
android:id="@+id/discrete_multiple"
android:layout_width="match_parent"
android:layout_height="wrap_content"
app:dsb_min="0"
app:dsb_max="100"
app:dsb_value="0"
/>

<RelativeLayout
android:layout_below="@+id/discrete_multiple"
android:layout_marginBottom="20dp"
android:layout_width="match_parent"
android:padding="5dp"
android:layout_height="wrap_content">

<TextView
android:text="Min:0"
android:gravity="left"
android:textSize="12sp"
android:layout_marginLeft="10dp"
android:textColor="@color/colorPrimary"
android:layout_width="match_parent"
android:layout_height="wrap_content" />

<TextView
android:text="Max:10000"
android:gravity="right"
android:textSize="12sp"
android:layout_marginRight="10dp"
android:textColor="@color/colorPrimary"
android:layout_width="match_parent"
android:layout_height="wrap_content" />


</RelativeLayout>

</RelativeLayout>

<RelativeLayout
android:id="@+id/multiple_range_seekbar"
android:layout_below="@+id/multiple_seekbar"
android:layout_width="match_parent"
android:layout_height="wrap_content">

<TextView
android:text="Multiple Range of SeekBar"
android:id="@+id/title_range_multiple"
android:gravity="center"
android:textSize="15sp"
android:layout_marginBottom="20dp"
android:textColor="@color/colorPrimary"
android:layout_width="match_parent"
android:layout_height="wrap_content" />

<org.adw.library.widgets.discreteseekbar.DiscreteSeekBar
android:layout_below="@+id/title_range_multiple"
android:id="@+id/discrete_multiple_range"
android:layout_width="match_parent"
android:layout_height="wrap_content"
app:dsb_min="0"
app:dsb_max="100"
app:dsb_value="0"
/>

<RelativeLayout
android:layout_below="@+id/discrete_multiple_range"
android:layout_marginBottom="20dp"
android:layout_width="match_parent"
android:padding="5dp"
android:layout_height="wrap_content">

<TextView
android:text="Min:500"
android:gravity="left"
android:textSize="12sp"
android:layout_marginLeft="10dp"
android:textColor="@color/colorPrimary"
android:layout_width="match_parent"
android:layout_height="wrap_content" />

<TextView
android:text="Max:10000"
android:gravity="right"
android:textSize="12sp"
android:layout_marginRight="10dp"
android:textColor="@color/colorPrimary"
android:layout_width="match_parent"
android:layout_height="wrap_content" />


</RelativeLayout>

</RelativeLayout>

<RelativeLayout
android:id="@+id/interval_multiple_range_seekbar"
android:layout_below="@+id/multiple_range_seekbar"
android:layout_width="match_parent"
android:layout_height="wrap_content">

<TextView
android:text="Interval Multiple Range of SeekBar"
android:id="@+id/title_interval_range_multiple"
android:gravity="center"
android:textSize="15sp"
android:layout_marginBottom="20dp"
android:textColor="@color/colorPrimary"
android:layout_width="match_parent"
android:layout_height="wrap_content" />

<org.adw.library.widgets.discreteseekbar.DiscreteSeekBar
android:layout_below="@+id/title_interval_range_multiple"
android:id="@+id/discrete_interval_multiple_range"
android:layout_width="match_parent"
android:layout_height="wrap_content"
app:dsb_min="0"
app:dsb_max="100"
app:dsb_value="0"
/>

<RelativeLayout
android:layout_below="@+id/discrete_interval_multiple_range"
android:layout_marginBottom="20dp"
android:layout_width="match_parent"
android:padding="5dp"
android:layout_height="wrap_content">

<TextView
android:text="Min:500"
android:gravity="left"
android:textSize="12sp"
android:layout_marginLeft="10dp"
android:textColor="@color/colorPrimary"
android:layout_width="match_parent"
android:layout_height="wrap_content" />

<TextView
android:text="Max:10000"
android:gravity="right"
android:textSize="12sp"
android:layout_marginRight="10dp"
android:textColor="@color/colorPrimary"
android:layout_width="match_parent"
android:layout_height="wrap_content" />


</RelativeLayout>

</RelativeLayout>

</RelativeLayout>

Thanks for reading this post.

SlidePlaneLayout vs DrawerLayout for menu in android

$
0
0

In the most of applications we have seen the slide menu used and many of the users wants some attractive menu something like to slide with different ways and style. Slide menu is more attractive for users. To build this kind of features many Concept are available for developer to implement this,

Now a day NavigatonView is more popular for slide menu. But Here I am describing to you to create slide menu for different - different style. I am not going to more customized but giving some useful platform that you can make your customization on this.

Here are some basic things which I am targeting.
1. SlidePanelLayout
2, DrawerLayout

SlidePanelLayout is provide horizontal multi pane layout to create for multiple screens. For more detail about this Please check the developer site Here.
DrawerLayout provides to pull the view in vertical way. It is strongly recommended to use in Navigation. For detail about this Please check developer site Here.

Lets check both Layout to implement menu slide. Before writing the code I want to show the implemented video that helps you get understand both features. Please check this video.


Lets create an android project to implement this.

SlidePanelActivity.java


import android.os.Bundle;
import android.support.annotation.Nullable;
import android.support.v4.widget.SlidingPaneLayout;
import android.support.v7.app.ActionBar;
import android.support.v7.app.AppCompatActivity;
import android.support.v7.widget.DividerItemDecoration;
import android.support.v7.widget.LinearLayoutManager;
import android.support.v7.widget.RecyclerView;
import android.support.v7.widget.Toolbar;
import android.view.MenuItem;
import android.view.View;

import java.util.List;

import butterknife.BindView;
import butterknife.ButterKnife;

/**
* Created by sunil on 28-01-2017.
*/

public class SlidePanelActivity extends AppCompatActivity {

@BindView(R.id.recyclerView)
RecyclerView recyclerView;
@BindView(R.id.SlidingPanel)
SlidingPaneLayout SlidingPanel;
@BindView(R.id.tool_bar)
Toolbar toolBar;

private ActionBar actionBar;

@Override
protected void onCreate(@Nullable Bundle savedInstanceState) {
super.onCreate(savedInstanceState);
setContentView(R.layout.activity_slidepanel_right);
ButterKnife.bind(this);

setSupportActionBar(toolBar);
actionBar = getSupportActionBar();
actionBar.setDisplayHomeAsUpEnabled(true);
actionBar.setHomeAsUpIndicator(R.drawable.ic_menu);


List list = Constant.getList();
recyclerView.setLayoutManager(new LinearLayoutManager(this));
recyclerView.addItemDecoration(new DividerItemDecoration(this, LinearLayoutManager.VERTICAL));
RecyclerAdapter adapter = new RecyclerAdapter(this, list);
recyclerView.setAdapter(adapter);

SlidingPanel.setPanelSlideListener(new SlidingPaneLayout.PanelSlideListener() {
@Override
public void onPanelSlide(View panel, float slideOffset) {

}

@Override
public void onPanelOpened(View panel) {
actionBar.setHomeAsUpIndicator(R.drawable.ic_arrow_back_white_24dp);
}

@Override
public void onPanelClosed(View panel) {
actionBar.setHomeAsUpIndicator(R.drawable.ic_menu);
}
});
}

@Override
public boolean onOptionsItemSelected(MenuItem item) {
// TODO Auto-generated method stub
switch (item.getItemId()) {
case android.R.id.home:
if (SlidingPanel.isOpen()) {
actionBar.setHomeAsUpIndicator(R.drawable.ic_arrow_back_white_24dp);
SlidingPanel.closePane();
actionBar.setTitle(getString(R.string.app_name));
} else {
actionBar.setHomeAsUpIndicator(R.drawable.ic_menu);
SlidingPanel.openPane();
actionBar.setTitle("Menu Titles");
}
break;
default:
break;
}
return super.onOptionsItemSelected(item);
}

}

activity_slide_panel.xml


<?xml version="1.0" encoding="utf-8"?>
<LinearLayout xmlns:android="http://schemas.android.com/apk/res/android"
android:orientation="vertical" android:layout_width="match_parent"
android:layout_height="match_parent">
<include
android:id="@+id/tool_bar"
layout="@layout/toolbar_layout">
</include>
<include
android:id="@+id/SlidingPanel"
layout="@layout/slidepanel_layout">
</include>

</LinearLayout>

slidepanel_laout.xml


<android.support.v4.widget.SlidingPaneLayout xmlns:android="http://schemas.android.com/apk/res/android"
android:id="@+id/SlidingPanel"
android:layout_width="match_parent"
android:layout_height="match_parent">

<LinearLayout
android:layout_width="240dp"
android:layout_height="match_parent"
android:layout_gravity="right">

<android.support.v7.widget.RecyclerView
android:id="@+id/recyclerView"
android:layout_width="match_parent"
android:layout_height="match_parent">
</android.support.v7.widget.RecyclerView>

</LinearLayout>

<LinearLayout
android:layout_width="match_parent"
android:layout_height="match_parent"
android:layout_gravity="right"
android:background="#101010"
android:orientation="vertical">

<TextView
android:text="Slide Panel"
android:textColor="#fff"
android:gravity="center"
android:background="@color/colorAccent"
android:textSize="20dp"
android:layout_width="match_parent"
android:layout_height="match_parent" />
</LinearLayout>

</android.support.v4.widget.SlidingPaneLayout>

SlideDrawerActivity.java


import android.os.Bundle;
import android.support.v4.widget.DrawerLayout;
import android.support.v7.app.AppCompatActivity;
import android.support.v7.widget.DividerItemDecoration;
import android.support.v7.widget.LinearLayoutManager;
import android.support.v7.widget.RecyclerView;
import android.view.Gravity;
import android.view.View;
import android.widget.ImageView;
import android.widget.RelativeLayout;

import java.util.List;

import butterknife.BindView;
import butterknife.ButterKnife;

/**
* Created by sunil on 04-02-2017.
*/

public class SlideDrawerActivity extends AppCompatActivity {


@BindView(R.id.menu)
ImageView menu;
@BindView(R.id.content_frame)
RelativeLayout contentFrame;
@BindView(R.id.left_drawer)
RelativeLayout leftDrawer;
@BindView(R.id.drawer_layout)
DrawerLayout drawerLayout;
@BindView(R.id.recyclerView)
RecyclerView recyclerView;

@Override
protected void onCreate(Bundle savedInstanceState) {
super.onCreate(savedInstanceState);
setContentView(R.layout.activity_slide);
ButterKnife.bind(this);

List list = Constant.getList();
recyclerView.setLayoutManager(new LinearLayoutManager(this));
recyclerView.addItemDecoration(new DividerItemDecoration(this, LinearLayoutManager.VERTICAL));
RecyclerAdapter adapter = new RecyclerAdapter(this, list);
recyclerView.setAdapter(adapter);

menu.setOnClickListener(new View.OnClickListener() {
@Override
public void onClick(View view) {
drawerLayout.openDrawer(Gravity.LEFT);
}
});

drawerLayout.addDrawerListener(new DrawerLayout.DrawerListener() {
@Override
public void onDrawerSlide(View drawerView, float slideOffset) {
contentFrame.setX(slideOffset * 380);
}

@Override
public void onDrawerOpened(View drawerView) {

}

@Override
public void onDrawerClosed(View drawerView) {

}

@Override
public void onDrawerStateChanged(int newState) {

}
});
}
}

activity_slide.xml


<android.support.v4.widget.DrawerLayout
xmlns:android="http://schemas.android.com/apk/res/android"
android:id="@+id/drawer_layout"
android:layout_width="match_parent"
android:layout_height="match_parent"
android:background="#fff">

<RelativeLayout
android:id="@+id/content_frame"
android:layout_width="match_parent"
android:layout_height="match_parent"
android:background="@color/colorAccent">

<ImageView
android:layout_width="40dp"
android:layout_height="40dp"
android:id="@+id/menu"
android:layout_alignParentTop="true"
android:layout_alignParentLeft="true"
android:layout_marginTop="10dp"
android:layout_marginLeft="10dp"
android:src="@drawable/ic_menu"
/>
<TextView
android:text="Slide Drawer"
android:textColor="#fff"
android:gravity="center"
android:textSize="20dp"
android:layout_width="match_parent"
android:layout_height="match_parent" />
</RelativeLayout>


<RelativeLayout
android:id="@+id/left_drawer"
android:layout_width="200dp"
android:background="#fff"
android:layout_height="match_parent"
android:layout_gravity="start">

<RelativeLayout
android:gravity="center"
android:id="@+id/header_container"
android:layout_width="match_parent"
android:layout_height="150dp">

<TextView
android:text="UserName"
android:gravity="center"
android:layout_width="match_parent"
android:layout_height="wrap_content" />

</RelativeLayout>

<android.support.v7.widget.RecyclerView
android:id="@+id/recyclerView"
android:layout_below="@+id/header_container"
android:layout_width="match_parent"
android:layout_height="match_parent">
</android.support.v7.widget.RecyclerView>

</RelativeLayout>
</android.support.v4.widget.DrawerLayout>


Thanks for reading this post. I hope it helps you.

RxJava2 in Android Part1

$
0
0
RxJava is getting popular to used in android application. Many of the developers they are supporting to use RxJava in building android app. They are getting good response to find that it taking the android app up-to next level. 

Rx java is using the Observer design pattern.I followed many article and tutorial for understand what is observable and observer in technical term and every time got confused. Every articles have different-2 explanation So I got more confused How to use RxJava, But most important when and Where to use.

Now Its create the confusion to you also right because to understand the technical thing required to understand first what is usage and 
existence in the real world.Yes sounds Great:).
So Let’s first take some real time example or daily basis usages to understand this technical concept.

Suppose Android point is tutorial hub for android . Many list of developer’s has subscribed for this tutorial. Once any new tutorial added into Android Point then listed subscribed developers will get notified for same that new article or tutorial added in Android point. So here developers are Observer And Android Tutorial point is Observable. So once Observable Object get updated then Observers will get notified.

Still confused. Let me give another example.

Everybody has its own permanent address  and this address is registered on your passport and pan card etc. So once your Permanent address get updated then your card authority get 
notify that something has change in permanent address. So here Your authority card are Observer and permanent address is the Observable. Once is change in Observable your observer get notify.
 
I hope now it’s clear about Observable and Observer in real time. Let’s check how is same relation with technology term.
Any Object have its own property and behaviors. The Observer Pattern defines a one-to-many dependency between objects so that when one object changes state (means change in his property or behavior ), all of its dependents are notified and updated automatically. Again confusion Ohh !! Let’s connect above example with Java Program.

CardObserver.java

package com.sunil.rxjavaexample;

import java.util.Objects;

/**
* Created by sunil on 11-02-2017.
*/

public abstract class CardObserver {

protected PermanentAddressObservable permanentAddressObservable;
public abstract void update();
}

PermanentAddressObservable.java


package com.sunil.rxjavaexample;

import java.util.ArrayList;
import java.util.List;

/**
* Created by sunil on 11-02-2017.
*/

public class PermanentAddressObservable {

private List observers = new ArrayList();
private String address;

public String getAddress() {
return address;
}

public void setAddress(String address) {
this.address = address;
notifyAllObservers();
}

public void attach(CardObserver observer){
observers.add(observer);
}

public void notifyAllObservers(){
for (CardObserver observer : observers) {
observer.update();
}
}
}

AuthorityCardAddressObserver.java


package com.sunil.rxjavaexample;

/**
* Created by sunil on 11-02-2017.
*/

public class AuthorityCardAddressObserver extends CardObserver {

public AuthorityCardAddressObserver(PermanentAddressObservable permanentAddressObservable){
this.permanentAddressObservable = permanentAddressObservable;
this.permanentAddressObservable.attach(this);
}

@Override
public void update() {
System.out.println( "Address Change: "+permanentAddressObservable.getAddress());
}
}

MainActivity.java


package com.sunil.rxjavaexample;

import android.support.v7.app.AppCompatActivity;
import android.os.Bundle;

public class MainActivity extends AppCompatActivity {

@Override
protected void onCreate(Bundle savedInstanceState) {
super.onCreate(savedInstanceState);
setContentView(R.layout.activity_main);

PermanentAddressObservable permanentAddressObservable = new PermanentAddressObservable();
new AuthorityCardAddressObserver(permanentAddressObservable);
System.out.println("Initiated Address Change");
permanentAddressObservable.setAddress("This is my new Address");
}
}

Result will be :
02-11 11:44:14.661 9430-9430/com.sunil.rxjavaexample I/System.out: Initiated Address Change 02-11 11:44:14.661 9430-9430/com.sunil.rxjavaexample I/System.out: Address Change: This is my new Address

I hope this is understandable. Now lets focus How Observable and Observer following this pattern.Observable is the class and Observer is the interface. Observable maintain the list of Observers. When Observable Object get changes then its notify to all Observers to get update. Again Confused Oh No!!! . Let me again explained by example.

AndroidPointTutorial.java

package com.sunil.rxjavaexample.tutorial;

import java.util.Observable;

/**
* Created by sunil on 11-02-2017.
*/

public class AndroidPointTutorial extends Observable{

private String article;

public AndroidPointTutorial(String value) {
article = value;
}

public String getArticle() {
return article;
}

public void setArticle(String newArticle) {
if (!article.equals(newArticle)) {
System.out.println("Article changed to new article: " + article);
article = newArticle;
setChanged();
notifyObservers(article);
}
}
}

Developers.java

package com.sunil.rxjavaexample.tutorial;

import java.util.Observable;
import java.util.Observer;

/**
* Created by sunil on 11-02-2017.
*/

public class Developers implements Observer{

private AndroidPointTutorial androidPointTutorial = null;

public Developers(AndroidPointTutorial androidPointTutorial) {
this.androidPointTutorial = androidPointTutorial;
}
public void update(Observable observable, Object o) {
System.out.println("Updated :"+androidPointTutorial.getArticle());
}

}  

MainActivity.java

package com.sunil.rxjavaexample;

import android.support.v7.app.AppCompatActivity;
import android.os.Bundle;

import com.sunil.rxjavaexample.tutorial.AndroidPointTutorial;
import com.sunil.rxjavaexample.tutorial.Developers;

import java.util.Observable;
import java.util.Observer;

public class MainActivity extends AppCompatActivity {

@Override
protected void onCreate(Bundle savedInstanceState) {
super.onCreate(savedInstanceState);
setContentView(R.layout.activity_main);

AndroidPointTutorial androidPointTutorial = new AndroidPointTutorial("Original Article");
Developers developers = new Developers(androidPointTutorial);
androidPointTutorial.addObserver(developers);

androidPointTutorial.setArticle("New Article"); // this will get update and notify to developer
}

}
Result will be:


02-11 12:54:55.661 20994-20994/com.sunil.rxjavaexample I/System.out: Article changed to new article: Original Article

02-11 12:54:55.661 20994-20994/com.sunil.rxjavaexample I/System.out: Updated :New Article

This all about the Observable pattern.Now Rx is following this pattern and used this in android development. I heard that now many android  developer are using this pattern and it gives good result.
It avoid boilerplate code I mean it avoid the unnecessary duplicate code. Many of the library that implemented on this pattern. For example Retrofit is using RX Pattern and Realm also using this concept and many more good available library that working with Rx Team. I will explain in detail related Rx(Reactive Programming) Java2 to use in Android application development. Thanks for reading this post.

RxJava2 in Android Part2

$
0
0

In my last tutorial We learnt basic of Rx Observable and Observer. We learnt how Observable and observer works together. If you still not checked then please visit here to get details: RxJava2 in Android Part1.

In this article I am focusing about Rx (Reactive programming). So question now What is Rx ? Rx means Reactive Extensions It means any thing change happen it will react something. Rx Functionality is hard to understand initially if you from basic java, But believe me it is really awesome because it gives good result. 

Lets check the basic hello world programming in Android with Rx. Rx is basically standard Observer pattern. Observable emit the data and Observers consume the data. To emit the data Observers should be subscribe. 


Observable observable = Observable.just("Hello World");
observable.subscribe(observer);
Here Observer should be subscribe to consume data.

Observer observer = new Observer() {
@Override
public void onSubscribe(Disposable d) {

}

@Override
public void onNext(Object value) {
Toast.makeText(MainActivity.this, (String)value, Toast.LENGTH_LONG).show();
}

@Override
public void onError(Throwable e) {
Toast.makeText(MainActivity.this, "Error "+e, Toast.LENGTH_LONG).show();
}

@Override
public void onComplete() {
Toast.makeText(MainActivity.this, "Completed", Toast.LENGTH_LONG).show();
}
};

Now Question Why RxJava in Android?

In general android programming we used many callback and event to complete the task. Its really hard to understand for beginner developers. Even I also not like personally to used many callbacks.
For example We have fragment that contain listview or recycler view, In adapter class we  used callback while click on any item view to update something.

Let me take another example in simple word, We used AlertDialog with Cancel and  Okay button option. User can do click either okay or cancel button. Here also we used callback while click on any button to perform action that notify to update accordingly. 

Here I am creating an interface  DialogListener for using callback.


package com.sunil.rxjavaexample.utils;

/**
* Created by sunil on 18-02-2017.
*/

public interface DialogListener {

void onPositiveButtonClick();
void onNegativeButtonClick();
}

DialogUtil is the class that contain all kind of dialog that used in your app.
package com.sunil.rxjavaexample.utils;

import android.app.AlertDialog;
import android.content.Context;
import android.content.DialogInterface;

/**
* Created by sunil on 18-02-2017.
*/

public class DialogUtil {

public static void showDialog(Context context, String title, String message, final DialogListener dialogListener){
new AlertDialog.Builder(context)
.setTitle(title)
.setMessage(message)
.setPositiveButton(android.R.string.yes, new DialogInterface.OnClickListener() {
public void onClick(DialogInterface dialog, int which) {
dialogListener.onPositiveButtonClick();
}
})
.setNegativeButton(android.R.string.no, new DialogInterface.OnClickListener() {
public void onClick(DialogInterface dialog, int which) {
dialogListener.onNegativeButtonClick();
}
})
.setIcon(android.R.drawable.ic_dialog_alert)
.show();
}
}
And I want to show dialog while click on button. Here you can get your callback return. Now you can see this is hard to understand to everyone.

final DialogListener dialogListener = new DialogListener() {
@Override
public void onPositiveButtonClick() {
Toast.makeText(MainActivity.this, "Positive Clicked", Toast.LENGTH_LONG).show();
}

@Override
public void onNegativeButtonClick() {
Toast.makeText(MainActivity.this, "Negative Clicked", Toast.LENGTH_LONG).show();
}
};

Button button = (Button)findViewById(R.id.alertButton);
button.setOnClickListener(new View.OnClickListener() {
@Override
public void onClick(View view) {
DialogUtil.showDialog(MainActivity.this, "Rx Alert", "Are you love this Rx?", dialogListener);


}
});

Now lets same thing check with Rx Java using. Lets create one more method in DialogUtil with name showDialogRx(). I subscribe my observer same way as above in Hello World program as we see.


  public static void showDialogRx(final Context context, final String title, final String message, final Observer observer) {

Observable.create(new ObservableOnSubscribe() {
@Override
public void subscribe(final ObservableEmitter e) throws Exception {
final AlertDialog ad = new AlertDialog.Builder(context)
.setTitle(title)
.setMessage(message)
.setPositiveButton(android.R.string.yes, new DialogInterface.OnClickListener() {
public void onClick(DialogInterface dialog, int which) {
e.onNext(true);
e.onComplete();
}
})
.setNegativeButton(android.R.string.no, new DialogInterface.OnClickListener() {
public void onClick(DialogInterface dialog, int which) {
e.onNext(false);
e.onComplete();
}
})
.create();
ad.show();
}
}).subscribe(observer);
}
Now here I want to get the callback return just get the instance of Observer, As like above.

button.setOnClickListener(new View.OnClickListener() {
@Override
public void onClick(View view) {
DialogUtil.showDialogRx(MainActivity.this, "Rx Alert", "Are you love this Rx?", observer);

}
});

Observer observer = new Observer() {
@Override
public void onSubscribe(Disposable d) {

}

@Override
public void onNext(Object value) {
Toast.makeText(MainActivity.this, value.toString(), Toast.LENGTH_LONG).show();
}

@Override
public void onError(Throwable e) {
Toast.makeText(MainActivity.this, "Error "+e, Toast.LENGTH_LONG).show();
}

@Override
public void onComplete() {
Toast.makeText(MainActivity.this, "Completed", Toast.LENGTH_LONG).show();
}
};
See this is pretty easy to understand, Here we do not required any interface or instance of interface. It works automatically all subscribed observers will get notify. This is the one case that we can prefer to use RxJava.

Now Lets take another example to encourage us to use RxJava in building the awesome app. We are using multiple background task in our app to fetch the data from server and display on UI and many more kind of thing we does. To achieve this background task mostly we used async task. But Async task has its own drawback like When your application running multiple async task then we do not know which task will be finished first and all.

Async task is running in activity context and it is partially run by background thread and partially run by Main Thread. In case if Android Os will killed your application because of memory not available at that time then Your activity will be destroy and then context of activity will be destroyed. But async task will be running because its half part will be in background thread. its cause memory leak. Some time error handling in Async task is also very dirty.

If you are dealing with Activity and fragment life cycle by using rxJava then please unsubscribe the Observable emitting to avoid memory leak.

In Rx java it is very stable way we can do or we can switch threads to tell them which thread will be good suite to execute my task. For multiple task you can easily merge your task and cache. This is not only thing you can do much more with RxJava.

Webservice.getNetworkCall()
.subscribeOn(Schedulers.io())
.observeOn(AndroidSchedulers.mainThread())
.subscribe(new Observer() {
@Override
public void onSubscribe(Disposable d) {

}

@Override
public void onNext(String value) {
// handle your request or you can merge any thing
}

@Override
public void onError(Throwable e) {

}

@Override
public void onComplete() {

}
});
So now we can get that why should used RxJava in a Android. this is few things I have pointed but it provides much more and many ways we can use Rxjava in our application to make awesome app. In my next tutorial I will focus some more good features of RxJava that we must to used to build awesome and stable app. Thanks for reading this post.

Service in android part1

$
0
0
Service is the most important component in android. Service is running in background It means that it does not have the user interface. It is an independent of activity means it does not matter if an activity is running or destroyed, service always running in the background. Service is used for long background task it could be anything.

There are two types of service.
1. Started service or unbound service
2. Bound service.

Started service

Started service are those service that started by Activity or broadcast receiver client and it is independent of activity. It will always be running in the background. Service only killed by Android resource when anything happens wrong for example memory is not available or not enough memory to execute the task.

There are two types of started service.

1. Which extends with Service Class
2. Which extends with IntentService Class.

Let's see what are the basic difference between these two services and where we can be used this services?

Service 

Service which is running the main thread it should not be any long operation kind of task. But it does not matter, Here you can create your worker thread also for any long running task.


Service will continue running in the background it does not matter it is completed the task or not, that why it is the cause of draining battery. It will only stop when you need to call the stopSelf() method on particular task Id.  For every task, it contains one task Id. You need to stop the service once it task has completed. So in this case you can avoid battery draining.

If you have started multiple tasks inside the service then it will parallel running all task. We have not sure which task will finish first and which one in last. Whenever you start your service either from Activity or Broadcast Receiver it's life cycle will start executing.

onCreate() -> onStartCommand() -> onDestroy()

import android.app.Service;
import android.content.Intent;
import android.os.IBinder;
import android.support.annotation.Nullable;

/**
* Created by sunil on 25-02-2017.
*/

public class TestService extends Service {

@Override
public void onCreate() {
super.onCreate();
}

@Override
public int onStartCommand(Intent intent, int flags, int startId) {

doSomeTask(startId); // Here you do some task
return super.onStartCommand(intent, flags, startId);

}

@Nullable
@Override
public IBinder onBind(Intent intent) {
return null;
}

@Override
public void onDestroy() {
super.onDestroy();
}

private void doSomeTask(int startId) {

stopSelf(startId); // stop service if your task completed
}
}

onCreate() called means service is created, And after onStartCommand() called it means service running in the background. Here you can execute your task. onDestroy() called means your service has finished or killed.

As I above discussed that your service will destroy or killed by Android OS if anything happened wrong like low memory or memory is not enough to execute the task. But we don't want sometimes our service is stopped, we want it will again restart when memory comes available. In this case, we can make our service as per our requirement. Service provides the option for you to make accordingly. You can set the flag.

1. START_STICKY - When you set your service is started sticky it means it will restart your service again by Android when memory is available to execute the task. But before make sure that you do not pass any intent data because intent data will be lost when service is killed. So we will receive null intent data on startCommand().

2. START_NOT_STICKY - When you set the flag to start not sticky then it will not start your service if it killed by android resource and some more flag are available you can check on the official developer site. You can set your flag as below.

@Override
public int onStartCommand(Intent intent, int flags, int startId) {

doSomeTask(startId); // Here you do some task
return START_STICKY; // you can set the flag as per your requirement.

}

This is all about the service. Let's check about intent service.

IntentService

Intent service is running by the worker thread, not by main thread or UI thread. You can not update any UI here because it always running by the background thread. It can be used for long operation kind of task for example for downloading files from the server etc.

It can also start service from activity or broadcast receiver. When you start service from here its life cycle method will be executed.
onCreate() -> onHandleIntent() -> onDestroy().

import android.app.IntentService;
import android.content.Intent;

/**
* Created by sunil on 25-02-2017.
*/

public class TestIntentService extends IntentService {

public TestIntentService(String s){
super(s);
}

@Override
protected void onHandleIntent(Intent intent) {
doSomeTask(); // do your task
}

private void doSomeTask() {

}

@Override
public void onDestroy() {
super.onDestroy();
}
}

Service is created once called the onCreate() and after it will be running on onHandleIntent(). Here you can do some task. Service will destroy it will be called onDestroy() method.
Intent service automatically stopped once it will complete the task.

If you have multiple tasks running it will handle one task at one time and other tasks will be in a queue.
Once the current task is completed then it will take next task from the queue.

Bound service

Bound service is one that allows binding service with the client. This service will continue running the client unbind it. This service will start running when it bind by bindService(). This kind of service provides the option to the client with either in the same process or different process. For the different process, it binds remotely by IPC (inter-process communication).


Inter-process communication provides to run service in a separate thread or multiple threads. For single thread process it will execute by Messenger and for multiple threads, it will handle by AIDL (Android Interface Definition Language)  for example audio, video playing etc.

Let's first check How it works bind service in the application. Service can bind either from activity or broadcast. What you need to do just call bindService(). For binding the service You need to pass the IBinder instance in onBind() life cycle of service. Whenever your task has completed then unBind() service from the client. Here is an example to understand the concept.

import android.app.Service;
import android.content.Intent;
import android.os.Binder;
import android.os.IBinder;
import android.support.annotation.Nullable;

/**
* Created by sunil on 2/25/2017.
*/

public class MyService extends Service{

private final IBinder mBinder = new LocalService();

@Nullable
@Override
public IBinder onBind(Intent intent) {
return mBinder;
}

public class LocalService extends Binder{

MyService getService(){
return MyService.this;
}
}

public String getFirstMessage(){
return "Hi, I am sunil";
}

public String getSecondMessage(){
return "Good to see you.";
}
}

Let's create an activity to bind this service and access this method inside the client.

import android.app.Service;
import android.content.ComponentName;
import android.content.Context;
import android.content.Intent;
import android.content.ServiceConnection;
import android.os.Bundle;
import android.os.IBinder;
import android.support.annotation.Nullable;
import android.support.v7.app.AppCompatActivity;
import android.view.View;
import android.widget.Button;
import android.widget.Toast;
/**
* Created by sunil on 2/25/2017.
*/

public class BindServiceActivity extends AppCompatActivity {

MyService myService;
private boolean isBind;

@Override
protected void onCreate(@Nullable Bundle savedInstanceState) {
super.onCreate(savedInstanceState);
setContentView(R.layout.activity_bind_service);

((Button) findViewById(R.id.btn_start)).setOnClickListener(new View.OnClickListener() {
@Override
public void onClick(View v) {
getServiceMessage();
}
});
}


private void getServiceMessage() {
// call the localService methods Here
String firstMessage = myService.getFirstMessage();
String secondMessage = myService.getSecondMessage();
Toast.makeText(BindServiceActivity.this, firstMessage + "" + secondMessage, Toast.LENGTH_LONG).show();
}

// Here need to create the service connection
ServiceConnection serviceConnection = new ServiceConnection() {
@Override
public void onServiceConnected(ComponentName name, IBinder service) {
// get the locala service instance
MyService.LocalService localService = (MyService.LocalService) service;
myService = localService.getService();
isBind = true;


}

@Override
public void onServiceDisconnected(ComponentName name) {
isBind = false;
}
};


@Override
protected void onSart() {
super.onStart();
Intent intent = new Intent(this, MyService.class);
bindService(intent, serviceConnection, Context.BIND_AUTO_CREATE);
}

@Override
protected void onStop() {
super.onStop();
if (isBind) {
unbindService(serviceConnection);
}
}
}
Here is required ServiceConnection instance to create the connection between client and server. You can bind the service in onStart() method and unbndService() in onStop() method. But it's per your requirement When we can unbind service.

In my next tutorial, I will focus on IPC Remote connection for bind service for single thread and multiple threads. Here is the link for Service in android part2 (Coming soon).

Thanks for reading this post.

Service in Android part2

$
0
0
In my last tutorial, we learned the basics of service used in the android application.We have understood that what are the basic difference between the Service and Intent Service. We also learned basic of bound Service. If you have not checked the detail then do not wait, Please check this link Service in Android part1.

Now we got one more day to learn something new about the Service that used on the application side. In this article, we will learn about service which using the technique of Messenger and AIDL. Wow Sounds great :).

Bound Service (Messenger and AIDL)

In this article, I am focusing on the bound services which are running in the background in the different process in the single thread and multi-tread environment. If we talk about the Single thread for sending the message in a queue the first thing comes in mind is that Messenger.


Messenger 

Messenger will process the message in a different process by using IPC (Inter Process Communication) remote technique to communicate with client and server. Messenger will be coupled with the handler, hence all the task will be in queue process in a Single thread by Handler.

For bind the service what you need to do with pass the Messenger instance reference in onBind() method and pass the reference of handler while creating the Messenger instance. Here message will be carried in the format of the bundle with Messenger that it awesome. Let's see for example to create one service which runs in the different process by using Messenger which is the coupled by Handler.

import android.app.Service;
import android.content.Intent;
import android.os.Bundle;
import android.os.Handler;
import android.os.IBinder;
import android.os.Message;
import android.os.Messenger;
import android.os.RemoteException;
import android.support.annotation.Nullable;
import android.widget.Toast;

/**
* Created by sunil on 2/26/2017.
*/

public class MyServiceIPC extends Service {

public static final int JOB_1 = 1;
public static final int JOB_RESPONSE_1 = 2;

Messenger messenger = new Messenger(new IncomingHandler());

@Nullable
@Override
public IBinder onBind(Intent intent) {
return messenger.getBinder();
}

class IncomingHandler extends Handler {
@Override
public void handleMessage(Message msg) {

Message message;
Bundle bundle = new Bundle();
String messageText;

switch (msg.what) {
case JOB_1:
messageText = msg.getData().getString("message");
message = Message.obtain(null, JOB_RESPONSE_1);
Toast.makeText(getApplicationContext(),messageText , Toast.LENGTH_SHORT).show();
bundle.putString("message_res", messageText.toUpperCase());
message.setData(bundle);
Messenger activityMessenger = msg.replyTo;
try {
activityMessenger.send(message);
} catch (RemoteException e) {
e.printStackTrace();
}
break;
default:
super.handleMessage(msg);
}

}
}
}
Now let's create activity class to bind this service to send the message to this server and again send back this response from server to client by using Messenger process by the handler.

import android.app.Service;
import android.content.ComponentName;
import android.content.Context;
import android.content.Intent;
import android.content.ServiceConnection;
import android.os.Bundle;
import android.os.Handler;
import android.os.IBinder;
import android.os.Message;
import android.os.Messenger;
import android.os.RemoteException;
import android.support.annotation.Nullable;
import android.support.v7.app.AppCompatActivity;
import android.view.View;
import android.widget.Button;
import android.widget.EditText;
import android.widget.Toast;

import com.example.testapp.R;

/**
* Created by sunil on 2/26/2017.
*/

public class BindServiceIPCActivity extends AppCompatActivity {

private Button btnSend;
private EditText editText;
private Messenger messenger;
private boolean isBound;
private final Messenger mActivityMessenger = new Messenger(
new ResponseTakeHandler(this));


@Override
protected void onCreate(@Nullable Bundle savedInstanceState) {
super.onCreate(savedInstanceState);
setContentView(R.layout.activity_bind_ipc);

editText = (EditText)findViewById(R.id.messageEditText);
btnSend = (Button)findViewById(R.id.sendButton);
btnSend.setOnClickListener(new View.OnClickListener() {
@Override
public void onClick(View v) {

String messageText = editText.getText().toString();
if (messageText.isEmpty()){
Toast.makeText(BindServiceIPCActivity.this, "Please enter message", Toast.LENGTH_LONG).show();
}else{
Message message = Message.obtain(null,MyServiceIPC.JOB_1);
Bundle bundle = new Bundle();
bundle.putString("message", messageText);
message.setData(bundle);
message.replyTo = mActivityMessenger;
try {
messenger.send(message);
} catch (RemoteException e) {
e.printStackTrace();
}
}

}
});

}

@Override
protected void onStart() {
super.onStart();
if (!isBound) {
// start service here
Intent intent = new Intent(BindServiceIPCActivity.this, MyServiceIPC.class);
bindService(intent, serviceConnection, Context.BIND_AUTO_CREATE);
}
}

@Override
protected void onStop() {
super.onStop();
isBound = false;
messenger = null;
}

ServiceConnection serviceConnection = new ServiceConnection() {
@Override
public void onServiceConnected(ComponentName name, IBinder service) {
messenger = new Messenger(service);
isBound = true;
}

@Override
public void onServiceDisconnected(ComponentName name) {
isBound = false;
messenger = null;

}
};


public class ResponseTakeHandler extends Handler{

public ResponseTakeHandler(Context context){

}
@Override
public void handleMessage(Message msg) {

switch (msg.what){
case MyServiceIPC.JOB_RESPONSE_1:
String result = msg.getData().getString("message_res");
Toast.makeText(BindServiceIPCActivity.this, "Response: "+result, Toast.LENGTH_LONG).show();
break;
default:
super.handleMessage(msg);
}

}
}

}
Here also required the Service Connection to build the connection between the client and the server. The handler will process the response of Messenger and update the user interface. But one more thing does not forget to add this service in AndroidManifest.xml.

<service android:name=".bindservice.ipc.MyServiceIPC" android:process=":remote"/>
Here is the XML file

<?xml version="1.0" encoding="utf-8"?>
<LinearLayout xmlns:android="http://schemas.android.com/apk/res/android"
android:orientation="vertical" android:layout_width="match_parent"
android:layout_height="match_parent"
android:padding="10dp">

<EditText
android:layout_width="match_parent"
android:layout_height="wrap_content"
android:hint="Enter message here"
android:id="@+id/messageEditText"/>

<Button
android:layout_marginTop="10dp"
android:id="@+id/sendButton"
android:layout_width="match_parent"
android:layout_height="wrap_content"
android:background="@color/colorPrimary"
android:textColor="#fff"
android:text="Send IPC Message"/>

</LinearLayout>
That great! Please see this snap to understand.


Wow, Messenger is awesome to communicate between server and client. In my next tutorial, we will check how is AIDL works in different process.

Thanks for reading this post.

Service in Android part3

$
0
0
In my last tutorial, I have addressed the basic of services of both types of Started and Bound service. I will recommend checking my last tutorial link before reading this post. Here is the link of Service in Android part1 and Service in Android part2. Thanks for reading.

Wow, Today we got one more day to learn something new about the bound service feature. In this category Today, We will learn about the AIDL.

 AIDL 

AIDL means android interface definition language.It can process any task remotely by using IPC technique. Android has a strong mechanism to communicate between service and client through IPC technique. AIDL process the data between clients remotely and safely onlything is required that client should be bind with this services. AIDL support to process the generic data by using the Parcelable. Data processing through Parcelable is fast in IPCmechanism. Different process means I am talking about the communication between two different applications.

Let's take a simple word to define AIDL IPC mechanism, suppose you have App1 consider as a remote server that running AIDL service. What does this service? it gets the list of users information of table and process data to the client or any business logic that get information from the client and do some task and give a response back to the client (It means App2). Here the user model should be Parcelable for fast communication.

I think it's big complex example, Let's give another simple example to explain. I want to multiply for given two numbers. I will pass two different numbers as input and will tell to AIDL service to give the result as a response back to me. Ohh Wow This is pretty simple and easy to understand.  I took simple task here but it can take any long background task to the process, for example, downloading any audio or video files from the server.


For communication with two different apps or process, I need to create the AIDL file in the same package of both apps. Why AIDL is required on client side also it will create the copy of proxy for remote access.

Let's create two different android studio project for App1 and App2. 

MultiplyNumberAidl.aidl


// MultiplyNumberAidl.aidl
package com.example.testapp;

// Declare any non-default types here with import statements

interface MultiplyNumberAidl {

int multiply(in int firstNumber, in int secondNumber);
}


AidlService.java


import android.app.Service;
import android.content.Intent;
import android.os.IBinder;
import android.os.RemoteException;
import android.support.annotation.Nullable;

import com.example.testapp.MultiplyNumberAidl;

/**
* Created by sunil on 4/03/2017.
*/

public class AidlService extends Service{

@Nullable
@Override
public IBinder onBind(Intent intent) {
return new MultiplyNumberAidl.Stub() {
@Override
public int multiply(int firstNumber, int secondNumber) throws RemoteException {
return (firstNumber * secondNumber);
}
};
}
}

You need to set the build and sync to access the aidl file.

build.gradle app level


sourceSets {
main {
aidl.srcDirs = ['src/main/aidl']
}
}

Add the service in AndroidManifest.xml file.


<service android:name=".bindservice.ipc.aidl.AidlService" android:process=":remote">
<intent-filter>
<action android:name="com.example.testapp.bindservice.ipc.aidl.MultiplyNumberAidl" />
</intent-filter>
</service>
Now in App2, I will try to access the service to get the result. You need to bind via explicit intent service with the client by ServiceConnection.

MultiplyNumberAidlActivity.java


import android.content.ComponentName;
import android.content.Context;
import android.content.Intent;
import android.content.ServiceConnection;
import android.content.pm.PackageManager;
import android.content.pm.ResolveInfo;
import android.os.Bundle;
import android.os.IBinder;
import android.os.RemoteException;
import android.support.annotation.Nullable;
import android.support.v7.app.AppCompatActivity;
import android.view.View;
import android.widget.Button;
import android.widget.EditText;
import android.widget.Toast;

import com.example.contentprovideraccess.R;
import com.example.testapp.MultiplyNumberAidl;

import java.util.List;

import butterknife.BindView;
import butterknife.ButterKnife;

/**
* Created by sunil on 04/03/2017.
*/

public class MultiplyNumberAidlActivity extends AppCompatActivity {

@BindView(R.id.editText_First)
EditText firstNumEditText;
@BindView(R.id.editText_Second)
EditText secondNumEditText;
@BindView(R.id.addButton)
Button btnAdd;

MultiplyNumberAidl aidlService;

@Override
protected void onCreate(@Nullable Bundle savedInstanceState) {
super.onCreate(savedInstanceState);
setContentView(R.layout.activity_aidl);
ButterKnife.bind(this);

initView();
}

private void initView() {

btnAdd.setOnClickListener(new View.OnClickListener() {
@Override
public void onClick(View v) {
String firstNumber = firstNumEditText.getText().toString().trim();
String secondNumber = secondNumEditText.getText().toString().trim();
int multiply= -1;
if (firstNumber.isEmpty() && secondNumber.isEmpty()){
Toast.makeText(MultiplyNumberAidlActivity.this, "Please enter first and second number.", Toast.LENGTH_SHORT).show();
}else{
try {
multiply = aidlService.multiply(Integer.valueOf(firstNumber), Integer.valueOf(secondNumber));
} catch (RemoteException e) {
e.printStackTrace();
}
Toast.makeText(MultiplyNumberAidlActivity.this, ""+multiply, Toast.LENGTH_SHORT).show();
}
}
});

}

@Override
protected void onStart() {
super.onStart();
Intent intent = new Intent("com.example.testapp.bindservice.ipc.aidl.MultiplyNumberAidl");
Intent updateIntent = createExplicitFromImplicitIntent(MultiplyNumberAidlActivity.this, intent);
bindService(updateIntent, serviceConnection, Context.BIND_AUTO_CREATE);

}

public static Intent createExplicitFromImplicitIntent(Context context, Intent implicitIntent) {
//Retrieve all services that can match the given intent
PackageManager pm = context.getPackageManager();
List resolveInfo = pm.queryIntentServices(implicitIntent, 0);

//Make sure only one match was found
if (resolveInfo == null || resolveInfo.size() != 1) {
return null;
}

//Get component info and create ComponentName
ResolveInfo serviceInfo = resolveInfo.get(0);
String packageName = serviceInfo.serviceInfo.packageName;
String className = serviceInfo.serviceInfo.name;
ComponentName component = new ComponentName(packageName, className);

//Create a new intent. Use the old one for extras and such reuse
Intent explicitIntent = new Intent(implicitIntent);

//Set the component to be explicit
explicitIntent.setComponent(component);

return explicitIntent;
}

ServiceConnection serviceConnection = new ServiceConnection() {
@Override
public void onServiceConnected(ComponentName name, IBinder service) {
aidlService = MultiplyNumberAidl.Stub.asInterface(service);
}

@Override
public void onServiceDisconnected(ComponentName name) {
aidlService = null;
}
};
}

activity_aidl.xml


<?xml version="1.0" encoding="utf-8"?>
<RelativeLayout xmlns:android="http://schemas.android.com/apk/res/android"
android:orientation="vertical" android:layout_width="match_parent"
android:layout_height="match_parent"
android:padding="10dp">

<EditText
android:maxLength="3"
android:inputType="number"
android:id="@+id/editText_First"
android:layout_width="match_parent"
android:layout_height="wrap_content"
android:hint="Enter First Number"/>

<EditText
android:maxLength="3"
android:inputType="number"
android:layout_marginTop="10dp"
android:layout_below="@+id/editText_First"
android:layout_width="match_parent"
android:layout_height="wrap_content"
android:id="@+id/editText_Second"
android:hint="Enter Second Number"/>

<Button
android:layout_marginTop="10dp"
android:layout_below="@+id/editText_Second"
android:layout_width="match_parent"
android:layout_height="wrap_content"
android:text="Multiply"
android:id="@+id/addButton"
android:background="@color/colorPrimary"
android:textColor="#fff"/>

</RelativeLayout>
Here is snapshot to understand.


Wow AIDL is the really awesome feature of service that running in the background in multi-thread environment and its IPC mechanism is very strong to communicate remotely.

Thanks for reading this post.

Content Provider in Android

$
0
0

In my last tutorial, I have discussed the service that is the most important component in android. I would be recommended to you, please check all post related android services. Here are the details of link Service in Android Part1Service in Android Part2 and Service in Android Part3.

Now In this article, I am focusing on the share the content from different -2 ways. We will check that how many ways we can share the content to multiple apps. What are the best procedure and which is most recommended by android?

Ok, Let's see how many ways we can share the data from an app to multiple apps. Actually, you can share the content many ways but some of all are not recommended by an android framework.

1. Share the shared preference to other apps.
2. Share the SQLite database to other apps.
3. Share the internal storage files
4. Share data with content provider (recommended)
5. Share data by AIDL service
6. Share data by TCP/IP or HTTP network communication.

I have pointed some of the mechanism that we can share the content with other applications. It might be many more mechanisms also available for sharing but these are the basics that everyone is known for sharing data. The first point is here sharing the shared preference data to other apps. If we talk about the SharedPreferenece it means that we can store limited data. You can not share the huge data from this way. For a small amount of data if you want to share then its possible and make sure the database would be public for share. If you made private then is difficult to share the data,  Data has stored in device sandbox that not have permission to access by any other apps. We are using SharedPreference for storing the user information.

For a large amount of data,  if you want to share then you can share by SQLite database. You can access the database tables and data of each table by simple SQL query. You can make a copy of SQLite DB into assets folder for access the data. Or the other one is shared by storage files. It does not need to explanation it is pretty simple. You can write the information into storage files of sd card and shared the files to other applications.

Content Provider is the recommended by the Android framework to share any data from one app to other apps. By name it clear that it provide the content data to any application. Content Resolver is the mediator to help to get access the share data. By ContentResolver you can make the query on Content Provide which kind of data you want to access. It works well in the different process to share the content data with multiple apps.

Even You can share data from the ADIL IPC mechanism. IPC remote mechanism is very strong to get access data from one application to other applications. Here other applications need to bind remotely. I have already focused here Service in Android Part3.

You can share data from HTTP request to any other application. But it required the internet connection to get the data from the server.

Let's create the App1 that maintain the database as a provider. We need to make the method synchronized to avoid the collision.  It makes the method thread safe if multiple thread access the same method subsequently. Content Provider works very well in the different process. Here is uploaded the video that helps you to understand.


Article.java


import android.content.ContentValues;
import android.database.Cursor;

/**
* Created by sunil on 3/11/2017.
*/

public class Article {

public static final String TABLE_NAME = "Article";

// Naming the id column with an underscore is good to be consistent
// with other Android things. This is ALWAYS needed
public static final String ARTICLE_ID = "_id";
// These fields can be anything you want.
public static final String TITLE = "title";
public static final String DESCRIPTION = "description";
public static final String AUTHOR_NAME = "author";

public long id = -1;
public String title = "";
public String description = "";
public String author = "";

public Article(){

}

public static final String CREATE_TABLE =
"CREATE TABLE " + TABLE_NAME + "("
+ ARTICLE_ID + " INTEGER PRIMARY KEY,"
+ TITLE + " TEXT NOT NULL DEFAULT '',"
+ DESCRIPTION + " TEXT NOT NULL DEFAULT '',"
+ AUTHOR_NAME + " TEXT NOT NULL DEFAULT ''"
+ ")";

public Article(final Cursor cursor) {
// Indices expected to match order in FIELDS!
this.id = cursor.getLong(0);
this.title = cursor.getString(1);
this.description = cursor.getString(2);
this.author = cursor.getString(3);
}


public ContentValues getContent(Article article) {
final ContentValues values = new ContentValues();
// Note that ID is NOT included here
values.put(TITLE, article.getTitle());
values.put(DESCRIPTION, article.getDescription());
values.put(AUTHOR_NAME, article.getAuthor());
return values;
}

public static final String[] FIELDS = { ARTICLE_ID, TITLE, DESCRIPTION, AUTHOR_NAME };

public String getTitle() {
return title;
}

public void setTitle(String title) {
this.title = title;
}

public String getDescription() {
return description;
}

public void setDescription(String description) {
this.description = description;
}

public String getAuthor() {
return author;
}

public void setAuthor(String author) {
this.author = author;
}
}

DatabaseHelper.java


import android.content.Context;
import android.database.Cursor;
import android.database.sqlite.SQLiteDatabase;
import android.database.sqlite.SQLiteOpenHelper;

import java.util.ArrayList;
import java.util.List;

/**
* Created by sunil on 03/11/2017.
*/

public class DatabaseHelper extends SQLiteOpenHelper{

private static final int DATABASE_VERSION = 1;
private static final String DATABASE_NAME = "AndroidPoint";
private final Context context;

private static DatabaseHelper databaseHandlerInstance;

public static DatabaseHelper getInstance(final Context context) {
if (databaseHandlerInstance == null) {
databaseHandlerInstance = new DatabaseHelper(context);
}
return databaseHandlerInstance;
}

public DatabaseHelper(Context context){
super(context, DATABASE_NAME, null, DATABASE_VERSION);
this.context = context.getApplicationContext();
}

@Override
public void onCreate(SQLiteDatabase db) {
db.execSQL(Article.CREATE_TABLE);

Article article = new Article();
article.setTitle("Service in android part1");;
article.setDescription("Service is important component");
article.setAuthor("sunil");
db.insert(Article.TABLE_NAME, null, article.getContent(article));

Article article1 = new Article();
article1.setTitle("Service in android part2");
article1.setDescription("Service is running in background.");
article1.setAuthor("sunil");
db.insert(Article.TABLE_NAME, null, article.getContent(article1));
}

@Override
public void onUpgrade(SQLiteDatabase db, int oldVersion, int newVersion) {

}

public synchronized Article getArticle(final long id) {
final SQLiteDatabase db = this.getReadableDatabase();
final Cursor cursor = db.query(Article.TABLE_NAME, Article.FIELDS,
Article.ARTICLE_ID + " IS ?", new String[] { String.valueOf(id) },
null, null, null, null);
if (cursor == null || cursor.isAfterLast()) {
return null;
}

Article item = null;
if (cursor.moveToFirst()) {
item = new Article(cursor);
}
cursor.close();
return item;
}

public synchronized List getAllArticle() {
List articleList = new ArrayList<>();
final SQLiteDatabase db = this.getReadableDatabase();
final Cursor cursor = db.query(Article.TABLE_NAME, Article.FIELDS,
null, null, null, null, null, null);
try {
while (cursor.moveToNext()) {
Article article = new Article();
article.setTitle(cursor.getString(1));
article.setDescription(cursor.getString(2));
article.setAuthor( cursor.getString(3));
articleList.add(article);
}
} finally {
cursor.close();
}
return articleList;
}

public synchronized boolean addArticle(final Article article) {
boolean success = false;
int result = 0;
final SQLiteDatabase db = this.getWritableDatabase();

if (article.id > -1) {
result += db.update(Article.TABLE_NAME, article.getContent(article),
Article.ARTICLE_ID + " IS ?",
new String[] { String.valueOf(article.id) });
}

if (result > 0) {
success = true;
} else {
// Update failed or wasn't possible, insert instead
final long id = db.insert(Article.TABLE_NAME, null,
article.getContent(article));

if (id > -1) {
article.id = id;
success = true;
}
}

if (success) {
notifyProviderOnArticleChange();
}

return success;
}


private void notifyProviderOnArticleChange() {
context.getContentResolver().notifyChange(ArticleProvider.URI_ARTICLE, null, false);
}
}

ArticleProvider.java


import android.content.ContentProvider;
import android.content.ContentValues;
import android.database.Cursor;
import android.net.Uri;
import android.support.annotation.Nullable;

/**
* Created by sunil on 3/11/2017.
*/

public class ArticleProvider extends ContentProvider{

public static final String AUTHORITY = "com.example.testapp.contentprovider";
public static final String SCHEME = "content://";

// URIs
// Used for all articles
public static final String ARTICLES = SCHEME + AUTHORITY + "/article";
public static final Uri URI_ARTICLE = Uri.parse(ARTICLES);
// Used for a single Article, just add the id to the end
public static final String ARTICLE_BASE = ARTICLES + "/";

public ArticleProvider(){

}

@Override
public boolean onCreate() {
return true;
}

@Nullable
@Override
public Cursor query(Uri uri, String[] projection, String selection, String[] selectionArgs, String sortOrder) {
Cursor result = null;
if (URI_ARTICLE.equals(uri)) {
result = DatabaseHelper.getInstance(getContext()).getReadableDatabase()
.query(Article.TABLE_NAME, Article.FIELDS, null, null, null, null, null, null);
result.setNotificationUri(getContext().getContentResolver(), URI_ARTICLE);

} else if (uri.toString().startsWith(ARTICLE_BASE)) {
final long id = Long.parseLong(uri.getLastPathSegment());
result = DatabaseHelper.getInstance(getContext()).getReadableDatabase()
.query(Article.TABLE_NAME, Article.FIELDS,
Article.ARTICLE_ID + " IS ?",
new String[] { String.valueOf(id) }, null, null, null, null);

result.setNotificationUri(getContext().getContentResolver(), URI_ARTICLE);
} else {
throw new UnsupportedOperationException("Not yet implemented");
}
return result;
}

@Nullable
@Override
public String getType(Uri uri) {
throw new UnsupportedOperationException("Not yet implemented");
}

@Nullable
@Override
public Uri insert(Uri uri, ContentValues values) {
throw new UnsupportedOperationException("Not yet implemented");
}

@Override
public int delete(Uri uri, String selection, String[] selectionArgs) {
throw new UnsupportedOperationException("Not yet implemented");
}

@Override
public int update(Uri uri, ContentValues values, String selection, String[] selectionArgs) {
throw new UnsupportedOperationException("Not yet implemented");
}
}

AddArticleActivity.java


import android.os.Bundle;
import android.support.annotation.Nullable;
import android.support.v7.app.AppCompatActivity;
import android.widget.Button;
import android.widget.EditText;
import android.widget.Toast;

import com.example.testapp.R;

import butterknife.BindView;
import butterknife.ButterKnife;
import butterknife.OnClick;

/**
* Created by sunil on 11-03-2017.
*/

public class AddArticleActivity extends AppCompatActivity {

@BindView(R.id.articleName)
EditText articleName;
@BindView(R.id.articleDesc)
EditText articleDesc;
@BindView(R.id.addButton)
Button addButton;

DatabaseHelper db;

@Override
protected void onCreate(@Nullable Bundle savedInstanceState) {
super.onCreate(savedInstanceState);
setContentView(R.layout.add_article_activity);
ButterKnife.bind(this);

db = DatabaseHelper.getInstance(this);
}

@OnClick(R.id.addButton)
public void addArticle(){
String articleTitle = articleName.getText().toString();
String articleDescription = articleDesc.getText().toString();
if (articleTitle.isEmpty() && articleDescription.isEmpty()){
Toast.makeText(AddArticleActivity.this, "Please enter details.", Toast.LENGTH_LONG).show();
}else{
Article article = new Article();
article.setTitle(articleTitle);
article.setDescription(articleDescription);
article.setAuthor("Sunil");
db.addArticle(article);

finish();
}

}
}

add_article_activity.xml


<?xml version="1.0" encoding="utf-8"?>
<RelativeLayout xmlns:android="http://schemas.android.com/apk/res/android"
android:orientation="vertical" android:layout_width="match_parent"
android:layout_height="match_parent"
android:padding="10dp">

<EditText
android:id="@+id/articleName"
android:layout_width="match_parent"
android:layout_height="wrap_content"
android:hint="Enter Article"
/>

<EditText
android:layout_marginTop="10dp"
android:layout_below="@+id/articleName"
android:id="@+id/articleDesc"
android:layout_width="match_parent"
android:layout_height="wrap_content"
android:hint="Enter Article Description"
/>

<Button
android:textColor="#fff"
android:background="@color/colorPrimary"
android:layout_alignParentBottom="true"
android:id="@+id/addButton"
android:layout_width="match_parent"
android:layout_height="wrap_content"
android:text="Add Article"/>

</RelativeLayout>

So this is the App1 that contain the data. Now Let's access this data on App2 by using the content provider.

MainActivity.java


import android.content.ContentProviderClient;
import android.content.DialogInterface;
import android.content.Intent;
import android.content.pm.PackageManager;
import android.database.Cursor;
import android.net.Uri;
import android.os.Bundle;
import android.os.RemoteException;
import android.support.v4.app.ActivityCompat;
import android.support.v4.content.ContextCompat;
import android.support.v7.app.AlertDialog;
import android.support.v7.app.AppCompatActivity;
import android.support.v7.widget.LinearLayoutManager;
import android.support.v7.widget.RecyclerView;
import android.view.View;
import android.widget.Button;
import android.widget.Toast;

import com.example.contentprovideraccess.aidl.MultiplyNumberAidlActivity;

import java.util.ArrayList;
import java.util.List;

import butterknife.BindView;
import butterknife.ButterKnife;

public class MainActivity extends AppCompatActivity {

@BindView(R.id.recyclerView)
RecyclerView recyclerView;
@BindView(R.id.aidlButton)
Button aidlButton;

private ArticleAdapter articleAdapter;

@Override
protected void onCreate(Bundle savedInstanceState) {
super.onCreate(savedInstanceState);
setContentView(R.layout.activity_main);
ButterKnife.bind(this);

initView();
}

private void initView() {
recyclerView.setLayoutManager(new LinearLayoutManager(this));
List
list = getArticles();
articleAdapter = new ArticleAdapter(this, list);
recyclerView.setAdapter(articleAdapter);

}

private List getArticles() {
List articleList = new ArrayList<>();
String ARTICLES_URI = "content://com.example.testapp.contentprovider/article";
Uri uri = Uri.parse(ARTICLES_URI);

/* ContentProvider cp = getContentResolver().acquireContentProviderClient(uri).getLocalContentProvider();
ArticleProvider articleProvider = (ArticleProvider)cp; // for same process*/

// for different process
ContentProviderClient contentProviderClient = getContentResolver().acquireContentProviderClient(uri); // for different process
if (contentProviderClient != null) {
Cursor cursor = null;
String[] FIELDS = {"_id", "title", "description", "author"};
try {
cursor = contentProviderClient.query(uri, FIELDS, null, null, null);
} catch (RemoteException e) {
e.printStackTrace();
}
try {
while (cursor.moveToNext()) {
Article article = new Article();
article.setTitle(cursor.getString(1));
article.setDescription(cursor.getString(2));
article.setAuthor(cursor.getString(3));
articleList.add(article);
}
} finally {
cursor.close();
}
} else {
Toast.makeText(MainActivity.this, "Looks like provider is not available", Toast.LENGTH_LONG).show();
}
return articleList;
}

}
Thanks for the reading post.


Viewing all 106 articles
Browse latest View live