Quantcast
Channel: Android point
Viewing all 106 articles
Browse latest View live

Custom ListView AlertDialog With Filter and Search

$
0
0
Hi Guys,

I hope this tutorial might be helpful to all android developer to search or filter the item of the custom list view.
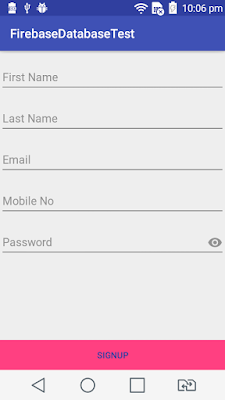
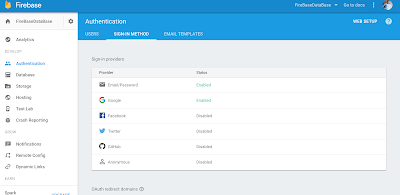
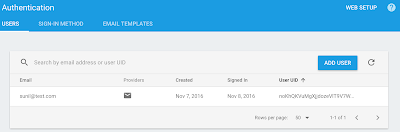
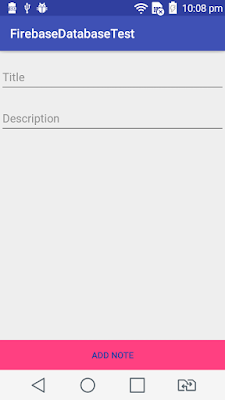
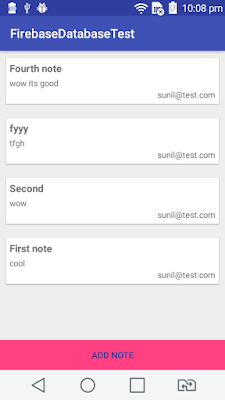
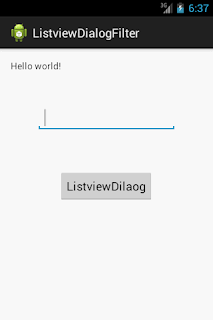
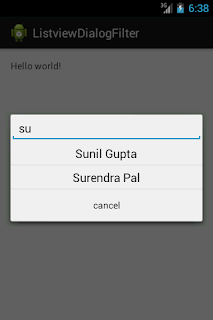
Here the list view which shows in Alert-dialog. And we can search the item of the list view.

Here I am creating the ListView and Editext programatically and search the item of the list view.
So lets start the coding to search the item of the listview in alert dialog.


Main_activity.xml


alertlistrow.xml


MainActivity.java

package com.sunil.listviewdialog;

import java.util.ArrayList;
import java.util.Arrays;

import android.app.Activity;
import android.app.AlertDialog;
import android.content.DialogInterface;
import android.os.Bundle;
import android.text.Editable;
import android.text.TextWatcher;
import android.view.View;
import android.view.View.OnClickListener;
import android.widget.AdapterView;
import android.widget.AdapterView.OnItemClickListener;
import android.widget.Button;
import android.widget.EditText;
import android.widget.LinearLayout;
import android.widget.ListView;

public class MainActivity extends Activity implements OnClickListener, OnItemClickListener{

private Button btn_listviewdialog=null;
private EditText txt_item=null;
private String TitleName[]={"Sunil Gupta","Ram Chnadra"," Abhishek Tripathi","Amit Verma","Sandeep Pal","Awadhesh Diwakar","Shishir Verma","Ravi Vimal","Prabhakr Singh","Manish Srivastva","Jitendra Singh","Surendra Pal"};
private ArrayList array_sort;
int textlength=0;
private AlertDialog myalertDialog=null;
@Override
protected void onCreate(Bundle savedInstanceState) {
super.onCreate(savedInstanceState);
setContentView(R.layout.activity_main);

txt_item=(EditText)findViewById(R.id.editText_item);
btn_listviewdialog=(Button)findViewById(R.id.button_listviewdialog);
btn_listviewdialog.setOnClickListener(this);
}
@Override
public void onClick(View arg0) {

AlertDialog.Builder myDialog = new AlertDialog.Builder(MainActivity.this);

final EditText editText = new EditText(MainActivity.this);
final ListView listview=new ListView(MainActivity.this);
editText.setCompoundDrawablesWithIntrinsicBounds(R.drawable.discoverseed_larg1, 0, 0, 0);
array_sort=new ArrayList (Arrays.asList(TitleName));
LinearLayout layout = new LinearLayout(MainActivity.this);
layout.setOrientation(LinearLayout.VERTICAL);
layout.addView(editText);
layout.addView(listview);
myDialog.setView(layout);
CustomAlertAdapter arrayAdapter=new CustomAlertAdapter(MainActivity.this, array_sort);
listview.setAdapter(arrayAdapter);
listview.setOnItemClickListener(this);
editText.addTextChangedListener(new TextWatcher()
{
public void afterTextChanged(Editable s){

}
public void beforeTextChanged(CharSequence s,
int start, int count, int after){

}
public void onTextChanged(CharSequence s, int start, int before, int count)
{
editText.setCompoundDrawablesWithIntrinsicBounds(0, 0, 0, 0);
textlength = editText.getText().length();
array_sort.clear();
for (int i = 0; i < TitleName.length; i++)
{
if (textlength <= TitleName[i].length())
{

if(TitleName[i].toLowerCase().contains(editText.getText().toString().toLowerCase().trim()))
{
array_sort.add(TitleName[i]);
}
}
}
listview.setAdapter(new CustomAlertAdapter(MainActivity.this, array_sort));
}
});
myDialog.setNegativeButton("cancel", new DialogInterface.OnClickListener() {

@Override
public void onClick(DialogInterface dialog, int which) {
dialog.dismiss();
}
});

myalertDialog=myDialog.show();

}
@Override
public void onItemClick(AdapterView arg0, View arg1, int position, long arg3) {

myalertDialog.dismiss();
String strName=TitleName[position];
txt_item.setText(strName);
}

}

CustomAlertAdapter.java

package com.sunil.listviewdialog;

import java.util.ArrayList;

import android.app.Activity;
import android.content.Context;
import android.view.LayoutInflater;
import android.view.View;
import android.view.ViewGroup;
import android.widget.BaseAdapter;
import android.widget.TextView;

public class CustomAlertAdapter extends BaseAdapter{

Context ctx=null;
ArrayList listarray=null;
private LayoutInflater mInflater=null;
public CustomAlertAdapter(Activity activty, ArrayList list)
{
this.ctx=activty;
mInflater = activty.getLayoutInflater();
this.listarray=list;
}
@Override
public int getCount() {

return listarray.size();
}

@Override
public Object getItem(int arg0) {
return null;
}

@Override
public long getItemId(int arg0) {
return 0;
}

@Override
public View getView(int position, View convertView, ViewGroup arg2) {
final ViewHolder holder;
if (convertView == null ) {
holder = new ViewHolder();
convertView = mInflater.inflate(R.layout.alertlistrow, null);

holder.titlename = (TextView) convertView.findViewById(R.id.textView_titllename);
convertView.setTag(holder);
}
else {
holder = (ViewHolder) convertView.getTag();
}

String datavalue=listarray.get(position);
holder.titlename.setText(datavalue);

return convertView;
}

private static class ViewHolder {
TextView titlename;
}
}


You can download the source code CustomListviewFilter.
Cheers Guys! 

PayPal Android SDK With Multiple In-App Payment

$
0
0
Hi Guys,

I hope this tutorial and article might be helpful for all android developer to make a multiple payment with this new android sdk pay pal in app.
PayPal announced a new Android SDK that tries to make it easier for developers to accept in-app payments on Google’s mobile platform.
As expected, the Android payments solution accepts both PayPal and credit card payments. The company says it is quick and easy to use, and “removes payment friction so developers can focus on creating amazing experiences.”

PayPal’s strategy is to make it as easy as possible for mobile developers to integrate its payments into their work. The pitch is simple: if consumers don’t have to leave your app to pay, and they can do so in more ways than one (click a PayPal button or scan a credit/debit card), they will be more likely to do so.

The new PayPal Android SDK supports Android version 2.2 and up. The new Android payment solution will allow developers to accept payments via PayPal and via credit cards. PayPal believes that giving users the option to pay quickly and easily via their PayPal account or by scanning a credit card will lure more customers into paying developers for their work.

PayPal says that it is also offering security features that will allow developers to “significantly reduce” fraud they encounter with payments. So I think that its really amazing concept for android developer.
More in detail visit the pay pal developer site and git-hub repository Pay Pay Developer.


main_activity.xml


MainActivity.java

package com.paypal.sunil.paypalandroidsdk;

import java.math.BigDecimal;

import org.json.JSONException;

import android.app.Activity;
import android.content.Intent;
import android.os.Bundle;
import android.util.Log;
import android.view.View;

import com.paypal.android.sdk.payments.PayPalPayment;
import com.paypal.android.sdk.payments.PayPalService;
import com.paypal.android.sdk.payments.PaymentActivity;
import com.paypal.android.sdk.payments.PaymentConfirmation;

public class MainActivity extends Activity {

// set to PaymentActivity.ENVIRONMENT_LIVE to move real money.
// set to PaymentActivity.ENVIRONMENT_SANDBOX to use your test credentials from https://developer.paypal.com
// set to PaymentActivity.ENVIRONMENT_NO_NETWORK to kick the tires without communicating to PayPal's servers.
private static final String CONFIG_ENVIRONMENT = PaymentActivity.ENVIRONMENT_NO_NETWORK;

// note that these credentials will differ between live & sandbox environments.
private static final String CONFIG_CLIENT_ID = "credential from developer.paypal.com";
// when testing in sandbox, this is likely the -facilitator email address.
private static final String CONFIG_RECEIVER_EMAIL = "matching paypal email address";

@Override
protected void onCreate(Bundle savedInstanceState) {
super.onCreate(savedInstanceState);
setContentView(R.layout.activity_main);

Intent intent = new Intent(this, PayPalService.class);

intent.putExtra(PaymentActivity.EXTRA_PAYPAL_ENVIRONMENT, CONFIG_ENVIRONMENT);
intent.putExtra(PaymentActivity.EXTRA_CLIENT_ID, CONFIG_CLIENT_ID);
intent.putExtra(PaymentActivity.EXTRA_RECEIVER_EMAIL, CONFIG_RECEIVER_EMAIL);

startService(intent);
}

public void onBuyPressed(View pressed) {
PayPalPayment thingToBuy = new PayPalPayment(new BigDecimal("1.75"), "USD", "hipster jeans");

Intent intent = new Intent(this, PaymentActivity.class);

intent.putExtra(PaymentActivity.EXTRA_PAYPAL_ENVIRONMENT, CONFIG_ENVIRONMENT);
intent.putExtra(PaymentActivity.EXTRA_CLIENT_ID, CONFIG_CLIENT_ID);
intent.putExtra(PaymentActivity.EXTRA_RECEIVER_EMAIL, CONFIG_RECEIVER_EMAIL);

// It's important to repeat the clientId here so that the SDK has it if Android restarts your
// app midway through the payment UI flow.
intent.putExtra(PaymentActivity.EXTRA_CLIENT_ID, "credential-from-developer.paypal.com");
intent.putExtra(PaymentActivity.EXTRA_PAYER_ID, "your-customer-id-in-your-system");
intent.putExtra(PaymentActivity.EXTRA_PAYMENT, thingToBuy);

startActivityForResult(intent, 0);
}

@Override
protected void onActivityResult (int requestCode, int resultCode, Intent data) {
if (resultCode == Activity.RESULT_OK) {
PaymentConfirmation confirm = data.getParcelableExtra(PaymentActivity.EXTRA_RESULT_CONFIRMATION);
if (confirm != null) {
try {
Log.i("paymentExample", confirm.toJSONObject().toString(4));

// TODO: send 'confirm' to your server for verification.
// see https://developer.paypal.com/webapps/developer/docs/integration/mobile/verify-mobile-payment/
// for more details.

} catch (JSONException e) {
Log.e("paymentExample", "an extremely unlikely failure occurred: ", e);
}
}
}
else if (resultCode == Activity.RESULT_CANCELED) {
Log.i("paymentExample", "The user canceled.");
}
else if (resultCode == PaymentActivity.RESULT_PAYMENT_INVALID) {
Log.i("paymentExample", "An invalid payment was submitted. Please see the docs.");
}
}

@Override
public void onDestroy() {
stopService(new Intent(this, PayPalService.class));
super.onDestroy();
}
}

Manifest.xml


You can download the source code PaypalSDK

Insert And Retrieve Image into DB

$
0
0
Hi Guys,

In this tutorial we are sharing the code to insert the image into db and retrieve the image from db. I hope this article might be helpful to all learning developer.

SQLite is really a quick and compact android database technology which incorporates SQL syntax to create queries and also handle data.

Android SDK by itself provides the SQLite support which without doubt making the setup as well as utilization process within our applications with no trouble.

Whenever we make use of an Android SQLite Database all of us undoubtedly require the help of SQLiteOpenHelper to handle our data.SQLiteOpenHelper is surely an superb destination to place some initial values right into the android sqlite database when it is built.

For storing the image we are using the blob type. Blob is a Java interface representing the SQL BLOB type.
An SQL BLOB type stores a large array of binary data (bytes) as the value in a column of a database.
The java.sql.Blob interface provides methods for setting and retrieving data in the Blob, for querying Blob data length, and for searching for data within the Blob. More details about Blob Here

But i think in big level storing the image in database is not valuable because database sqlite have limited space so store the image path is valuable.

main_activity.xml


MainActivity.java

package com.sunil.insertimageindb;

import java.io.ByteArrayOutputStream;

import com.sunil.insertimageindb.R;

import android.os.Bundle;
import android.app.Activity;
import android.content.ContentValues;
import android.database.Cursor;
import android.database.sqlite.SQLiteDatabase;
import android.graphics.Bitmap;
import android.graphics.BitmapFactory;
import android.view.Menu;
import android.view.View;
import android.view.View.OnClickListener;
import android.widget.Button;
import android.widget.ImageView;
import android.widget.Toast;

public class MainActivity extends Activity implements OnClickListener{

private ImageView imageview=null;
private Button btninsert=null;
private Button btnretrive=null;
private MyDataBase mdb=null;
private SQLiteDatabase db=null;
private Cursor c=null;
private byte[] img=null;
private static final String DATABASE_NAME = "ImageDb.db";
public static final int DATABASE_VERSION = 1;

@Override
protected void onCreate(Bundle savedInstanceState) {
super.onCreate(savedInstanceState);
setContentView(R.layout.activity_main);

btninsert=(Button)findViewById(R.id.button_insert);
btnretrive= (Button)findViewById(R.id.button_retrieve);
imageview= (ImageView)findViewById(R.id.imageView_image);
imageview.setImageResource(0);
btninsert.setOnClickListener(this);
btnretrive.setOnClickListener(this);
mdb=new MyDataBase(getApplicationContext(), DATABASE_NAME,null, DATABASE_VERSION);


Bitmap b=BitmapFactory.decodeResource(getResources(), R.drawable.ic_launcher);
ByteArrayOutputStream bos=new ByteArrayOutputStream();
b.compress(Bitmap.CompressFormat.PNG, 100, bos);
img=bos.toByteArray();
db=mdb.getWritableDatabase();
}
@Override
public void onClick(View arg0) {

if(btninsert==arg0)
{
ContentValues cv=new ContentValues();
cv.put("image", img);
db.insert("tableimage", null, cv);
Toast.makeText(this, "inserted successfully", Toast.LENGTH_SHORT).show();
}
else if(btnretrive==arg0)
{
String[] col={"image"};
c=db.query("tableimage", col, null, null, null, null, null);

if(c!=null){
c.moveToFirst();
do{
img=c.getBlob(c.getColumnIndex("image"));
}while(c.moveToNext());
}
Bitmap b1=BitmapFactory.decodeByteArray(img, 0, img.length);

imageview.setImageBitmap(b1);
Toast.makeText(this, "Retrive successfully", Toast.LENGTH_SHORT).show();
}
}

}

MyDatabase.java

package com.sunil.insertimageindb;


import android.content.Context;
import android.database.sqlite.SQLiteDatabase;
import android.database.sqlite.SQLiteOpenHelper;
import android.database.sqlite.SQLiteDatabase.CursorFactory;

public class MyDataBase extends SQLiteOpenHelper{

public MyDataBase(Context context, String dbname, CursorFactory factory, int dbversion) {
super(context, dbname, factory, dbversion);
}

@Override
public void onCreate(SQLiteDatabase db) {
db.execSQL("create table tableimage(image blob);");
}

@Override
public void onUpgrade(SQLiteDatabase db, int oldVersion, int newVersion) {

}

}

Store the image in db looks like that


You can download the source code InsertImageintoDB.
Cheers Guys!!

Alarm via BoardCast Reciever Android

$
0
0
Hi Guys,

This tutorial might be helpful for leaning about the Alarm with Broadcast Receiver in android.
A Broadcast Receiver is an Android component which allows you to register for system or application events. All registered receivers for an event will be notified by the Android run-time once this event happens. 

A BroadcastReceiver object is only valid for the duration of the call to onReceive(Context, Intent). Once your code returns from this function, the system considers the object to be finished and no longer active.

If registering a receiver in your Activity.onResume() implementation, you should unregistered it in Activity.onPause(). (You won't receive intents when paused, and this will cut down on unnecessary system overhead). Do not unregistered in Activity.onSaveInstanceState(), because this won't be called if the user moves back in the history stack.  More detail about broadcast receiever Here.

Alarm Manager class provides access to the system alarm services. These allow you to schedule your application to be run at some point in the future. When an alarm goes off, the Intent that had been registered for it is broadcast by the system, automatically starting the target application if it is not already running. Registered alarms are retained while the device is asleep (and can optionally wake the device up if they go off during that time), but will be cleared if it is turned off and rebooted.

The Alarm Manager holds a CPU wake lock as long as the alarm receiver's onReceive() method is executing. This guarantees that the phone will not sleep until you have finished handling the broadcast. Once onReceive() returns, the Alarm Manager releases this wake lock. This means that the phone will in some cases sleep as soon as your onReceive() method completes.

There are two way we can registered and unregistered the broadcast receive.
1. Dynamic way
2. Static Way 

Dynamic way:-

You can register a receiver dynamically via the Context.registerReceiver() method. You can also dynamically unregister receiver by using Context.unregisterReceiver() method.

Static Way:-

You can use thePackageManager class to enable or disable receivers registered in your AndroidManifest.xml file.
For Register
ComponentName receiver = new ComponentName(this, AlarmManagerBR.class);
PackageManager pm = this.getPackageManager();
pm.setComponentEnabledSetting(receiver, PackageManager.COMPONENT_ENABLED_STATE_ENABLED, PackageManager.DONT_KILL_APP);
For UnRegister
ComponentName receiver = new ComponentName(this, AlarmManagerBR.class);
PackageManager pm = this.getPackageManager();
pm.setComponentEnabledSetting(receiver, PackageManager.COMPONENT_ENABLED_STATE_DISABLED, PackageManager.DONT_KILL_APP);

main_activity.xml


MainActivity.java

package com.sunil.br;

import android.app.Activity;
import android.app.AlarmManager;
import android.app.PendingIntent;
import android.content.ComponentName;
import android.content.Context;
import android.content.Intent;
import android.content.pm.PackageManager;
import android.os.Bundle;
import android.view.View;
import android.view.View.OnClickListener;
import android.widget.Button;
import android.widget.Toast;

public class MainActivity extends Activity implements OnClickListener{

private Button btnstartalarm=null;
private Button btncancelalarm=null;
private Button btnenablebr=null;
private Button btndiablebr=null;
AlarmManager amanager=null;
PendingIntent pi=null;

@Override
protected void onCreate(Bundle savedInstanceState) {
super.onCreate(savedInstanceState);
setContentView(R.layout.activity_main);

btnstartalarm = (Button)findViewById(R.id.button_startalarm);
btncancelalarm = (Button)findViewById(R.id.button_cancelalarm);
btnenablebr = (Button)findViewById(R.id.button_enablebr);
btndiablebr = (Button)findViewById(R.id.button_disablebr);

btnstartalarm.setOnClickListener(this);
btndiablebr.setOnClickListener(this);
btncancelalarm.setOnClickListener(this);
btnenablebr.setOnClickListener(this);

}

@Override
public void onClick(View arg0) {

if(arg0==btnstartalarm)
{
amanager=(AlarmManager)this.getSystemService(Context.ALARM_SERVICE);
Intent intent= new Intent(this, AlarmManagerBR.class);
pi=PendingIntent.getBroadcast(this, 0, intent, 0);
//After after 2 seconds
amanager.setRepeating(AlarmManager.RTC_WAKEUP, System.currentTimeMillis(), 1000*4, pi);
Toast.makeText(this, "Start Repating Alarm", Toast.LENGTH_SHORT).show();

}
else if (arg0==btncancelalarm) {

amanager.cancel(pi);
Toast.makeText(this, "Canceled Alarm", Toast.LENGTH_SHORT).show();
}

else if(arg0==btnenablebr){

ComponentName receiver = new ComponentName(this, AlarmManagerBR.class);
PackageManager pm = this.getPackageManager();
pm.setComponentEnabledSetting(receiver, PackageManager.COMPONENT_ENABLED_STATE_ENABLED, PackageManager.DONT_KILL_APP);
Toast.makeText(this, "Enable Boradcast Reciever", Toast.LENGTH_SHORT).show();
}
else if (arg0==btndiablebr) {

ComponentName receiver = new ComponentName(this, AlarmManagerBR.class);
PackageManager pm = this.getPackageManager();
pm.setComponentEnabledSetting(receiver, PackageManager.COMPONENT_ENABLED_STATE_DISABLED, PackageManager.DONT_KILL_APP);
Toast.makeText(this, "Diable Boradcast Reciever", Toast.LENGTH_SHORT).show();
}
}
}

AlarmManagerBR.java

package com.sunil.br;

import java.text.SimpleDateFormat;
import java.util.Date;

import android.annotation.SuppressLint;
import android.content.BroadcastReceiver;
import android.content.Context;
import android.content.Intent;
import android.widget.Toast;

public class AlarmManagerBR extends BroadcastReceiver{

@SuppressLint("SimpleDateFormat")
@Override
public void onReceive(Context arg0, Intent arg1) {

StringBuilder sb=new StringBuilder();
SimpleDateFormat format=new SimpleDateFormat("hh:mm:ss a");
sb.append(format.format(new Date()));
Toast.makeText(arg0, sb, Toast.LENGTH_SHORT).show();
}

}

Manifest.xml


You can download the source code BoradCastRecieverExample
Cheers Guys!!

Multiple Row Item Deleted from Listview Android

$
0
0
Hi Guys!!

First of all Happy Diwali to all my friends and fans.

In this article we are learning the new android API concept that delete the multiple  row item of the list view.
Before we have knowledge about the delete the row item with the help of check box. But in new API-18 have provide the features to delete the multiple row item from the list-view without the check-box uses.

This feature is available inside the contextual action mode in higher android version 3.0. So here question is what is contextual action mode?
The contextual action mode is a system implementation of ActionMode that focuses user interaction toward performing contextual actions. When a user enables this mode by selecting an item, a contextual action bar appears at the top of the screen to present actions the user can perform on the currently selected item(s). While this mode is enabled, the user can select multiple items (if you allow it), deselect items, and continue to navigate within the activity (as much as you're willing to allow). The action mode is disabled and the contextual action bar disappears when the user deselects all items, presses the BACK button, or selects the Done action on the left side of the bar.

This event happen when the user performs a long-click on the view.  Contextual actions on groups of items in a ListView or GridView (allowing the user to select multiple items and perform an action on them all).
More details about this contextual menu. and MultiChoiceModeListener.

So lets start the to coding to see this features.


main_activity.xml


MainActivity.java

package com.sunil.listviewmuntilerowdelete;

import java.util.ArrayList;
import java.util.List;

import android.annotation.SuppressLint;
import android.app.Activity;
import android.content.Context;
import android.os.Bundle;
import android.util.SparseBooleanArray;
import android.view.ActionMode;
import android.view.Menu;
import android.view.MenuItem;
import android.widget.AbsListView.MultiChoiceModeListener;
import android.widget.ListView;

@SuppressLint("NewApi")
public class MainActivity extends Activity implements MultiChoiceModeListener{

private String[] myfriendname=null;
private String[] myfriendnickname=null;
private int[] photo=null;
ListView listView=null;
Context contex=null;
MyListAdapter adapter=null;
private List list=new ArrayList();
@Override
protected void onCreate(Bundle savedInstanceState) {
super.onCreate(savedInstanceState);
setContentView(R.layout.activity_main);
contex=this;
listView = (ListView) findViewById(R.id.listview);

myfriendname = new String[] { "Sunil Gupta", "Abhishek Tripathi","Sandeep Pal", "Amit Verma" };
myfriendnickname = new String[] { "sunil android", "Abhi cool","Sandy duffer", "Budhiya jokar"};
photo = new int[] { R.drawable.sunil, R.drawable.abhi, R.drawable.sandy, R.drawable.amit};

for(int index=0; index< myfriendname.length; index++){
MyFriendsSDetails details=new MyFriendsSDetails(myfriendname[index], myfriendnickname[index], photo[index]);
list.add(details);
}

adapter=new MyListAdapter(contex, list);
listView.setAdapter(adapter);
listView.setMultiChoiceModeListener(this);
listView.setChoiceMode(listView.CHOICE_MODE_MULTIPLE_MODAL);

}
@Override
public boolean onActionItemClicked(ActionMode arg0, MenuItem arg1) {
switch (arg1.getItemId()) {
case R.id.delete:
SparseBooleanArray selected = adapter.getSelectedIds();
for (int i = (selected.size() - 1); i >= 0; i--) {
if (selected.valueAt(i)) {
MyFriendsSDetails selecteditem = adapter.getItem(selected.keyAt(i));
adapter.remove(selecteditem);
}
}
// Close CAB
arg0.finish();
return true;
default:
return false;
}
}
@Override
public boolean onCreateActionMode(ActionMode arg0, Menu arg1) {
arg0.getMenuInflater().inflate(R.menu.main, arg1);
return true;

}
@Override
public void onDestroyActionMode(ActionMode arg0) {
adapter.removeSelection();
}
@Override
public boolean onPrepareActionMode(ActionMode arg0, Menu arg1) {
return false;
}
@Override
public void onItemCheckedStateChanged(ActionMode arg0, int arg1, long arg2, boolean arg3) {

final int checkedCount = listView.getCheckedItemCount();
arg0.setTitle(checkedCount + " Selected");
adapter.toggleSelection(arg1);
}

}

MyFriendsSDetails.java

package com.sunil.listviewmuntilerowdelete;

public class MyFriendsSDetails {

private String myfriendname=null;
private String myfriendnickname=null;
private int photo=0;

public MyFriendsSDetails(String friendname, String friendnickname, int myphoto){
this.myfriendname=friendname;
this.myfriendnickname=friendnickname;
this.photo=myphoto;
}

public String getMyfriendname() {
return myfriendname;
}

public void setMyfriendname(String myfriendname) {
this.myfriendname = myfriendname;
}

public String getMyfriendnickname() {
return myfriendnickname;
}

public void setMyfriendnickname(String myfriendnickname) {
this.myfriendnickname = myfriendnickname;
}

public int getPhoto() {
return photo;
}

public void setPhoto(int photo) {
this.photo = photo;
}


}

list_item.xml


MyListAdapter.java

package com.sunil.listviewmuntilerowdelete;

import java.util.List;

import android.content.Context;
import android.util.SparseBooleanArray;
import android.view.LayoutInflater;
import android.view.View;
import android.view.ViewGroup;
import android.widget.ArrayAdapter;
import android.widget.ImageView;
import android.widget.TextView;

public class MyListAdapter extends ArrayAdapter{

Context context;
LayoutInflater inflater;
List list;
private SparseBooleanArray mSelectedItemsIds;

public MyListAdapter(Context context, List list) {
super(context, 0, list);
mSelectedItemsIds = new SparseBooleanArray();
this.context = context;
this.list = list;
inflater = LayoutInflater.from(context);
}

@Override
public View getView(int position, View convertView, ViewGroup parent) {

final ViewHolder holder;
if (convertView == null) {
holder = new ViewHolder();
convertView = inflater.inflate(R.layout.list_item, null);
holder.name = (TextView) convertView.findViewById(R.id.title);
holder.nickname = (TextView) convertView.findViewById(R.id.subtitle);
holder.photo = (ImageView) convertView.findViewById(R.id.icon);
convertView.setTag(holder);
} else {
holder = (ViewHolder) convertView.getTag();
}
holder.name.setText(list.get(position).getMyfriendname());
holder.nickname.setText(list.get(position).getMyfriendnickname());
holder.photo.setImageResource(list.get(position).getPhoto());
return convertView;
}

public void toggleSelection(int position) {
selectView(position, !mSelectedItemsIds.get(position));
}

public void selectView(int position, boolean value) {
if (value)
mSelectedItemsIds.put(position, value);
else
mSelectedItemsIds.delete(position);
notifyDataSetChanged();
}

public void removeSelection() {
mSelectedItemsIds = new SparseBooleanArray();
notifyDataSetChanged();
}

public SparseBooleanArray getSelectedIds() {
return mSelectedItemsIds;
}
private class ViewHolder {
TextView name;
TextView nickname;
ImageView photo;
}
}
Screen shot:


You can download the full source code ListViewMultipleRowDelete

Cheers Guys!!

Check Network Connectivity

$
0
0
Hi Guys,

I am sharing the code for check the internet connectivity of your device either mobile or wifi connectivity.
More detail Here 
Java Code:

private void checkNetworkConnection() {
ConnectivityManager connMgr =
(ConnectivityManager) getSystemService(Context.CONNECTIVITY_SERVICE);
NetworkInfo activeInfo = connMgr.getActiveNetworkInfo();
if (activeInfo != null && activeInfo.isConnected()) {
wifiConnected = activeInfo.getType() == ConnectivityManager.TYPE_WIFI;
mobileConnected = activeInfo.getType() == ConnectivityManager.TYPE_MOBILE;
if(wifiConnected) {
Log.i(TAG, "WIFI connected");
} else if (mobileConnected){
Log.i(TAG, "Mobile Connected");
}
} else {
Log.i(TAG,"Neither Mobile nor WIFi connected.");
}
}
or second way

public static boolean isInternetOn(Context context) {
ConnectivityManager cm = (ConnectivityManager) context
.getSystemService(Context.CONNECTIVITY_SERVICE);
// test for connection
if (cm.getActiveNetworkInfo() != null
&& cm.getActiveNetworkInfo().isAvailable()
&& cm.getActiveNetworkInfo().isConnected()) {
Log.v("Util", "Internet is working");
// txt_status.setText("Internet is working");
return true;
} else {
// txt_status.setText("Internet Connection Not Present");
Log.v("Util", "Internet Connection Not Present");
return false;
}
}
Please do not forget to add the permission in AndroidMenifest file.


CalenderView Example

$
0
0
Hi Guys,

Today I am sharing the code for CalenderView. This class is a calendar widget for displaying and selecting dates. The range of dates supported by this calendar is configurable. A user can select a date by taping on it and can scroll and fling the calendar to a desired date.

activity_main.xml


MainActivity.java

package com.sunil.calenderexample;

import android.support.v7.app.ActionBarActivity;
import android.os.Bundle;
import android.view.Menu;
import android.view.MenuItem;
import android.widget.CalendarView;
import android.widget.CalendarView.OnDateChangeListener;
import android.widget.Toast;

public class MainActivity extends ActionBarActivity implements OnDateChangeListener {

private CalendarView calenderview=null;
@Override
protected void onCreate(Bundle savedInstanceState) {
super.onCreate(savedInstanceState);
setContentView(R.layout.activity_main);
calenderview=(CalendarView)findViewById(R.id.calendarView_cl);
calenderview.setOnDateChangeListener(this);

}

@Override
public boolean onCreateOptionsMenu(Menu menu) {
// Inflate the menu; this adds items to the action bar if it is present.
getMenuInflater().inflate(R.menu.main, menu);
return true;
}

@Override
public boolean onOptionsItemSelected(MenuItem item) {
// Handle action bar item clicks here. The action bar will
// automatically handle clicks on the Home/Up button, so long
// as you specify a parent activity in AndroidManifest.xml.
int id = item.getItemId();
if (id == R.id.action_settings) {
return true;
}
return super.onOptionsItemSelected(item);
}

@Override
public void onSelectedDayChange(CalendarView arg0, int arg1, int arg2, int arg3) {

Toast.makeText(getBaseContext(), arg1+"/"+arg2+"/"+arg3, Toast.LENGTH_LONG).show();
}
}


Result is:
Here you can download the source code CalenderView Example

Volley Network Image Loader

$
0
0
Hi All,

Volley is a library that handles the processing and caching of network requests. It helps to download the imaged from web asynchronously. We do not worry  about the Async Task to download the image from network because Volley library now can able to handle the image download asynchronously.

We already had known the famous library Universal Image Loder and Piccaso. Both are easy to handle to download the image in a thread pool and maintained the cache management.

Volley simplify everything and increases the app performances. - See more at: http://www.survivingwithandroid.com/2013/11/android-volley-tutorial-post-download.html#sthash.ATBAtGr2.dpuf
 Volley have lot of advantages:


  • Efficient network management
  • Easy to use request managements
  • Disk and memory cache management
  • Easy to extend and customize to our needs
  • - See more at: http://www.survivingwithandroid.com/2013/11/android-volley-tutorial-post-download.html#sthash.ATBAtGr2.dpuf
    • Automatic scheduling of network requests.
    • Multiple concurrent network connections.
    • Transparent disk and memory response caching
    • Support for request prioritization.
    • Cancellation request API. You can cancel a single request, or you can set blocks or scopes of requests to cancel.
    • Ease of customization, for example, for retry and backoff.
    • Strong ordering that makes it easy to correctly populate your UI with data fetched asynchronously from the network.
    • Debugging and tracing tools.
    • Application performance
    There are two available cache implementations. The recommended approach uses a basic in memory LRU cache. For the disk cache implementation I chose to use the DiskLruCache written by Jake Wharton. I chose this implementation because it is frequently used in the Android community and represents a common use case for someone trying to retrofit their application for Volley. Using a disk based L1 cache may cause i/o blocking issues. Volley already has an implicit disk L2 cache. The disk L1 cache is included because I was originally unaware of how Volley handled image request caching. 

    For download or clone of Volley library you have to run predefined command in your system, In your system should have installed the git.

    1. git clonehttps://android.googlesource.com/platform/frameworks/volley
    2. android update project -p .
    3. ant jar
    Once you done this commond you can get the volley clone library in your directory.
    Only thing you have to use the  NetworkImageView in place of ImageView. I have share code for GridView image loader with volley that manage the cache management for network processing.


  • Efficient network management
  • Easy to use request managements
  • Disk and memory cache management
  • Easy to extend and customize to our needs
  • - See more at: http://www.survivingwithandroid.com/2013/11/android-volley-tutorial-post-download.html#sthash.ATBAtGr2.dpuf


  • Efficient network management
  • Easy to use request managements
  • Disk and memory cache management
  • Easy to extend and customize to our needs
  • - See more at: http://www.survivingwithandroid.com/2013/11/android-volley-tutorial-post-download.html#sthash.ATBAtGr2.dpuf


  • Efficient network management
  • Easy to use request managements
  • Disk and memory cache management
  • Easy to extend and customize to our needs
  • - See more at: http://www.survivingwithandroid.com/2013/11/android-volley-tutorial-post-download.html#sthash.ATBAtGr2.dpuf


  • Efficient network management
  • Easy to use request managements
  • Disk and memory cache management
  • Easy to extend and customize to our needs
  • - See more at: http://www.survivingwithandroid.com/2013/11/android-volley-tutorial-post-download.html#sthash.ATBAtGr2.dpuf
    Volley simplify everything and increases the app performances. - See more at: http://www.survivingwithandroid.com/2013/11/android-volley-tutorial-post-download.html#sthash.ATBAtGr2.dpuf
    Volley simplify everything and increases the app performances. - See more at: http://www.survivingwithandroid.com/2013/11/android-volley-tutorial-post-download.html#sthash.ATBAtGr2.dpuf

    activity_main.xml

    < RelativeLayout xmlns:android="http://schemas.android.com/apk/res/android"
    xmlns:tools="http://schemas.android.com/tools"
    android:layout_width="match_parent"
    android:layout_height="match_parent"
    android:paddingBottom="@dimen/activity_vertical_margin"
    android:paddingLeft="@dimen/activity_horizontal_margin"
    android:paddingRight="@dimen/activity_horizontal_margin"
    android:paddingTop="@dimen/activity_vertical_margin"
    tools:context="comsunil.volleygridexample.MainActivity">


    < /RelativeLayout>

    grid_image_item.xml

    < ?xml version="1.0" encoding="utf-8"?>


    MainActivity.java

    package comsunil.volleygridexample;

    import android.os.Bundle;
    import android.support.v7.app.ActionBarActivity;
    import android.view.Menu;
    import android.view.MenuItem;
    import android.view.View;
    import android.view.ViewGroup;
    import android.widget.BaseAdapter;
    import android.widget.GridView;
    import android.widget.ImageView;

    import com.android.volley.toolbox.ImageLoader;
    import com.android.volley.toolbox.NetworkImageView;

    public class MainActivity extends ActionBarActivity {

    ImageLoader mImageLoader;
    NetworkImageView mNetworkImageView;
    @Override
    protected void onCreate(Bundle savedInstanceState) {
    super.onCreate(savedInstanceState);
    setContentView(R.layout.activity_main);


    mImageLoader = MyVolleySingleton.getInstance(this).getImageLoader();

    final GridView gridView = (GridView) findViewById(R.id.gridView);
    gridView.setAdapter(new MyImageAdapter());


    }

    static class ViewHolder {
    ImageView imageView;
    }

    class MyImageAdapter extends BaseAdapter {

    @Override
    public int getCount() {
    return ImageUrlArray.IMAGES.length;
    }

    @Override
    public Object getItem(int position) {
    return null;
    }

    @Override
    public long getItemId(int position) {
    return position;
    }

    @Override
    public View getView(int position, View convertView, ViewGroup parent) {

    View view = convertView;
    final ViewHolder gridViewImageHolder;
    // check to see if we have a view
    if (view == null) {
    view = getLayoutInflater().inflate(R.layout.grid_image_item, parent, false);
    gridViewImageHolder = new ViewHolder();
    gridViewImageHolder.imageView = (ImageView) view.findViewById(R.id.networkImageView);
    view.setTag(gridViewImageHolder);
    } else {
    gridViewImageHolder = (ViewHolder) view.getTag();
    }

    mNetworkImageView = (NetworkImageView) gridViewImageHolder.imageView;
    mNetworkImageView.setDefaultImageResId(R.drawable.no_image);
    mNetworkImageView.setErrorImageResId(R.drawable.error);
    mNetworkImageView.setAdjustViewBounds(true);
    mNetworkImageView.setImageUrl(ImageUrlArray.IMAGES[position], mImageLoader);

    return view;
    }
    }
    @Override
    public boolean onCreateOptionsMenu(Menu menu) {
    // Inflate the menu; this adds items to the action bar if it is present.
    getMenuInflater().inflate(R.menu.main, menu);
    return true;
    }

    @Override
    public boolean onOptionsItemSelected(MenuItem item) {
    // Handle action bar item clicks here. The action bar will
    // automatically handle clicks on the Home/Up button, so long
    // as you specify a parent activity in AndroidManifest.xml.
    int id = item.getItemId();
    if (id == R.id.action_settings) {
    return true;
    }
    return super.onOptionsItemSelected(item);
    }
    }

    MyVolleySingleton.java

    package comsunil.volleygridexample;

    import android.content.Context;

    import com.android.volley.Request;
    import com.android.volley.RequestQueue;
    import com.android.volley.toolbox.ImageLoader;
    import com.android.volley.toolbox.Volley;

    /**
    * copied from the official documentation
    */
    public class MyVolleySingleton {

    private static MyVolleySingleton mVolleyInstance;
    private RequestQueue mRequestQueue;
    private ImageLoader mImageLoader;
    private static Context mContext;

    private MyVolleySingleton(Context context) {
    mContext = context;
    mRequestQueue = getRequestQueue();
    mImageLoader = new ImageLoader(mRequestQueue,
    new MyLruBitmapCache(MyLruBitmapCache.getCacheSize(context))
    );
    }

    public static synchronized MyVolleySingleton getInstance(Context context) {
    if (mVolleyInstance == null) {
    mVolleyInstance = new MyVolleySingleton(context);
    }
    return mVolleyInstance;
    }

    public RequestQueue getRequestQueue() {
    if (mRequestQueue == null) {
    // use the application context
    mRequestQueue = Volley.newRequestQueue(mContext.getApplicationContext());
    }
    return mRequestQueue;
    }

    public void addToRequestQueue(Request req) {
    getRequestQueue().add(req);
    }

    public ImageLoader getImageLoader() {
    return mImageLoader;
    }
    }

    MyLruBitmapCache.java

    package comsunil.volleygridexample;

    import android.content.Context;
    import android.graphics.Bitmap;
    import android.support.v4.util.LruCache;
    import android.util.DisplayMetrics;

    import com.android.volley.toolbox.ImageLoader;

    /**
    * copied from official documentation
    */
    public class MyLruBitmapCache extends LruCache
    implements ImageLoader.ImageCache {

    public MyLruBitmapCache(int maxSize) {
    super(maxSize);
    }

    public MyLruBitmapCache(Context ctx) {
    this(getCacheSize(ctx));
    }

    @Override
    protected int sizeOf(String key, Bitmap value) {
    return value.getRowBytes() * value.getHeight();
    }

    @Override
    public Bitmap getBitmap(String url) {
    return get(url);
    }

    @Override
    public void putBitmap(String url, Bitmap bitmap) {
    put(url, bitmap);
    }

    // Returns a cache size equal to approximately three screens worth of images.
    public static int getCacheSize(Context ctx) {
    final DisplayMetrics displayMetrics = ctx.getResources().
    getDisplayMetrics();
    final int screenWidth = displayMetrics.widthPixels;
    final int screenHeight = displayMetrics.heightPixels;
    // 4 bytes per pixel
    final int screenBytes = screenWidth * screenHeight * 4;

    return screenBytes * 3;
    }
    }


    Here you can dwonload the source code VolleyGridview

    FireBase push notification android

    $
    0
    0
    Google announced the new strong product Firebase in Google I/O 2016 . Firebase is a cloud platform with some of amazing feature for android development. Firebase cloud messaging (FCM) is free messaging service from Google that not required any server side code. Earlier google has provided GCM that is Google cloud messaging for push notification which was required server side code to execute the push message. FCM is the new version of GCM.

    These are the differences between these two services:

    Firebase Cloud Messaging provides a complete set of messaging capabilities through its client SDKs and HTTP and XMPP server protocols. For deployments with more complex messaging requirements, FCM is the right choice.

    Firebase Notifications is a lightweight, serverless messaging solution built on Firebase Cloud Messaging. With a user-friendly graphical console and reduced coding requirements, Firebase Notifications lets users easily send messages to reengage and retain users, foster app growth, and support marketing campaigns. If you want a more detailed comparison. Read this.

    Lets see the basic configuration

    To integrate the Firebase push notification in android we need to follow few steps .

    Step.1: Please go to Firebase console to create the project


    Step.2: Now you can create the project name and enter your county name. Please refer the below snap.


    Step.3: You have to choose which platform do you want to use firebase push. Here we are configuring for android platform, so I am choosing option for android app.


    Step.4: Now you need to enter your package name of your project. Ex: Here my package name is "com.sunil.firebasepushnotificationandroid" . Other fields are optional for debug mode. But if you want to release your app that time you need to pass the SHA-1 key.


    Step.5: Once you done your step.5 You will get downloded one google-services.json file. You have to copy this file and paste inside the app folder. Please see the below snap to get thing done.


    Step.6: Add these dependencies to your build.gradle file.


    Wow! you have done the configuration steps completely. Lets focus on code required for push in client side. Firebase push is required two service, one for get the token or registration Id and other for listen the push message to notify to particular device. Here are the details of services.

    MyFirebaseInstanceIDService.java

    import android.content.SharedPreferences;
    import android.util.Log;

    import com.google.firebase.iid.FirebaseInstanceId;
    import com.google.firebase.iid.FirebaseInstanceIdService;
    import com.sunil.firebasepushnotificationandroid.MainApplication;
    import com.sunil.firebasepushnotificationandroid.config.Config;
    import com.sunil.firebasepushnotificationandroid.contstant.Constant;

    /**
    * Created by sunil on 21-Oct-16.
    */

    public class MyFirebaseInstanceIDService extends FirebaseInstanceIdService {

    private static final String TAG = MyFirebaseInstanceIDService.class.getSimpleName();

    /**
    * Called if InstanceID token is updated. This may occur if the security of
    * the previous token had been compromised. Note that this is called when the InstanceID token
    * is initially generated so this is where you would retrieve the token.
    */
    @Override
    public void onTokenRefresh() {
    // Get updated InstanceID token.
    String refreshedToken = FirebaseInstanceId.getInstance().getToken();
    Log.d(TAG, "Refreshed token: " + refreshedToken);

    // Saving reg id to shared preferences
    storeRegIdInPref(refreshedToken);

    // If you want to send messages to this application instance or
    // manage this apps subscriptions on the server side, send the
    // Instance ID token to your app server.
    sendRegistrationToServer(refreshedToken);
    }
    // [END refresh_token]

    /**
    * Persist token to third-party servers.
    *
    * Modify this method to associate the user's FCM InstanceID token with any server-side account
    * maintained by your application.
    *
    * @param token The new token.
    */
    private void sendRegistrationToServer(String token) {
    // TODO: Implement this method to send token to your app server.
    // this is required to send this registration Id to your server if you want push message from server side.
    }

    private void storeRegIdInPref(String token) {
    SharedPreferences pref = MainApplication.getInstance().getSharedPreferences(Config.SHARED_PREF, 0);
    SharedPreferences.Editor editor = pref.edit();
    editor.putString(Constant.REGISTRATION_ID, token);
    editor.commit();
    }
    }


    MyFirebaseMessagingService.java

    import android.app.NotificationManager;
    import android.app.PendingIntent;
    import android.content.Context;
    import android.content.Intent;
    import android.media.RingtoneManager;
    import android.net.Uri;
    import android.support.v4.app.NotificationCompat;
    import android.util.Log;
     
    import com.batch.android.json.JSONObject;
    import com.google.firebase.messaging.FirebaseMessagingService;
    import com.google.firebase.messaging.RemoteMessage;
    import com.sunil.firebasepushnotificationandroid.MainActivity;
    import com.sunil.firebasepushnotificationandroid.R;
     
    /**
     * Created by sunil on 21-Oct-16.
     */
     
    public class MyFirebaseMessagingService extends FirebaseMessagingService {
     
        private static final String TAG = MyFirebaseMessagingService.class.getSimpleName();
     
        /**
         * Called when message is received.
         *
         * @param remoteMessage Object representing the message received from Firebase Cloud Messaging.
         */
        // [START receive_message]
        @Override
        public void onMessageReceived(RemoteMessage remoteMessage) {
     
            if (remoteMessage == null)
                return;
     
            Log.d(TAG, "From: " + remoteMessage.getFrom());
            // Check if message contains a data payload.
            if (remoteMessage.getData().size() > 0) {
                Log.d(TAG, "Message data payload: " + remoteMessage.getData());
            }
     
            // Check if message contains a notification payload.
            if (remoteMessage.getNotification() != null) {
                Log.d(TAG, "Message Notification Body: " + remoteMessage.getNotification().getBody());
                sendNotification(remoteMessage.getNotification().getBody());
            }
     
            // Check if message contains a data payload.
            if (remoteMessage.getData().size() > 0) {
                Log.e(TAG, "Data Payload: " + remoteMessage.getData().toString());
                try {
                    JSONObject json = new JSONObject(remoteMessage.getData().toString());
                    // parse json and get the string to show in notification.
                } catch (Exception e) {
                    Log.e(TAG, "Exception: " + e.getMessage());
                }
            }
     
        }
        // [END receive_message]
     
        private void sendNotification(String messageBody) {
            Intent intent = new Intent(this, MainActivity.class);
            intent.addFlags(Intent.FLAG_ACTIVITY_CLEAR_TOP);
            PendingIntent pendingIntent = PendingIntent.getActivity(this, 0 , intent,
                    PendingIntent.FLAG_ONE_SHOT);
     
            Uri defaultSoundUri= RingtoneManager.getDefaultUri(RingtoneManager.TYPE_NOTIFICATION);
            NotificationCompat.Builder notificationBuilder = new NotificationCompat.Builder(this)
                    .setSmallIcon(R.drawable.message)
                    .setContentTitle("FCM Message")
                    .setContentText(messageBody)
                    .setAutoCancel(true)
                    .setSound(defaultSoundUri)
                    .setContentIntent(pendingIntent);
     
            NotificationManager notificationManager =
                    (NotificationManager) getSystemService(Context.NOTIFICATION_SERVICE);
     
            notificationManager.notify(0 , notificationBuilder.build());
        }
    }


    AndroidManifest.xml

    <manifest package="com.sunil.firebasepushnotificationandroid" xmlns:android="http://schemas.android.com/apk/res/android"&gt

    <uses-permission android:name="android.permission.INTERNET"/&gt

    <application android:allowbackup="true" android:icon="@mipmap/ic_launcher" android:label="@string/app_name" android:name=".MainApplication" android:supportsrtl="true" android:theme="@style/AppTheme"&gt
    <intent-filter&gt
    <action android:name="android.intent.action.MAIN"/&gt

    <category android:name="android.intent.category.LAUNCHER"/&gt
    </intent-filter&gt
    </activity&gt


    <service android:name=".MyFirebaseMessagingService"&gt
    <intent-filter&gt
    <action android:name="com.google.firebase.MESSAGING_EVENT"/&gt
    </intent-filter&gt
    </service&gt


    <service android:name=".MyFirebaseInstanceIDService"&gt
    <intent-filter&gt
    <action android:name="com.google.firebase.INSTANCE_ID_EVENT"/&gt
    </intent-filter&gt
    </service&gt

    </application&gt
    </manifest&gt


    These basic code is required for push. Firebase aslo handle itself when the device is in background. It will notify user with push message. Firebase also provide feature for developer to send custom message like title, image, url link etc in json fomate. Developer needs to parse them before notify.

    Now here I am not using server side push. So I will push from Firebase console panel.


    If you selected push message Send Now. It will push the message to registered devices.


    I hope it will help to all newbie developer to implement push notification by using Firebase.

    Thanks for your valuable time to reading this post.

    Firebase Crash Reporting in Android

    $
    0
    0
    Hi,

    In previous article we have learned about how to send push notification in android by using Firebase cloud messaging. If you have not read this please Firebase push notification in android read this link.

    It will helps you to making configuration of basic steps.
    Now in this article we are learning about to track our crash report by using Firebase.

    Here again I am configuring the basic setups.
    Please see the below snap shot that help you to get the json mapping file and paste inside your app folder.


    Now you need to add below dependency in your build.gradle root project and project.

    build.gradle root project

    // Top-level build file where you can add configuration options common to all sub-projects/modules.

    buildscript {
    repositories {
    jcenter()
    }
    dependencies {
    classpath 'com.android.tools.build:gradle:2.2.2'
    classpath 'com.google.gms:google-services:3.0.0'

    // NOTE: Do not place your application dependencies here; they belong
    // in the individual module build.gradle files
    }
    }

    allprojects {
    repositories {
    jcenter()
    }
    }

    task clean(type: Delete) {
    delete rootProject.buildDir
    }


    build.gradle

    apply plugin: 'com.android.application'

    android {
    compileSdkVersion 25
    buildToolsVersion "25.0.0"
    defaultConfig {
    applicationId "com.sunil.firebasecrashreport"
    minSdkVersion 15
    targetSdkVersion 25
    versionCode 1
    versionName "1.0"
    testInstrumentationRunner "android.support.test.runner.AndroidJUnitRunner"
    }
    buildTypes {
    release {
    minifyEnabled false
    proguardFiles getDefaultProguardFile('proguard-android.txt'), 'proguard-rules.pro'
    }
    }
    }

    dependencies {
    compile fileTree(dir: 'libs', include: ['*.jar'])
    androidTestCompile('com.android.support.test.espresso:espresso-core:2.2.2', {
    exclude group: 'com.android.support', module: 'support-annotations'
    })
    compile 'com.android.support:appcompat-v7:25.0.0'
    testCompile 'junit:junit:4.12'
    compile 'com.google.firebase:firebase-crash:9.8.0'
    compile 'com.google.android.gms:play-services-analytics:9.8.0'

    }
    // Add to the bottom of the file
    apply plugin: 'com.google.gms.google-services'


    MainActivity.java

    import android.app.Dialog;
    import android.support.v7.app.AppCompatActivity;
    import android.os.Bundle;
    import android.util.Log;
    import android.view.View;
    import android.widget.Button;

    import com.google.android.gms.common.ConnectionResult;
    import com.google.android.gms.common.GoogleApiAvailability;
    import com.google.firebase.crash.FirebaseCrash;

    public class MainActivity extends AppCompatActivity {

    private boolean isCrashKnow = true;

    @Override
    protected void onCreate(Bundle savedInstanceState) {
    super.onCreate(savedInstanceState);
    setContentView(R.layout.activity_main);

    //Check if google play services is up to date
    final int playServicesStatus = GoogleApiAvailability.getInstance().isGooglePlayServicesAvailable(this);
    if(playServicesStatus != ConnectionResult.SUCCESS){
    //If google play services in not available show an error dialog and return
    final Dialog errorDialog = GoogleApiAvailability.getInstance().getErrorDialog(this, playServicesStatus, 0, null);
    errorDialog.show();
    return;
    }

    Button btnCrash = (Button) findViewById(R.id.crash);
    btnCrash.setOnClickListener(new View.OnClickListener() {
    @Override
    public void onClick(View view) {

    FirebaseCrash.logcat(Log.INFO, "MainActivity", "Crash button clicked");

    // If known crash the exception and report is using
    // Crash.report(). Otherwise throw the exception and let Firebase Crash automatically
    // report the crash.
    if (isCrashKnow) {
    try {
    throw new NullPointerException();
    } catch (NullPointerException ex) {
    // [START log_and_report]
    FirebaseCrash.logcat(Log.ERROR, "MainActivity", "NPE caught");
    FirebaseCrash.report(ex);
    // [END log_and_report]
    }
    } else {
    throw new NullPointerException();
    }
    }
    });

    }
    }


    AndroidManifest.xml

    <manifest package="com.sunil.firebasecrashreport" xmlns:android="http://schemas.android.com/apk/res/android"&gt


    <uses-permission android:name="android.permission.INTERNET"&gt
    <uses-permission android:name="android.permission.ACCESS_NETWORK_STATE"&gt

    <application android:allowbackup="true" android:icon="@mipmap/ic_launcher" android:label="@string/app_name" android:supportsrtl="true" android:theme="@style/AppTheme"&gt

    <activity android:name="com.sunil.firebasecrashreport.MainActivity"&gt

    <intent-filter&gt

    <action android:name="android.intent.action.MAIN"/&gt


    <category android:name="android.intent.category.LAUNCHER"/&gt

    </intent-filter&gt

    </activity&gt
    </application&gt
    </manifest&gt


    Errors take up to 20 minutes to show up in the Crash Reporting console. Check back to see your report there. This is only drawback i can see. It might be in beta case, Google team may be solve this after release. You can see crash on console.

    Here is the crash report details in my dashboard that I got after 24 hours . It may more delay yours also.


    I hope it will helps you to understand crash analytics by using firebase.

    Firebase Analytics in Android

    $
    0
    0
    Firebase Analytics,, a free and unlimited analytics tool built from the ground up for mobile apps. Firebase Analytics is at the core of the Firebase platform, providing the insights you need to build successful apps.

    SDK automatically captures a number of events and user properties and also allows you to define your own custom events to measure the things that uniquely matter to your business. Once the data is captured, it's available in a dashboard through the Firebase console. This dashboard provides detailed insights about your data — from summary data such as active users and demographics, to more detailed data such as identifying your most purchased items.
    Firebase Analytics also integrates with a number of other Firebase features. For example, it automatically logs events that correspond to your Firebase Notifications and provides reporting on the impact of each campaign.

    Lets start configuration. You need to complete few steps. Here is reference snap shot that helps you to make configuration done.


    Now you got the google-services.json file. what you need to do, please paste this file inside the app folder of your project.

    You have to add some dependency and project level and app level. Here is the detail.


    build.gradle project level

    // Top-level build file where you can add configuration options common to all sub-projects/modules.

    buildscript {
    repositories {
    jcenter()
    }
    dependencies {
    classpath 'com.android.tools.build:gradle:2.2.2'
    classpath 'com.google.gms:google-services:3.0.0'
    // NOTE: Do not place your application dependencies here; they belong
    // in the individual module build.gradle files
    }
    }

    allprojects {
    repositories {
    jcenter()
    }
    }

    task clean(type: Delete) {
    delete rootProject.buildDir
    }


    build.gradle app level

    apply plugin: 'com.android.application'

    android {
    compileSdkVersion 25
    buildToolsVersion "25.0.0"
    defaultConfig {
    applicationId "com.sunil.firebaseanalyticsandroid"
    minSdkVersion 15
    targetSdkVersion 25
    versionCode 1
    versionName "1.0"
    testInstrumentationRunner "android.support.test.runner.AndroidJUnitRunner"
    }
    buildTypes {
    release {
    minifyEnabled false
    proguardFiles getDefaultProguardFile('proguard-android.txt'), 'proguard-rules.pro'
    }
    }
    }

    dependencies {
    compile fileTree(dir: 'libs', include: ['*.jar'])
    androidTestCompile('com.android.support.test.espresso:espresso-core:2.2.2', {
    exclude group: 'com.android.support', module: 'support-annotations'
    })
    compile 'com.android.support:appcompat-v7:25.0.0'
    testCompile 'junit:junit:4.12'
    compile 'com.google.firebase:firebase-core:9.8.0'
    }
    // Add to the bottom of the file
    apply plugin: 'com.google.gms.google-services'


    Wow You done almost steps. You need to get instance of FirebaseAnalytics and make enable for tracking your events.

    MainActivity.java

    import android.support.v7.app.AppCompatActivity;
    import android.os.Bundle;
    import android.view.View;
    import android.widget.Button;

    import com.google.firebase.analytics.FirebaseAnalytics;

    public class MainActivity extends AppCompatActivity {

    private FirebaseAnalytics mFirebaseAnalytics;


    @Override
    protected void onCreate(Bundle savedInstanceState) {
    super.onCreate(savedInstanceState);
    setContentView(R.layout.activity_main);

    // Obtain the FirebaseAnalytics instance.
    mFirebaseAnalytics = FirebaseAnalytics.getInstance(this);

    // make the firebase enabled and give session duration according to you
    mFirebaseAnalytics.setAnalyticsCollectionEnabled(true);
    mFirebaseAnalytics.setMinimumSessionDuration(20000);

    Button subscribeButton = (Button) findViewById(R.id.analytics);
    subscribeButton.setOnClickListener(new View.OnClickListener() {
    @Override
    public void onClick(View view) {

    Bundle bundle = new Bundle();
    String id = "music";
    String name = "Annual Menbership";

    bundle.putString(FirebaseAnalytics.Param.ITEM_ID, id);
    bundle.putString(FirebaseAnalytics.Param.ITEM_NAME, name);
    bundle.putString(FirebaseAnalytics.Param.CURRENCY, "INR");
    bundle.putString(FirebaseAnalytics.Param.PRICE, "999.00");
    mFirebaseAnalytics.logEvent(FirebaseAnalytics.Event.SELECT_CONTENT, bundle);
    }
    });


    }
    }


    Make sure you have added these three permission in your AndroidManifest.xml file.

    <uses-permission android:name="android.permission.INTERNET"/&gt
    <uses-permission android:name="android.permission.ACCESS_NETWORK_STATE"/&gt
    <uses-permission android:name="android.permission.WAKE_LOCK"/&gt


    Once you click button then your event name -> SELECT_CONTENT will get reported in your Fire base console dashboard. It may delay in reporting you have to wait 24 hours or less. Here is my Tracking events in my firebase DashBoard.


    Now you might be having question about the other events like first_open and session_start that already triggered default. So I can say some of events that already reserved. Here are details

    The following event names are reserved and cannot be used:
    • app_clear_data
    • app_uninstall
    • app_update
    • error
    • first_open
    • in_app_purchase
    • notification_dismiss
    • notification_foreground
    • notification_open
    • notification_receive
    • os_update
    • session_start
    • user_engagement
    You can learn more about other Events Here.. You can add your custom events also. 

    From the doc "Custom parameters: Custom parameters are not represented directly in your Analytics reports, but they can be used as filters in audience definitions that can be applied to every report. Custom parameters are also included in data exported to BigQuery if your app is linked to a BigQuery project."

    You can log your custom event like that:

    Bundle params =newBundle();
    params
    .putString(FirebaseAnalytics.Param.VALUE,"play button clicked");
    mFirebaseAnalytics
    .logEvent("Main_Activity_play_button_clicked", params);
    Post Here.Thanks I hope it will help you to track your events. 

    Firebase database Authentication in Android

    $
    0
    0
    In the last article we have learned about the Firebase Analytics and Firebase Crashlytics
    Firebase also provides awesome feature about real time Database. It is a powerful platform for building iOS, Android, and web-based apps, offering real-time data storage and synchronization, user authentication, and more.

    Store and sync data with our NoSQL cloud database. Data is synced across all clients in realtime, and remains available when your app goes offline. No server required to configure and no any API call required like using volley and Retrofit.

    It is very easy to use. Firebase still in Beta So here you can get started.


    Lets start configuration for firebase database and firebase authentication.

    Step.1: Please go to Firebase console to create the project.

    Step.2: Now you can create the project name and enter your county name. 

    Step.3: You have to choose which platform do you want to use firebase push. Here we are configuring for android platform, so I am choosing option for android app. 

    Step.4: Now you need to enter your package name of your project. Ex: Here my package name is "com.sunil.firebasedatabasetest" . Other fields are optional for debug mode. But if you want to release your app that time you need to pass the SHA-1 key. 


    Step.5: Once you done your step.5 You will get downloded one google-services.json file. You have to copy this file and paste inside the app folder. 

    Wow You have done your configuration. Now add your dependencies in your project level and app level.

    build.gradle project level

    // Top-level build file where you can add configuration options common to all sub-projects/modules.

    buildscript {
    repositories {
    jcenter()
    }
    dependencies {
    classpath 'com.android.tools.build:gradle:2.2.2'
    classpath 'com.google.gms:google-services:3.0.0'
    classpath 'com.neenbedankt.gradle.plugins:android-apt:1.8'
    // NOTE: Do not place your application dependencies here; they belong
    // in the individual module build.gradle files

    }
    }

    allprojects {
    repositories {
    jcenter()
    }
    }

    task clean(type: Delete) {
    delete rootProject.buildDir
    }


    build.gradle app level

    apply plugin: 'com.android.application'
    apply plugin: 'com.neenbedankt.android-apt'

    android {
    compileSdkVersion 25
    buildToolsVersion "25.0.0"
    defaultConfig {
    applicationId "com.sunil.firebasedatabasetest"
    minSdkVersion 15
    targetSdkVersion 25
    versionCode 1
    versionName "1.0"
    testInstrumentationRunner "android.support.test.runner.AndroidJUnitRunner"
    }
    buildTypes {
    release {
    minifyEnabled false
    proguardFiles getDefaultProguardFile('proguard-android.txt'), 'proguard-rules.pro'
    }
    }
    }

    dependencies {
    compile fileTree(dir: 'libs', include: ['*.jar'])
    androidTestCompile('com.android.support.test.espresso:espresso-core:2.2.2', {
    exclude group: 'com.android.support', module: 'support-annotations'
    })
    compile 'com.android.support:appcompat-v7:25.0.0'
    testCompile 'junit:junit:4.12'

    compile 'com.firebaseui:firebase-ui-database:0.6.2'
    compile 'com.google.firebase:firebase-auth:9.8.0'
    compile 'com.google.firebase:firebase-database:9.8.0'

    compile 'com.android.support:recyclerview-v7:25.0.0'
    compile 'com.android.support:cardview-v7:25.0.0'
    compile 'com.android.support:design:25.0.0'

    compile 'com.jakewharton:butterknife:8.4.0'
    apt 'com.jakewharton:butterknife-compiler:8.4.0'

    }
    apply plugin: 'com.google.gms.google-services'


    Lets create the signup and sign by using Firebase Auth.


    Now I am sharing the core part of code that required to signup with firebase auth.Before make sure you have enabled the Email from console.

    SignUpFragment.java

      @Override
    public View onCreateView(LayoutInflater inflater, ViewGroup container,
    Bundle savedInstanceState) {
    // Inflate the layout for this fragment
    rootView = inflater.inflate(R.layout.fragment_signup, container, false);
    ButterKnife.bind(this, rootView);

    // Initialize FirebaseAuth
    mFirebaseAuth = FirebaseAuth.getInstance();

    return rootView;
    }

    @OnClick(R.id.SignUp)
    public void onClickSignUp(){
    if (!valid()){
    return;
    }else {

    String email = emailEditText.getText().toString().trim();
    String password = passwordEditText.getText().toString().trim();
    mFirebaseAuth.createUserWithEmailAndPassword(email, password).addOnCompleteListener(new OnCompleteListener() {
    @Override
    public void onComplete(@NonNull Task task) {
    if (task.isSuccessful()){
    mListener.onSignUpDone();
    }else{
    Utility.showDialog(getActivity(), task);
    }

    }
    });
    }
    }


    Once you done signup successfully, you can see on dashboard one user entry insert.  Please refer snap shot that helps you to show the user entry.


    Now you can try with login with same email and password credential.


    SignInFragment.java

    import android.annotation.TargetApi;
    import android.app.Activity;
    import android.app.Fragment;
    import android.content.Context;
    import android.os.Build;
    import android.os.Bundle;
    import android.support.annotation.NonNull;
    import android.support.design.widget.TextInputLayout;
    import android.util.Log;
    import android.view.LayoutInflater;
    import android.view.View;
    import android.view.ViewGroup;
    import android.widget.EditText;

    import com.google.android.gms.tasks.OnCompleteListener;
    import com.google.android.gms.tasks.Task;
    import com.google.firebase.auth.AuthResult;
    import com.google.firebase.auth.FirebaseAuth;
    import com.google.firebase.auth.FirebaseUser;
    import com.google.firebase.database.DatabaseReference;
    import com.google.firebase.database.FirebaseDatabase;
    import com.sunil.firebasedatabasetest.R;
    import com.sunil.firebasedatabasetest.utils.SharedPreferenceUtils;
    import com.sunil.firebasedatabasetest.utils.Utility;

    import butterknife.BindView;
    import butterknife.ButterKnife;
    import butterknife.OnClick;
    public class SignInFragment extends Fragment {

    public static final String TAG = SignInFragment.class.getSimpleName();
    private View rootView;

    OnFragmentInteractionListener mListener;
    private FirebaseAuth mFirebaseAuth;

    @BindView(R.id.emailLayout)
    TextInputLayout emailLayout;
    @BindView(R.id.passwordLayout)
    TextInputLayout passwordLayout;

    @BindView(R.id.email)
    EditText emailEditText;
    @BindView(R.id.password)
    EditText passwordEditText;


    public static SignInFragment newInstance() {
    SignInFragment fragment = new SignInFragment();
    return fragment;
    }

    public SignInFragment() {
    // Required MyFundsCategoriesFragment public constructor
    }

    @Override
    public void onCreate(Bundle savedInstanceState) {
    super.onCreate(savedInstanceState);
    if (getArguments() != null) {

    }
    }

    @Override
    public View onCreateView(LayoutInflater inflater, ViewGroup container,
    Bundle savedInstanceState) {
    // Inflate the layout for this fragment
    rootView = inflater.inflate(R.layout.fragment_signin, container, false);
    ButterKnife.bind(this, rootView);

    // Initialize FirebaseAuth
    mFirebaseAuth = FirebaseAuth.getInstance();

    return rootView;
    }

    @TargetApi(23)
    @Override
    public void onAttach(Context context) {
    super.onAttach(context);
    onAttachToContext(context);
    }

    /*
    * Deprecated on API 23
    * Use onAttachToContext instead
    */


    @SuppressWarnings("deprecation")
    @Override
    public void onAttach(Activity activity) {
    super.onAttach(activity);
    if (Build.VERSION.SDK_INT < Build.VERSION_CODES.M) {
    onAttachToContext(activity);
    }
    }

    /*
    * Called when the fragment attaches to the activity
    */
    protected void onAttachToContext(Context context) {
    Activity activity = (Activity) context;
    try {
    mListener = (OnFragmentInteractionListener) activity;
    } catch (ClassCastException e) {
    throw new ClassCastException(activity.toString()
    + " must implement OnFragmentInteractionListener");
    }
    }

    @Override
    public void onDetach() {
    super.onDetach();
    mListener = null;
    }

    public interface OnFragmentInteractionListener {
    void onSignInDone();
    }

    @OnClick(R.id.signIn)
    public void getSignInClick(){
    if (!valid()){
    return;
    }else {
    String email = emailEditText.getText().toString().trim();
    String password = passwordEditText.getText().toString().trim();

    mFirebaseAuth.signInWithEmailAndPassword(email, password)
    .addOnCompleteListener(getActivity(), new OnCompleteListener() {
    @Override
    public void onComplete(@NonNull Task task) {
    if (task.isSuccessful()){
    FirebaseUser user = task.getResult().getUser();
    Log.d(TAG, "onComplete: uid=" + user.getUid());
    SharedPreferenceUtils.getInstance(getActivity()).setUUID(user.getUid());
    SharedPreferenceUtils.getInstance(getActivity()).setEmail(user.getEmail());
    mListener.onSignInDone();
    }else{
    Utility.showDialog(getActivity(), task);
    }

    }
    });
    }
    }

    private boolean valid(){
    boolean isValid;
    if (!Utility.validateEmail(emailLayout)){
    isValid = false;
    }
    else if (Utility.nullCheck(passwordLayout, "Password")){
    isValid = false;
    }else{
    isValid = true;
    }
    return isValid;
    }
    }


    Now you are logged user. Lets create the database with notes table. Every user can add notes. Lets show all created notes in recyclerView. And add note with title and description.
    Lets checkout first create a note.


    AddNoteFragment.java

    import android.app.Activity;
    import android.app.Fragment;
    import android.content.Context;
    import android.os.Build;
    import android.os.Bundle;
    import android.support.design.widget.TextInputLayout;
    import android.support.v7.widget.LinearLayoutManager;
    import android.support.v7.widget.RecyclerView;
    import android.util.Log;
    import android.view.LayoutInflater;
    import android.view.View;
    import android.view.ViewGroup;
    import android.widget.EditText;

    import com.google.firebase.auth.FirebaseAuth;
    import com.google.firebase.auth.FirebaseUser;
    import com.google.firebase.database.DataSnapshot;
    import com.google.firebase.database.DatabaseError;
    import com.google.firebase.database.DatabaseReference;
    import com.google.firebase.database.FirebaseDatabase;
    import com.google.firebase.database.Query;
    import com.google.firebase.database.ValueEventListener;
    import com.sunil.firebasedatabasetest.adapter.NoteAdapter;
    import com.sunil.firebasedatabasetest.model.NotesModel;
    import com.sunil.firebasedatabasetest.R;
    import com.sunil.firebasedatabasetest.utils.SharedPreferenceUtils;
    import com.sunil.firebasedatabasetest.utils.Utility;

    import java.util.ArrayList;
    import java.util.HashMap;
    import java.util.List;
    import java.util.Map;

    import butterknife.BindView;
    import butterknife.ButterKnife;
    import butterknife.OnClick;

    /**
    * Created by sunil on 11/7/16.
    */

    public class AddNoteFragment extends Fragment{

    public static final String TAG = AddNoteFragment.class.getSimpleName();
    private View rootView;

    OnFragmentInteractionListener mListener;
    DatabaseReference myRef;
    DatabaseReference database;
    private FirebaseAuth mFirebaseAuth;

    @BindView(R.id.titleLayout)
    TextInputLayout titleLayout;
    @BindView(R.id.discriptionLayout)
    TextInputLayout descriptionLayout;

    @BindView(R.id.title)
    EditText titleEditText;
    @BindView(R.id.discription)
    EditText descriptionEditText;

    public static AddNoteFragment newInstance() {
    AddNoteFragment fragment = new AddNoteFragment();
    return fragment;
    }

    public AddNoteFragment() {
    // Required MyFundsCategoriesFragment public constructor
    }

    @Override
    public void onCreate(Bundle savedInstanceState) {
    super.onCreate(savedInstanceState);
    if (getArguments() != null) {

    }
    }

    @Override
    public View onCreateView(LayoutInflater inflater, ViewGroup container,
    Bundle savedInstanceState) {
    // Inflate the layout for this fragment
    rootView = inflater.inflate(R.layout.fragment_add_note, container, false);
    ButterKnife.bind(this, rootView);

    database = FirebaseDatabase.getInstance().getReference();

    return rootView;
    }

    @TargetApi(23)
    @Override
    public void onAttach(Context context) {
    super.onAttach(context);
    onAttachToContext(context);
    }

    /*
    * Deprecated on API 23
    * Use onAttachToContext instead
    */


    @SuppressWarnings("deprecation")
    @Override
    public void onAttach(Activity activity) {
    super.onAttach(activity);
    if (Build.VERSION.SDK_INT < Build.VERSION_CODES.M) {
    onAttachToContext(activity);
    }
    }

    /*
    * Called when the fragment attaches to the activity
    */
    protected void onAttachToContext(Context context) {
    Activity activity = (Activity) context;
    try {
    mListener = (OnFragmentInteractionListener) activity;
    } catch (ClassCastException e) {
    throw new ClassCastException(activity.toString()
    + " must implement OnFragmentInteractionListener");
    }
    }

    @Override
    public void onDetach() {
    super.onDetach();
    mListener = null;
    }

    public interface OnFragmentInteractionListener {
    void notesAddedDone();
    }

    @OnClick(R.id.addNote)
    public void onClickAddNote(){
    if (!valid()){
    return;
    }else {

    String title = titleEditText.getText().toString().trim();
    String description = descriptionEditText.getText().toString().trim();
    addNotes(title, description);
    }
    }

    private void addNotes(final String title, final String description){
    final String userId = SharedPreferenceUtils.getInstance(getActivity()).getUUID();
    final String userEmail = SharedPreferenceUtils.getInstance(getActivity()).getEmail();
    //NotesModel model = new NotesModel(userEmail, userId,title, description);
    // database.child("notes").setValue(model);
    database.child("notes").child(userId).addListenerForSingleValueEvent(
    new ValueEventListener() {
    @Override
    public void onDataChange(DataSnapshot dataSnapshot) {
    // Get note value
    writeNewNote(userId, userEmail, title, description);

    }

    @Override
    public void onCancelled(DatabaseError databaseError) {
    Log.w(TAG, "getUser:onCancelled", databaseError.toException());
    }
    });
    }

    private void writeNewNote(String userId, String username, String title, String description) {
    // Create new post at /user-posts/$userid/$postid and at
    // /posts/$postid simultaneously
    String key = database.child("notes").push().getKey();
    NotesModel notesModel = new NotesModel(username,userId, title, description);
    Map postValues = notesModel.toMap();

    Map childUpdates = new HashMap<>();
    childUpdates.put("/notes/" + key, postValues);

    database.updateChildren(childUpdates);

    mListener.notesAddedDone();
    }

    private boolean valid(){
    boolean isValid;
    if (Utility.nullCheck(titleLayout, "Title")){
    isValid = false;
    }
    else if (Utility.nullCheck(descriptionLayout, "Description")){
    isValid = false;
    }
    else{
    isValid = true;
    }
    return isValid;
    }
    }


    Now what we had added notes by users we can show on recyclerview. Here is sample code.


    UserNotesFragment.java

    import android.annotation.TargetApi;
    import android.app.Activity;
    import android.app.Fragment;
    import android.content.Context;
    import android.os.Build;
    import android.os.Bundle;
    import android.support.v7.widget.LinearLayoutManager;
    import android.support.v7.widget.RecyclerView;
    import android.util.Log;
    import android.view.LayoutInflater;
    import android.view.View;
    import android.view.ViewGroup;

    import com.google.firebase.auth.FirebaseAuth;
    import com.google.firebase.auth.FirebaseUser;
    import com.google.firebase.database.DataSnapshot;
    import com.google.firebase.database.DatabaseError;
    import com.google.firebase.database.DatabaseReference;
    import com.google.firebase.database.FirebaseDatabase;
    import com.google.firebase.database.Query;
    import com.google.firebase.database.ValueEventListener;
    import com.sunil.firebasedatabasetest.R;
    import com.sunil.firebasedatabasetest.adapter.NoteAdapter;
    import com.sunil.firebasedatabasetest.model.NotesModel;

    import java.util.ArrayList;
    import java.util.List;

    import butterknife.BindView;
    import butterknife.ButterKnife;
    import butterknife.OnClick;

    /**
    * Created by sunil on 11/10/16.
    */

    public class UserNotesFragment extends Fragment {

    public static String TAG = UserNotesFragment.class.getSimpleName();
    private View rootView;

    @BindView(R.id.recycler_view)
    RecyclerView mRecyclerView;

    OnFragmentInteractionListener mListener;
    DatabaseReference database;
    private FirebaseAuth mFirebaseAuth;
    FirebaseUser mFirebaseUser;
    private String mUserId;

    public static UserNotesFragment newInstance() {
    UserNotesFragment fragment = new UserNotesFragment();
    return fragment;
    }

    public UserNotesFragment() {
    // Required MyFundsCategoriesFragment public constructor
    }

    @Override
    public void onCreate(Bundle savedInstanceState) {
    super.onCreate(savedInstanceState);
    if (getArguments() != null) {

    }
    }

    @Override
    public View onCreateView(LayoutInflater inflater, ViewGroup container,
    Bundle savedInstanceState) {
    // Inflate the layout for this fragment
    rootView = inflater.inflate(R.layout.fragment_userlist, container, false);
    ButterKnife.bind(this, rootView);

    database = FirebaseDatabase.getInstance().getReference();
    // Initialize FirebaseAuth
    mFirebaseAuth = FirebaseAuth.getInstance();

    mFirebaseUser = mFirebaseAuth.getCurrentUser();

    if (mFirebaseUser != null) {
    mUserId = mFirebaseUser.getUid();

    }

    LinearLayoutManager mManager = new LinearLayoutManager(getActivity());
    mManager.setReverseLayout(true);
    mManager.setStackFromEnd(true);
    mRecyclerView.setLayoutManager(mManager);
    mRecyclerView.setHasFixedSize(true);

    DatabaseReference usernameRef = database.child("notes");
    Query queryRef = usernameRef.orderByKey();
    queryRef.addListenerForSingleValueEvent(new ValueEventListener() {
    @Override
    public void onDataChange(DataSnapshot dataSnapshot) {
    List notesModels = new ArrayList();
    for (DataSnapshot child: dataSnapshot.getChildren()) {
    String title = (String) child.child("title").getValue();
    String description = (String) child.child("description").getValue();
    String user = (String) child.child("user").getValue();
    NotesModel notesModel = new NotesModel();
    notesModel.setDescription(description);
    notesModel.setUser(user);
    notesModel.setTitle(title);
    notesModels.add(notesModel);

    }

    NoteAdapter adapter = new NoteAdapter(getActivity(), notesModels);
    mRecyclerView.setAdapter(adapter);
    }

    @Override
    public void onCancelled(DatabaseError databaseError) {
    Log.e(TAG, databaseError.getMessage());
    }
    });

    return rootView;
    }

    @TargetApi(23)
    @Override
    public void onAttach(Context context) {
    super.onAttach(context);
    onAttachToContext(context);
    }

    /*
    * Deprecated on API 23
    * Use onAttachToContext instead
    */


    @SuppressWarnings("deprecation")
    @Override
    public void onAttach(Activity activity) {
    super.onAttach(activity);
    if (Build.VERSION.SDK_INT < Build.VERSION_CODES.M) {
    onAttachToContext(activity);
    }
    }

    /*
    * Called when the fragment attaches to the activity
    */
    protected void onAttachToContext(Context context) {
    Activity activity = (Activity) context;
    try {
    mListener = (OnFragmentInteractionListener) activity;
    } catch (ClassCastException e) {
    throw new ClassCastException(activity.toString()
    + " must implement OnFragmentInteractionListener");
    }
    }

    @Override
    public void onDetach() {
    super.onDetach();
    mListener = null;
    }


    public interface OnFragmentInteractionListener {
    void addNoteClick();
    }

    @OnClick(R.id.create)
    public void addNoteClick(){
    mListener.addNoteClick();
    }

    }

    Lets check the database and tables what inserted data. Please go to your project dash board and click of menu option database. Here are my database details.


    Thanks for reading this post. I hope it will help you to create the firebase real time database.

    Upload file on Firebase Storage in Android

    $
    0
    0
    Firebase provides lot of good feature as we had seen in my last tutorial. If you have not seen my last articles Here is the quick description Firebase Database and authentication and Firebase Analytics.

    Today I am sharing article to upload any files on Firebase storage. Lets talk about what is firebase storage. Firebase Storage is built for app developers who need to store and serve user-generated content, such as photos or videos. Firebase Storage is a stand-alone solution for uploading user generated content like images and videos from an iOS and Android device, as well as the Web.

    Here is firebase storage video by Firebase Team. 


    Lets start configuration for firebase storage and database. Here is video that helps you understand before start upload.


    Step.1: Please go to Firebase console to create the project.


    Step.2: Now you can create the project name and enter your county name. 

    Step.3: You have to choose which platform do you want to use. Here we are configuring for android platform, so I am choosing option for android app.
    Step.4: Now you need to enter your package name of your project. Ex: Here my package name is "com.sunil.firebasedatabasetest" . Other fields are optional for debug mode. But if you want to release your app that time you need to pass the SHA-1 key. 

    Step.5: Once you done your step.4 You will get downloded one google-services.json file. You have to copy this file and paste inside the app folder. 

    build.gradle project level

    // Top-level build file where you can add configuration options common to all sub-projects/modules.

    buildscript {
    repositories {
    jcenter()
    }
    dependencies {
    classpath 'com.android.tools.build:gradle:2.2.2'
    classpath 'com.google.gms:google-services:3.0.0'
    classpath 'com.neenbedankt.gradle.plugins:android-apt:1.8'
    // NOTE: Do not place your application dependencies here; they belong
    // in the individual module build.gradle files

    }
    }

    allprojects {
    repositories {
    jcenter()
    }
    }

    task clean(type: Delete) {
    delete rootProject.buildDir
    }


    build.gradle app level

    apply plugin: 'com.android.application'
    apply plugin: 'com.neenbedankt.android-apt'

    android {
    compileSdkVersion 25
    buildToolsVersion "25.0.0"
    defaultConfig {
    applicationId "com.sunil.firebasedatabasetest"
    minSdkVersion 15
    targetSdkVersion 25
    versionCode 1
    versionName "1.0"
    testInstrumentationRunner "android.support.test.runner.AndroidJUnitRunner"
    }
    buildTypes {
    release {
    minifyEnabled false
    proguardFiles getDefaultProguardFile('proguard-android.txt'), 'proguard-rules.pro'
    }
    }
    }

    dependencies {
    compile fileTree(dir: 'libs', include: ['*.jar'])
    androidTestCompile('com.android.support.test.espresso:espresso-core:2.2.2', {
    exclude group: 'com.android.support', module: 'support-annotations'
    })
    compile 'com.android.support:appcompat-v7:25.0.0'
    testCompile 'junit:junit:4.12'

    compile 'com.firebaseui:firebase-ui-database:0.6.2'
    compile 'com.google.firebase:firebase-auth:9.8.0'
    compile 'com.google.firebase:firebase-database:9.8.0'

    compile 'com.google.firebase:firebase-storage:9.8.0'

    compile 'de.hdodenhof:circleimageview:2.1.0'
    compile 'com.github.bumptech.glide:glide:3.7.0'

    compile 'com.android.support:cardview-v7:25.0.0'
    compile 'com.android.support:design:25.0.0'
    compile 'com.jakewharton:butterknife:8.4.0'
    apt 'com.jakewharton:butterknife-compiler:8.4.0'

    }
    apply plugin: 'com.google.gms.google-services'


    I will get the file form gallery and upload on Firebase storage. Before upload user should be authenticate to give reference where he wants to upload. Here I have button for select picture from gallery and one more button to upload on firebase storage.

    UserFragment.java

    /**
    * Created by sunil on 11/16/16.
    */

    public class UserFragment extends Fragment {

    public static final String TAG = UserFragment.class.getSimpleName();
    public static final int EXTERNAL_STORAGE_PERMISSION_REQUEST_CODE = 2;

    @BindView(R.id.profile_image)
    CircleImageView profileImage;
    @BindView(R.id.select)
    Button select;
    @BindView(R.id.uplaod)
    Button uplaod;
    @BindView(R.id.cardView)
    CardView cardView;
    @BindView(R.id.register_user_email_edit_text)
    TextInputEditText registerUserEmailEditText;
    @BindView(R.id.email_container)
    TextInputLayout emailContainer;
    @BindView(R.id.update)
    Button update;

    private View rootView;
    OnFragmentInteractionListener mListener;
    DatabaseReference databaseRef;
    private FirebaseAuth mFirebaseAuth;
    FirebaseUser mFirebaseUser;
    StorageReference storageRef;
    private ProgressDialog mProgressDialog;

    private static final int SELECT_PICTURE = 100;
    private File mFile;
    Uri selectedImageUri;


    public static UserFragment newInstance() {
    UserFragment fragment = new UserFragment();
    return fragment;
    }

    @Override
    public void onCreate(Bundle savedInstanceState) {
    super.onCreate(savedInstanceState);
    if (getArguments() != null) {

    }
    }

    @Override
    public View onCreateView(LayoutInflater inflater, ViewGroup container,
    Bundle savedInstanceState) {
    // Inflate the layout for this fragment
    rootView = inflater.inflate(R.layout.fragment_userprofile, container, false);
    ButterKnife.bind(this, rootView);

    databaseRef = FirebaseDatabase.getInstance().getReference();
    mFirebaseAuth = FirebaseAuth.getInstance();
    // creating an instance of Firebase Storage
    FirebaseStorage firebaseStorage = FirebaseStorage.getInstance();
    storageRef = firebaseStorage.getReference().child("photos");

    uplaod.setEnabled(false);

    getUserInfo();
    return rootView;
    }

    private void getUserInfo(){
    mFirebaseUser = mFirebaseAuth.getCurrentUser();
    if (mFirebaseUser != null) {
    String userId = mFirebaseUser.getUid();
    String email = mFirebaseUser.getEmail();
    registerUserEmailEditText.setText(email);
    DatabaseReference usernameRef = databaseRef.child(userId);
    Query queryRef = usernameRef.orderByKey();
    queryRef.addListenerForSingleValueEvent(new ValueEventListener() {
    @Override
    public void onDataChange(DataSnapshot dataSnapshot) {
    String userProfileUrl = (String) dataSnapshot.child("userProfileUrl").getValue();
    Log.e(TAG, "Profile Url: "+ userProfileUrl);
    if (userProfileUrl != null && !userProfileUrl.isEmpty()){
    Glide.with(getActivity()).load(userProfileUrl).into(profileImage);
    }
    }

    @Override
    public void onCancelled(DatabaseError databaseError) {
    Log.e(TAG, databaseError.getMessage());
    }
    });

    }


    //databaseReference.child(user.getUid()).child("userProfileUrl").setValue(22);
    }
    private void setUserProfile(String url){
    final String userId = SharedPreferenceUtils.getInstance(getActivity()).getUUID();
    databaseRef.child(userId).child("userProfileUrl").setValue(url);
    }

    @TargetApi(23)
    @Override
    public void onAttach(Context context) {
    super.onAttach(context);
    onAttachToContext(context);
    }

    /*
    * Deprecated on API 23
    * Use onAttachToContext instead
    */


    @SuppressWarnings("deprecation")
    @Override
    public void onAttach(Activity activity) {
    super.onAttach(activity);
    if (Build.VERSION.SDK_INT < Build.VERSION_CODES.M) {
    onAttachToContext(activity);
    }
    }

    /*
    * Called when the fragment attaches to the activity
    */
    protected void onAttachToContext(Context context) {
    Activity activity = (Activity) context;
    try {
    mListener = (OnFragmentInteractionListener) activity;
    } catch (ClassCastException e) {
    throw new ClassCastException(activity.toString()
    + " must implement OnFragmentInteractionListener");
    }
    }

    @Override
    public void onDetach() {
    super.onDetach();
    mListener = null;
    }

    public interface OnFragmentInteractionListener {
    void updateProfileDone();
    }

    @OnClick(R.id.select)
    public void imageSelectFile(){
    if(checkPermissionForExternalStorage(getActivity())) {
    if(checkPermissionForCamera(getActivity())) {
    openFile();
    }
    }
    }

    @OnClick(R.id.uplaod)
    public void uploadClick(){
    if (mFile != null && mFile.exists()) {
    uploadFile(mFile, selectedImageUri );
    }else {
    Toast.makeText(getActivity(), "File does not exist", Toast.LENGTH_LONG).show();
    }

    }

    private void showProgressDialog() {
    if (mProgressDialog == null) {
    mProgressDialog = new ProgressDialog(getActivity());
    mProgressDialog.setMessage("Loading...");
    mProgressDialog.setIndeterminate(true);
    }

    mProgressDialog.show();
    }

    private void hideProgressDialog() {
    if (mProgressDialog != null && mProgressDialog.isShowing()) {
    mProgressDialog.dismiss();
    }
    }

    private void uploadFile(File file, Uri fileUri){
    showProgressDialog();
    InputStream stream = null;
    try {
    stream = new FileInputStream(file);
    } catch (FileNotFoundException e) {
    e.printStackTrace();
    }

    if(stream != null){

    // Create a reference to "file"
    storageRef = storageRef.child(fileUri.getLastPathSegment());

    UploadTask uploadTask = storageRef.putStream(stream);
    uploadTask.addOnFailureListener(new OnFailureListener() {
    @Override
    public void onFailure(@NonNull Exception exception) {
    hideProgressDialog();
    Toast.makeText(getActivity(), "Uploading failed", Toast.LENGTH_LONG).show();
    // Handle unsuccessful uploads
    }
    }).addOnSuccessListener(new OnSuccessListener() {
    @Override
    public void onSuccess(UploadTask.TaskSnapshot taskSnapshot) {
    hideProgressDialog();
    // taskSnapshot.getMetadata() contains file metadata such as size, content-type, and download URL.
    Uri downloadUrl = taskSnapshot.getDownloadUrl();
    Log.e("Url", "DownloadUrl: "+downloadUrl);
    setUserProfile(downloadUrl.toString());
    uplaod.setEnabled(false);
    mListener.updateProfileDone();

    }
    });
    }
    else{
    Toast.makeText(getActivity(), "Getting null file", Toast.LENGTH_LONG).show();
    }
    }

    @TargetApi(Build.VERSION_CODES.M)
    public static boolean checkPermissionForCamera(Activity context) {
    int result = ContextCompat.checkSelfPermission(context, Manifest.permission.CAMERA);
    if (result == PackageManager.PERMISSION_GRANTED) {
    return true;
    } else {
    ActivityCompat.requestPermissions(context, new String[]{Manifest.permission.CAMERA}, EXTERNAL_STORAGE_PERMISSION_REQUEST_CODE);
    return false;
    }
    }

    @TargetApi(Build.VERSION_CODES.M)
    public static boolean checkPermissionForExternalStorage(Activity context) {
    int result = ContextCompat.checkSelfPermission(context, Manifest.permission.WRITE_EXTERNAL_STORAGE);
    if (result == PackageManager.PERMISSION_GRANTED) {
    return true;
    } else {
    ActivityCompat.requestPermissions(context, new String[]{Manifest.permission.WRITE_EXTERNAL_STORAGE}, EXTERNAL_STORAGE_PERMISSION_REQUEST_CODE);
    return false;
    }
    }

    @Override
    public void onRequestPermissionsResult(int requestCode, String[] permissions, int[] grantResults) {
    super.onRequestPermissionsResult(requestCode, permissions, grantResults);
    switch (requestCode){
    case EXTERNAL_STORAGE_PERMISSION_REQUEST_CODE:
    if (grantResults[0] == PackageManager.PERMISSION_GRANTED) {
    if(checkPermissionForCamera(getActivity())) {
    openFile();
    }
    } else {
    Toast.makeText(getActivity(), "You have denied permission to access external storage. Please go to settings and enable access to use this feature", Toast.LENGTH_LONG).show();
    }
    break;
    }
    }

    private void openFile(){
    Intent i = new Intent();
    i.setType("image/*");
    i.setAction(Intent.ACTION_GET_CONTENT);
    startActivityForResult(Intent.createChooser(i, "Select Picture"), SELECT_PICTURE );
    }


    @Override
    public void onActivityResult(int requestCode, int resultCode, Intent data) {
    super.onActivityResult(requestCode, resultCode, data);
    if(requestCode==SELECT_PICTURE){
    selectedImageUri = data.getData();
    String path = getPath(getActivity(),selectedImageUri);
    mFile = new File(path);
    uplaod.setEnabled(true);
    if (null != selectedImageUri) {
    // Get the path from the Uri
    ContentResolver cr = getActivity().getContentResolver();
    Bitmap bitmap;
    try {
    bitmap = android.provider.MediaStore.Images.Media.getBitmap(cr, selectedImageUri);
    profileImage.setImageBitmap(bitmap);
    } catch (Exception e) {
    Log.e("Camera", e.toString());
    }

    }
    }
    }

    @SuppressLint("NewApi")
    public static String getPath(final Context context, final Uri uri) {

    final boolean isKitKat = Build.VERSION.SDK_INT >= Build.VERSION_CODES.KITKAT;

    // DocumentProvider
    if (isKitKat && DocumentsContract.isDocumentUri(context, uri)) {
    // ExternalStorageProvider
    if (isExternalStorageDocument(uri)) {
    final String docId = DocumentsContract.getDocumentId(uri);
    final String[] split = docId.split(":");
    final String type = split[0];

    if ("primary".equalsIgnoreCase(type)) {
    return Environment.getExternalStorageDirectory() + "/"
    + split[1];
    }

    // TODO handle non-primary volumes
    }
    // DownloadsProvider
    else if (isDownloadsDocument(uri)) {

    final String id = DocumentsContract.getDocumentId(uri);
    final Uri contentUri = ContentUris.withAppendedId(
    Uri.parse("content://downloads/public_downloads"),
    Long.valueOf(id));

    return getDataColumn(context, contentUri, null, null);
    }
    // MediaProvider
    else if (isMediaDocument(uri)) {
    final String docId = DocumentsContract.getDocumentId(uri);
    final String[] split = docId.split(":");
    final String type = split[0];

    Uri contentUri = null;
    if ("image".equals(type)) {
    contentUri = MediaStore.Images.Media.EXTERNAL_CONTENT_URI;
    } else if ("video".equals(type)) {
    contentUri = MediaStore.Video.Media.EXTERNAL_CONTENT_URI;
    } else if ("audio".equals(type)) {
    contentUri = MediaStore.Audio.Media.EXTERNAL_CONTENT_URI;
    }

    final String selection = "_id=?";
    final String[] selectionArgs = new String[] { split[1] };

    return getDataColumn(context, contentUri, selection,
    selectionArgs);
    }
    }
    // MediaStore (and general)
    else if ("content".equalsIgnoreCase(uri.getScheme())) {
    return getDataColumn(context, uri, null, null);
    }
    // File
    else if ("file".equalsIgnoreCase(uri.getScheme())) {
    return uri.getPath();
    }

    return null;
    }

    public static boolean isExternalStorageDocument(Uri uri) {
    return "com.android.externalstorage.documents".equals(uri
    .getAuthority());
    }

    public static boolean isDownloadsDocument(Uri uri) {
    return "com.android.providers.downloads.documents".equals(uri
    .getAuthority());
    }

    public static boolean isMediaDocument(Uri uri) {
    return "com.android.providers.media.documents".equals(uri
    .getAuthority());
    }

    public static String getDataColumn(Context context, Uri uri,
    String selection, String[] selectionArgs) {

    Cursor cursor = null;
    final String column = "_data";
    final String[] projection = { column };

    try {
    cursor = context.getContentResolver().query(uri, projection,
    selection, selectionArgs, null);
    if (cursor != null && cursor.moveToFirst()) {
    final int column_index = cursor.getColumnIndexOrThrow(column);
    return cursor.getString(column_index);
    }
    } finally {
    if (cursor != null)
    cursor.close();
    }
    return null;
    }

    }

    Lest see our firebase console to check file had uploaded or not. Wow file is uploaded successfully.


    Uploaded file that can access and download and showed on imageview. Please refer my snap shot.


    Thanks for reading this article. I hope it will helps you to understand firebase storage.

    GreenDao Fast ORM in Android

    $
    0
    0
    Today We are learning about the Green Dao integration in android. It is a fast ORM (Object Relational Mapping) tool for android. Green Dao offers an object oriented interface with  relation database sqlite. It is fast to other ORM that why it is something special and different.
    Green dao has two basic things that works. One is core dao and another is Dao Generator. We can use this Core Dao and Dao generator will create automatically by Wrapper.

    Green Dao Documentation.

    DaoMaster: DaoMaster holds the database object (SQLiteDatabase) and manages DAO classes (not objects) for a specific schema. It has static methods to create the tables or drop them. Its inner classes OpenHelper and DevOpenHelper are SQLiteOpenHelper implementations that create the schema in the SQLite database. 

    DaoSession: Manages all available DAO objects for a specific schema, which you can acquire using one of the getter methods. DaoSession provides also some generic persistence methods like insert, load, update, refresh and delete for entities. Lastly, a DaoSession objects also keeps track of an identity scope. 

    DAOs: Data access objects (DAOs) persists and queries for entities. For each entity, greenDAO generates a DAO. It has more persistence methods than DaoSession, for example: count, loadAll, and insertInTx.

    Entities: Persistable objects. Usually, entities are objects representing a database row using standard Java properties (like a POJO or a JavaBean).

    Lets integrate the Green Dao with our small app to test. You need to create the java library with your project. Lava library is a module for your project. Here I have created "GreenDaoGenerator".


    build.gradle module level

    apply plugin: 'java'

    dependencies {
    compile fileTree(dir: 'libs', include: ['*.jar'])
    compile 'org.greenrobot:greendao-generator:3.2.0'

    }

    sourceCompatibility = "1.7"
    targetCompatibility = "1.7"

    MainGenerator.java

    public class MainGenerator {

    public static void main(String[] args) throws Exception {
    Schema schema = new Schema(3, "com.sunil.greendaorxapp.daogen");
    addNote(schema);
    new DaoGenerator().generateAll(schema, "../GreenDaoRxApp2/app/src/main/java/");
    }

    private static void addNote(Schema schema) {
    Entity note = schema.addEntity("Note");
    note.addIdProperty();
    note.addStringProperty("tittle").notNull();
    note.addStringProperty("comment");
    note.addStringProperty("noteDate");
    }
    }


    Now you have done your module setting. Whenever you want to change in schema or in any field of your table you need to run this main generator to update dao class.

    build.gradle project level

    // Top-level build file where you can add configuration options common to all sub-projects/modules.

    buildscript {
    repositories {
    jcenter()
    }
    dependencies {
    classpath 'com.android.tools.build:gradle:2.2.2'
    classpath 'com.neenbedankt.gradle.plugins:android-apt:1.8'
    classpath 'org.greenrobot:greendao-gradle-plugin:3.2.0'

    // NOTE: Do not place your application dependencies here; they belong
    // in the individual module build.gradle files
    }
    }

    allprojects {
    repositories {
    jcenter()
    }
    }

    task clean(type: Delete) {
    delete rootProject.buildDir
    }

    build.gradle app level

    apply plugin: 'com.android.application'
    apply plugin: 'com.neenbedankt.android-apt'
    apply plugin: 'org.greenrobot.greendao'


    android {
    compileSdkVersion 24
    buildToolsVersion "24.0.0"
    defaultConfig {
    applicationId "com.sunil.greendaorxapp"
    minSdkVersion 14
    targetSdkVersion 24
    versionCode 1
    versionName "1.0"
    testInstrumentationRunner "android.support.test.runner.AndroidJUnitRunner"
    }
    buildTypes {
    release {
    minifyEnabled false
    proguardFiles getDefaultProguardFile('proguard-android.txt'), 'proguard-rules.pro'
    }
    }
    }

    greendao {
    targetGenDir 'src/main/java'
    }


    dependencies {
    compile fileTree(dir: 'libs', include: ['*.jar'])
    androidTestCompile('com.android.support.test.espresso:espresso-core:2.2.2', {
    exclude group: 'com.android.support', module: 'support-annotations'
    })
    compile 'com.android.support:appcompat-v7:24.2.1'
    testCompile 'junit:junit:4.12'
    compile "com.jakewharton:butterknife:8.1.0"
    apt 'com.jakewharton:butterknife-compiler:8.0.1'
    compile 'org.greenrobot:eventbus:3.0.0'
    compile "com.android.support:recyclerview-v7:24.2.0"
    compile "com.android.support:cardview-v7:24.2.0"
    compile 'org.greenrobot:greendao:3.2.0'
    compile 'com.android.support:design:24.2.0'
    compile 'net.zetetic:android-database-sqlcipher:3.5.1'
    }

    build.gradle project level

    // Top-level build file where you can add configuration options common to all sub-projects/modules.

    buildscript {
    repositories {
    jcenter()
    }
    dependencies {
    classpath 'com.android.tools.build:gradle:2.2.2'
    classpath 'com.neenbedankt.gradle.plugins:android-apt:1.8'
    classpath 'org.greenrobot:greendao-gradle-plugin:3.2.0'

    // NOTE: Do not place your application dependencies here; they belong
    // in the individual module build.gradle files
    }
    }

    allprojects {
    repositories {
    jcenter()
    }
    }

    task clean(type: Delete) {
    delete rootProject.buildDir
    }

    MainApplication.java

    public class MainApplication extends Application{

    private static Context mContext;
    private DaoSession daoSession;
    public static final boolean ENCRYPTED = true;

    public void onCreate() {
    super.onCreate();
    mContext = getApplicationContext();

    DaoMaster.DevOpenHelper helper = new DaoMaster.DevOpenHelper(this, ENCRYPTED ? "notes-db-encrypted" : "notes-db");
    Database db = ENCRYPTED ? helper.getEncryptedWritableDb("super-secret") : helper.getWritableDb();
    daoSession = new DaoMaster(db).newSession();
    }

    public static Context getAppContext() {
    return mContext;
    }

    public DaoSession getDaoSession() {
    return daoSession;
    }
    }


    MainActivity.java

    public class MainActivity extends AppCompatActivity {

    private static String TAG = MainActivity.class.getSimpleName();

    @BindView(R.id.no_data)
    TextView no_data_tv;
    @BindView(R.id.recyclerView)
    RecyclerView recyclerView;
    @BindView(R.id.button_create)
    Button btn_create;


    @Override
    protected void onCreate(Bundle savedInstanceState) {
    super.onCreate(savedInstanceState);
    setContentView(R.layout.activity_main);
    ButterKnife.bind(this);

    recyclerView.setLayoutManager(new LinearLayoutManager(this));

    }

    @Override
    protected void onResume() {
    super.onResume();

    final List list = NoteManager.loadAll(this);
    if (list == null && list.size() == 0) {
    no_data_tv.setVisibility(View.VISIBLE);
    recyclerView.setVisibility(View.GONE);
    } else {
    no_data_tv.setVisibility(View.GONE);
    recyclerView.setVisibility(View.VISIBLE);
    NoteAdapter adapter = new NoteAdapter(this, list);
    recyclerView.setAdapter(adapter);
    recyclerView.addOnItemTouchListener(
    new RecyclerItemClickListener(this, new RecyclerItemClickListener.OnItemClickListener() {
    @Override
    public void onItemClick(View view, int position) {

    Note note = list.get(position);
    Intent intent = new Intent(MainActivity.this, NoteDetailActivity.class);
    intent.putExtra("Create", false);
    intent.putExtra("NoteID", note.getId());
    startActivity(intent);
    }
    })
    );

    }
    }

    @OnClick(R.id.button_create)
    public void createNoteClick() {
    Intent intent = new Intent(MainActivity.this, NoteDetailActivity.class);
    intent.putExtra("Create", true);
    startActivity(intent);
    }
    }


    activity_main.xml

    <?xml version="1.0" encoding="utf-8"?&gt
    <RelativeLayout xmlns:android="http://schemas.android.com/apk/res/android"
    xmlns:tools="http://schemas.android.com/tools"
    android:id="@+id/activity_main"
    android:layout_width="match_parent"
    android:layout_height="match_parent"
    android:paddingBottom="@dimen/activity_vertical_margin"
    android:paddingLeft="@dimen/activity_horizontal_margin"
    android:paddingRight="@dimen/activity_horizontal_margin"
    android:paddingTop="@dimen/activity_vertical_margin"
    tools:context="com.sunil.greendaorxapp.MainActivity"&gt

    <TextView
    android:id="@+id/no_data"
    android:text="@string/no_note"
    android:layout_centerInParent="true"
    android:gravity="center"
    android:visibility="gone"
    android:layout_width="match_parent"
    android:layout_height="wrap_content" /&gt

    <android.support.v7.widget.RecyclerView
    android:id="@+id/recyclerView"
    android:layout_width="match_parent"
    android:layout_marginBottom="20dp"
    android:layout_height="wrap_content">
    </android.support.v7.widget.RecyclerView&gt

    <Button
    android:id="@+id/button_create"
    android:layout_alignParentBottom="true"
    android:background="@color/colorAccent"
    android:layout_width="match_parent"
    android:text="@string/Create_Note"
    android:textColor="@color/colorPrimaryDark"
    android:layout_height="wrap_content" /&gt
    </RelativeLayout/&gt

    NoteManager.java

    public class NoteManager {

    public static Note load(Context ctx, long id) {
    return getNoteDao(ctx).load(id);
    }

    public static List loadAll(Context ctx) {
    return getNoteDao(ctx).loadAll();
    }

    public static long insertOrReplace(Context ctx, Note note) {
    return getNoteDao(ctx).insertOrReplace(note);
    }

    public static void remove(Context ctx, Note note) {
    getNoteDao(ctx).delete(note);
    }

    private static NoteDao getNoteDao(Context c) {
    // get the note DAO
    DaoSession daoSession = ((MainApplication) MainApplication.getAppContext()).getDaoSession();
    NoteDao noteDao = daoSession.getNoteDao();
    return noteDao ;
    }

    }


    NoteDetailActivity.java

    public class NoteDetailActivity extends AppCompatActivity {

    private static String TAG = NoteDetailActivity.class.getSimpleName();

    @BindView(R.id.titleLayout)
    TextInputLayout titleLabelLayout;
    @BindView(R.id.descriptionLayout)
    TextInputLayout descriptionLabelLayout;
    @BindView(R.id.dateLayout)
    TextInputLayout dateLabelLayout;

    @BindView(R.id.title)
    EditText titleEditText;
    @BindView(R.id.description)
    EditText descriptionEditText;
    @BindView(R.id.age)
    EditText dateEditText;

    @BindView(R.id.save)
    Button save;

    private boolean isCreate;
    private Long noteId;
    Note mNote;

    @Override
    protected void onCreate(@Nullable Bundle savedInstanceState) {
    super.onCreate(savedInstanceState);
    setContentView(R.layout.activity_note_detail);
    ButterKnife.bind(this);

    Bundle bundle = getIntent().getExtras();
    if (bundle != null) {
    isCreate = bundle.getBoolean("Create");
    noteId = bundle.getLong("NoteID");
    }
    if (!isCreate) {
    save.setText("Save");
    mNote = NoteManager.load(this, noteId);
    if (mNote != null) {
    titleEditText.setText(mNote.getTittle());
    descriptionEditText.setText(mNote.getComment());
    dateEditText.setText(mNote.getNoteDate() + "");
    }
    } else {
    save.setText("Add");
    Calendar c = Calendar.getInstance();
    System.out.println("Current time => " + c.getTime());
    dateEditText.setText(c.getTime()+"");
    }
    }

    @OnClick(R.id.save)
    public void saveClick(){
    if (isCreate){
    // insert note
    if (!valid()){
    return;
    }else{
    Note note = new Note();
    note.setTittle(titleEditText.getText().toString());
    note.setComment(descriptionEditText.getText().toString());
    note.setNoteDate(dateEditText.getText().toString());
    NoteManager.insertOrReplace(this, note);
    finish();
    }

    }else{
    // update note
    if (!valid()){
    return;
    }else{
    mNote.setTittle(titleEditText.getText().toString());
    mNote.setComment(descriptionEditText.getText().toString());
    mNote.setNoteDate(dateEditText.getText().toString());
    NoteManager.insertOrReplace(this, mNote);
    finish();
    }
    }
    }

    private boolean valid(){
    boolean isValid;
    if (Utility.nullCheck(titleLabelLayout, "Title")){
    isValid = false;
    }
    else if (Utility.nullCheck(descriptionLabelLayout, "Comment")){
    isValid = false;
    }
    else if (Utility.nullCheck(dateLabelLayout, "Date")){
    isValid = false;
    }else{
    isValid = true;
    }
    return isValid;
    }
    }


    Thanks for reading this post. I hope it will helps you.

    Drag and Drop Item in RecyclerView in Android

    $
    0
    0
    RecyclerView is the main feature of any app. It mostly used in building android app. RecyclerView comes in material design. It gives better user experience to bind the data and show in list. It gives better experience than ListView. Today people are using more complex design layout that difficult to handle by ListView.

    ListView will be obsolete in next coming days. It failed to provide better animation and multiple view click on Item. That why introduced RecyclerView.
    Its provide better scrolling and animation while adding item and removing item. Now today we are learning about how to drag and drop item in recyclerView. RecyclerView provide better experience in drag and drop item. You can set the order of items. Here is the video that what I am talking about Please check it.


    Lets create android project by Android studio. you need to add dependency for recycler-view.
    I used some of dependencies that makes better user interface. 

    build.gradle app level

    apply plugin: 'com.android.application'

    android {
    compileSdkVersion 23
    buildToolsVersion "23.0.2"

    defaultConfig {
    applicationId "com.sunil.recyclerviewdragndropitem"
    minSdkVersion 14
    targetSdkVersion 23
    versionCode 1
    versionName "1.0"
    }
    buildTypes {
    release {
    minifyEnabled false
    proguardFiles getDefaultProguardFile('proguard-android.txt'), 'proguard-rules.pro'
    }
    }
    }

    dependencies {
    compile fileTree(dir: 'libs', include: ['*.jar'])
    testCompile 'junit:junit:4.12'
    compile 'com.android.support:appcompat-v7:23.1.1'
    compile 'com.android.support:design:23.1.1'
    compile 'de.hdodenhof:circleimageview:2.0.0'
    compile 'com.jakewharton:butterknife:7.0.1'
    compile 'com.android.support:recyclerview-v7:23.1.0'
    compile 'com.squareup.picasso:picasso:2.5.2'
    compile 'com.android.support:cardview-v7:23.1.0'
    }


    ItemModel.java

    /**
    * Created by sunil on 27-Feb-16.
    */
    public class ItemModel {

    private String name;
    private String imagePath;

    public ItemModel(String name, String imagePath) {
    this.name = name;
    this.imagePath = imagePath;
    }

    public String getName() {
    return name;
    }

    public void setName(String name) {
    this.name = name;
    }

    public String getImagePath() {
    return imagePath;
    }

    public void setImagePath(String imagePath) {
    this.imagePath = imagePath;
    }
    }


    RecyclerView ItemTouchHelper.Callback is class that provide the listener to identify the item movement flag while either by long pressed or touch of item or swipe the item. With this help we can drag our item positions.

    EditItemTouchHelperCallback.java

    public class EditItemTouchHelperCallback extends ItemTouchHelper.Callback {

    private final ItemAdapter mAdapter;

    public EditItemTouchHelperCallback(ItemAdapter adapter) {
    mAdapter = adapter;
    }

    @Override
    public boolean isLongPressDragEnabled() {
    return true;
    }

    @Override
    public boolean isItemViewSwipeEnabled() {
    return false;
    }

    @Override
    public int getMovementFlags(RecyclerView recyclerView, RecyclerView.ViewHolder viewHolder) {
    int dragFlags = ItemTouchHelper.UP | ItemTouchHelper.DOWN;
    int swipeFlags = ItemTouchHelper.START | ItemTouchHelper.END;
    return makeMovementFlags(dragFlags, swipeFlags);
    }

    @Override
    public boolean onMove(RecyclerView recyclerView, RecyclerView.ViewHolder viewHolder,
    RecyclerView.ViewHolder target) {
    mAdapter.onItemMove(viewHolder.getAdapterPosition(), target.getAdapterPosition());
    return true;
    }

    @Override
    public void onSwiped(RecyclerView.ViewHolder viewHolder, int direction) {
    mAdapter.onItemDismiss(viewHolder.getAdapterPosition());
    }

    }


    MainActivity.java

    package com.sunil.recyclerviewdragndropitem;

    public class MainActivity extends AppCompatActivity implements OnStartDragListener{

    @Bind(R.id.recycler_view)
    RecyclerView mRecyclerView;
    ItemTouchHelper mItemTouchHelper;
    @Override
    protected void onCreate(Bundle savedInstanceState) {
    super.onCreate(savedInstanceState);
    setContentView(R.layout.activity_main);
    Toolbar toolbar = (Toolbar) findViewById(R.id.toolbar);
    setSupportActionBar(toolbar);
    ButterKnife.bind(this);

    FloatingActionButton fab = (FloatingActionButton) findViewById(R.id.fab);
    fab.setOnClickListener(new View.OnClickListener() {
    @Override
    public void onClick(View view) {
    Snackbar.make(view, "Replace with your own action", Snackbar.LENGTH_LONG)
    .setAction("Action", null).show();
    }
    });


    List list = Utility.getListPerson();

    mRecyclerView.setHasFixedSize(true);
    LinearLayoutManager mLayoutManager = new LinearLayoutManager(this);
    mRecyclerView.setLayoutManager(mLayoutManager);

    ItemAdapter mAdapter = new ItemAdapter(this, list, this);
    ItemTouchHelper.Callback callback =
    new EditItemTouchHelperCallback(mAdapter);
    mItemTouchHelper = new ItemTouchHelper(callback);
    mItemTouchHelper.attachToRecyclerView(mRecyclerView);

    mRecyclerView.setAdapter(mAdapter);


    }

    @Override
    public boolean onCreateOptionsMenu(Menu menu) {
    // Inflate the menu; this adds items to the action bar if it is present.
    getMenuInflater().inflate(R.menu.menu_main, menu);
    return true;
    }

    @Override
    public boolean onOptionsItemSelected(MenuItem item) {
    // Handle action bar item clicks here. The action bar will
    // automatically handle clicks on the Home/Up button, so long
    // as you specify a parent activity in AndroidManifest.xml.
    int id = item.getItemId();

    //noinspection SimplifiableIfStatement
    if (id == R.id.action_settings) {
    return true;
    }

    return super.onOptionsItemSelected(item);
    }

    @Override
    public void onStartDrag(RecyclerView.ViewHolder viewHolder) {
    mItemTouchHelper.startDrag(viewHolder);
    }
    }


    ItemAdapter.java

    public class ItemAdapter extends RecyclerView.Adapter implements ItemTouchHelperAdapter {

    private List mPersonList;
    OnItemClickListener mItemClickListener;
    private static final int TYPE_ITEM = 0;
    private final LayoutInflater mInflater;
    private final OnStartDragListener mDragStartListener;
    private Context mContext;

    public ItemAdapter(Context context, List list, OnStartDragListener dragListner) {
    this.mPersonList = list;
    this.mInflater = LayoutInflater.from(context);
    mDragStartListener = dragListner;
    mContext = context;

    }

    @Override
    public RecyclerView.ViewHolder onCreateViewHolder(ViewGroup viewGroup, int viewType) {

    if (viewType == TYPE_ITEM) {
    //inflate your layout and pass it to view holder
    View v = mInflater.inflate(R.layout.person_item, viewGroup, false);
    return new VHItem(v );
    }

    throw new RuntimeException("there is no type that matches the type " + viewType + " + make sure your using types correctly");

    }

    @Override
    public int getItemViewType(int position) {
    return TYPE_ITEM;
    }


    @Override
    public void onBindViewHolder(RecyclerView.ViewHolder viewHolder, final int i) {

    if (viewHolder instanceof VHItem) {

    final VHItem holder= (VHItem)viewHolder;
    ((VHItem) viewHolder).title.setText(mPersonList.get(i).getName());
    Picasso.with(mContext)
    .load(mPersonList.get(i).getImagePath())
    .placeholder(R.drawable.ic_profile)
    .into(((VHItem) viewHolder).imageView);

    ((VHItem) viewHolder).image_menu.setOnTouchListener(new View.OnTouchListener() {
    @Override
    public boolean onTouch(View v, MotionEvent event) {
    if (MotionEventCompat.getActionMasked(event) == MotionEvent.ACTION_DOWN) {
    mDragStartListener.onStartDrag(holder);
    }
    return false;
    }
    });
    }
    }

    @Override
    public int getItemCount() {
    return mPersonList.size();
    }

    public interface OnItemClickListener {
    public void onItemClick(View view, int position);
    }

    public void setOnItemClickListener(final OnItemClickListener mItemClickListener) {
    this.mItemClickListener = mItemClickListener;
    }

    public class VHItem extends RecyclerView.ViewHolder implements View.OnClickListener ,ItemTouchHelperViewHolder{
    public TextView title;
    private ImageView imageView;
    private ImageView image_menu;

    public VHItem(View itemView) {
    super(itemView);
    title = (TextView) itemView.findViewById(R.id.name);
    image_menu = (ImageView) itemView.findViewById(R.id.image_menu);
    imageView = (ImageView) itemView.findViewById(R.id.circle_imageView);
    itemView.setOnClickListener(this);
    }

    @Override
    public void onClick(View v) {
    if (mItemClickListener != null) {
    mItemClickListener.onItemClick(v, getPosition());
    }
    }

    @Override
    public void onItemSelected() {
    itemView.setBackgroundColor(Color.LTGRAY);
    }

    @Override
    public void onItemClear() {
    itemView.setBackgroundColor(0);
    }
    }

    @Override
    public void onItemDismiss(int position) {
    mPersonList.remove(position);
    notifyItemRemoved(position);
    }

    @Override
    public boolean onItemMove(int fromPosition, int toPosition) {
    //Log.v("", "Log position" + fromPosition + "" + toPosition);
    if (fromPosition < mPersonList.size() && toPosition < mPersonList.size()) {
    if (fromPosition < toPosition) {
    for (int i = fromPosition; i < toPosition; i++) {
    Collections.swap(mPersonList, i, i + 1);
    }
    } else {
    for (int i = fromPosition; i > toPosition; i--) {
    Collections.swap(mPersonList, i, i - 1);
    }
    }
    notifyItemMoved(fromPosition, toPosition);
    }
    return true;
    }

    public void updateList(List list) {
    mPersonList = list;
    notifyDataSetChanged();
    }
    }


    Thanks for reading this post. I hope it will help you.

    ViewPager Item of Recycler view in android

    $
    0
    0
    In my last article We learned how to Drag and Drop Item In RecyclerView. If you did not check Please see the above link that explained about the RecyclerView basic info.

    Today We have learned about How to use View Pager inside the recyclerView to maintain the scrolling of view pager and recyclerView.  In this article I want to present set of image to scroll with help of ViewPager and scroll item of RecyclerView. This concepts used many apps to show their products. Please check my video that helps to understand the feature.


    Lets start to create the android studio project to implements the same feature which is introduced in this video. In this project I used the GreenDao wrapper for local database. I will stored the some of image url into db and fetched at the time of show on recyclerview.
    If you not aware about the Green Dao wrapper of sqlite Please check my last article that helps you to understand . Here is the link Green Dao fast ORM in android.

    build.gradle app level

    apply plugin: 'com.android.application'
    apply plugin: 'com.neenbedankt.android-apt'
    apply plugin: 'org.greenrobot.greendao'

    android {
    compileSdkVersion 25
    buildToolsVersion "25.0.0"
    defaultConfig {
    applicationId "com.sunil.recyclerviewviewpager"
    minSdkVersion 15
    targetSdkVersion 25
    versionCode 1
    versionName "1.0"
    testInstrumentationRunner "android.support.test.runner.AndroidJUnitRunner"
    }
    buildTypes {
    release {
    minifyEnabled false
    proguardFiles getDefaultProguardFile('proguard-android.txt'), 'proguard-rules.pro'
    }
    }
    }

    greendao {
    targetGenDir 'src/main/java'
    }

    dependencies {
    compile fileTree(dir: 'libs', include: ['*.jar'])
    androidTestCompile('com.android.support.test.espresso:espresso-core:2.2.2', {
    exclude group: 'com.android.support', module: 'support-annotations'
    })
    compile 'com.android.support:appcompat-v7:25.0.0'
    testCompile 'junit:junit:4.12'

    compile 'com.android.support:recyclerview-v7:25.0.0'
    compile 'com.android.support:cardview-v7:25.0.0'
    compile 'com.android.support:design:25.0.0'

    compile 'com.jakewharton:butterknife:8.4.0'
    apt 'com.jakewharton:butterknife-compiler:8.4.0'

    compile 'com.github.bumptech.glide:glide:3.7.0'

    compile 'org.greenrobot:greendao:3.2.0'
    compile 'net.zetetic:android-database-sqlcipher:3.5.1'

    }


    MainActivity.java

    public class MainActivity extends AppCompatActivity {

    @BindView(R.id.recyclerView)
    RecyclerView recyclerView;
    @BindView(R.id.activity_main)
    RelativeLayout activityMain;

    String [] name = {"Bangalore", "Chennai", "Kolkata", "Delhi", "Mumbai", "Pune"};
    String [] image = {"http://farm8.staticflickr.com/7452/27782542462_12e206359b_m.jpg",
    "http://farm8.staticflickr.com/7311/27782539412_1e1cece561_m.jpg",
    "http://farm8.staticflickr.com/7452/27782542462_12e206359b_m.jpg",
    "http://farm8.staticflickr.com/7326/27605634010_917553d601_m.jpg",
    "http://farm8.staticflickr.com/7452/27782542462_12e206359b_m.jpg",
    "http://farm8.staticflickr.com/7311/27782539412_1e1cece561_m.jpg"};

    @Override
    protected void onCreate(Bundle savedInstanceState) {
    super.onCreate(savedInstanceState);
    setContentView(R.layout.activity_main);
    ButterKnife.bind(this);

    insertIntoDb();
    getInfo();
    }

    private void getInfo() {
    List listWall= WallTallManager.loadAll(this);
    LinearLayoutManager mLayoutManager = new LinearLayoutManager(this);
    recyclerView.setLayoutManager(mLayoutManager);
    WallAdapter adapter = new WallAdapter(this, listWall);
    recyclerView.setAdapter(adapter);
    DividerItemDecoration mDividerItemDecoration = new DividerItemDecoration(recyclerView.getContext(), mLayoutManager.getOrientation());
    recyclerView.addItemDecoration(mDividerItemDecoration);
    }

    private void insertIntoDb(){
    WallTallManager.removeAll(this);
    DataManager.removeAll(this);
    for (int index =0; index < 2; index++){
    WallTall wallTall = new WallTall();
    wallTall.setName_id(index);
    WallTallManager.insertOrReplace(this,wallTall);

    for (int i =0; i<6; i++) {
    DataWall dataWall = new DataWall();
    dataWall.setName_id(index);
    dataWall.setName(name[i]);
    dataWall.setImageurl(image[i]);
    DataManager.insertOrReplace(this,dataWall);
    }

    }
    }
    }

    activity_main.xml

    <?xml version="1.0" encoding="utf-8"?>
    <RelativeLayout xmlns:android="http://schemas.android.com/apk/res/android"
    xmlns:tools="http://schemas.android.com/tools"
    android:id="@+id/activity_main"
    android:layout_width="match_parent"
    android:layout_height="match_parent"
    tools:context="com.sunil.recyclerviewviewpager.MainActivity"/&gt

    <android.support.v7.widget.RecyclerView
    android:id="@+id/recyclerView"
    android:layout_width="match_parent"
    android:layout_height="wrap_content"/&gt
    </RelativeLayout/&gt

    WallAdapter.java

    public class WallAdapter extends RecyclerView.Adapter {

    private List wallTalls;
    private Context context;

    public WallAdapter(Context context, List wallTalls) {
    this.wallTalls = wallTalls;
    this.context = context;
    }

    @Override
    public int getItemCount() {
    return wallTalls.size();
    }


    @Override
    public RecyclerView.ViewHolder onCreateViewHolder(ViewGroup viewGroup, int i) {
    View itemView = LayoutInflater.from(viewGroup.getContext()).inflate(R.layout.item_layout, viewGroup, false);
    return new WallViewHolder(itemView);
    }

    @Override
    public void onBindViewHolder(RecyclerView.ViewHolder holder, int position) {
    int name_id = wallTalls.get(position).getName_id();
    List dataModelList = DataManager.loadByQuery(context, name_id);
    initializeViews(dataModelList, holder, position);
    }


    private void initializeViews(List dataModel, final RecyclerView.ViewHolder holder, int position) {
    ViewPagerAdapter adapter = new ViewPagerAdapter(dataModel);
    ((WallViewHolder)holder).viewPager.setAdapter(adapter);
    ((WallViewHolder)holder).viewPager.setClipToPadding(false);
    ((WallViewHolder)holder).viewPager.setPadding(40, 0, 40, 0);
    if (position == 0) {
    ((WallViewHolder) holder).title.setText("Weekend Shop");
    }
    else{
    ((WallViewHolder)holder).title.setText("Favorite Shop");
    }
    }

    public static class WallViewHolder extends RecyclerView.ViewHolder {

    @BindView(R.id.view_pager)
    ViewPager viewPager;

    @BindView(R.id.title)
    TextView title;

    public WallViewHolder(View itemView) {
    super(itemView);
    ButterKnife.bind(this, itemView);
    }
    }
    }

    ViewPagerAdapter.java

    public class ViewPagerAdapter extends PagerAdapter{

    List dataModels;
    public ViewPagerAdapter(List dataModels){
    this.dataModels = dataModels;
    }

    @Override
    public int getCount() {
    return dataModels.size();
    }

    @Override
    public Object instantiateItem(ViewGroup container, int position) {
    View itemView = LayoutInflater.from(container.getContext()).inflate(R.layout.view_pager_row, container, false);
    ImageView imageViewCampaign = (ImageView) itemView.findViewById(R.id.imageview_campaign);
    TextView textViewCampaign = (TextView) itemView.findViewById(R.id.textview_campaign);
    DataWall wall = dataModels.get(position);
    String imageUrl = wall.getImageurl();
    if (imageUrl != null && !imageUrl.isEmpty()){
    Glide.with(container.getContext())
    .load(imageUrl)
    .centerCrop()
    //.placeholder(R.drawable.ic)
    .crossFade()
    .into(imageViewCampaign);

    }
    textViewCampaign.setText(wall.getName());
    container.addView(itemView);
    return itemView;
    }

    @Override
    public void destroyItem(ViewGroup container, int position, Object object) {
    ((ViewPager) container).removeView((View) object);
    }

    @Override
    public boolean isViewFromObject(View view, Object object) {
    return view == object;
    }
    }
    Thanks for reading this post. I hope it will helps to understand.

    Section RecyclerView in Android

    $
    0
    0
    In the last article We have learned about the some of features of recyclerView . If you did not seen then Please have  a look on this links ViewPager Item in RecyclerView and Drag n Drop item in RecyclerView.

    In this article I am describing the Section in recyclerView. Section is dividing the list items in to sections. For example I am showing three sections "Weekends' , "Favorites" and "Offers".
    Here is uploaded video that presents the Sections in ListView and GridView formate in RecyclerView.


    To implements this section I got help from this link SectionRecyclerViewAdapter.
    Lets create an android studio project to implements section recyclerView.

    build.gradle app level

    apply plugin: 'com.android.application'
    apply plugin: 'com.neenbedankt.android-apt'

    android {
    compileSdkVersion 25
    buildToolsVersion "25.0.0"
    defaultConfig {
    applicationId "com.sunil.sectionrecyclerview"
    minSdkVersion 15
    targetSdkVersion 25
    versionCode 1
    versionName "1.0"
    testInstrumentationRunner "android.support.test.runner.AndroidJUnitRunner"
    }
    buildTypes {
    release {
    minifyEnabled false
    proguardFiles getDefaultProguardFile('proguard-android.txt'), 'proguard-rules.pro'
    }
    }
    }

    dependencies {
    compile fileTree(dir: 'libs', include: ['*.jar'])
    androidTestCompile('com.android.support.test.espresso:espresso-core:2.2.2', {
    exclude group: 'com.android.support', module: 'support-annotations'
    })
    compile 'com.android.support:appcompat-v7:25.0.0'
    testCompile 'junit:junit:4.12'

    compile 'com.android.support:recyclerview-v7:25.0.0'
    compile 'com.android.support:cardview-v7:25.0.0'
    compile 'com.android.support:design:25.0.0'

    compile 'com.jakewharton:butterknife:8.4.0'
    apt 'com.jakewharton:butterknife-compiler:8.4.0'

    compile 'com.github.bumptech.glide:glide:3.7.0'
    compile 'de.hdodenhof:circleimageview:2.0.0'
    }


    ListActivity.java

    public class ListActivity extends AppCompatActivity{

    String imageUrl[] = Constant.image;
    String names[] = Constant.name;

    @BindView(R.id.recyclerView)
    RecyclerView recyclerView;

    @Override
    protected void onCreate(Bundle savedInstanceState) {
    super.onCreate(savedInstanceState);
    setContentView(R.layout.acivity_listview);
    ButterKnife.bind(this);

    List list = getList();
    RecyclerAdapter adapter = new RecyclerAdapter(this, list);
    recyclerView.setLayoutManager(new LinearLayoutManager(this));
    recyclerView.setAdapter(adapter);
    recyclerView.addItemDecoration(new DividerItemDecoration(this,LinearLayoutManager.VERTICAL));

    //This is the code to provide a sectioned list
    List sections =
    new ArrayList();

    //Sections
    sections.add(new SectionedRecyclerViewAdapter.Section(0,"Weekends"));
    sections.add(new SectionedRecyclerViewAdapter.Section(2,"Favorites"));
    sections.add(new SectionedRecyclerViewAdapter.Section(4,"Offers"));

    //Add your adapter to the sectionAdapter
    SectionedRecyclerViewAdapter.Section[] dummy = new SectionedRecyclerViewAdapter.Section[sections.size()];
    SectionedRecyclerViewAdapter mSectionedAdapter = new
    SectionedRecyclerViewAdapter(this,R.layout.item_section, R.id.sectionName, adapter);
    mSectionedAdapter.setSections(sections.toArray(dummy));

    //Apply this adapter to the RecyclerView
    recyclerView.setAdapter(mSectionedAdapter);

    }

    private List getList() {
    List list = new ArrayList<>();
    for (int i = 0; i < imageUrl.length; i++) {
    ItemModel model = new ItemModel();
    model.setName(names[i]);
    model.setImagePath(imageUrl[i]);
    list.add(model);
    }
    return list;
    }
    }

    GridViewActivity.java

    public class GridViewActivity extends Activity{


    String imageUrl[] = Constant.image;
    String names[] = Constant.name;

    @BindView(R.id.recyclerView)
    RecyclerView recyclerView;

    @Override
    protected void onCreate(Bundle savedInstanceState) {
    super.onCreate(savedInstanceState);
    setContentView(R.layout.acivity_listview);
    ButterKnife.bind(this);

    List list = getList();
    RecyclerAdapter adapter = new RecyclerAdapter(this, list);
    recyclerView.setLayoutManager(new GridLayoutManager(this, 2));
    recyclerView.setAdapter(adapter);
    recyclerView.addItemDecoration(new DividerItemDecoration(this,LinearLayoutManager.VERTICAL));

    //This is the code to provide a sectioned list
    List sections =
    new ArrayList();

    //Sections
    sections.add(new SectionedGridRecyclerViewAdapter.Section(0,"Weekends"));
    sections.add(new SectionedGridRecyclerViewAdapter.Section(3,"Favorites"));

    //Add your adapter to the sectionAdapter
    SectionedGridRecyclerViewAdapter.Section[] dummy = new SectionedGridRecyclerViewAdapter.Section[sections.size()];
    SectionedGridRecyclerViewAdapter mSectionedAdapter = new
    SectionedGridRecyclerViewAdapter(this ,R.layout.item_section, R.id.sectionName, recyclerView, adapter);
    mSectionedAdapter.setSections(sections.toArray(dummy));

    //Apply this adapter to the RecyclerView
    recyclerView.setAdapter(mSectionedAdapter);

    }

    private List getList() {
    List list = new ArrayList<>();
    for (int i = 0; i < imageUrl.length; i++) {
    ItemModel model = new ItemModel();
    model.setName(names[i]);
    model.setImagePath(imageUrl[i]);
    list.add(model);
    }
    return list;
    }
    }

    RecyclerAdapter.java

    public class RecyclerAdapter extends RecyclerView.Adapter {

    private List itemModels;
    private Context context;

    public RecyclerAdapter(Context context, List wallTalls) {
    this.itemModels = wallTalls;
    this.context = context;
    }

    @Override
    public int getItemCount() {
    return itemModels.size();
    }


    @Override
    public RecyclerView.ViewHolder onCreateViewHolder(ViewGroup viewGroup, int i) {
    View itemView = LayoutInflater.from(viewGroup.getContext()).inflate(R.layout.item_layout, viewGroup, false);
    return new ItemViewHolder(itemView);
    }

    @Override
    public void onBindViewHolder(RecyclerView.ViewHolder holder, int position) {
    ItemModel model = itemModels.get(position);
    initializeViews(model, holder, position);
    }


    private void initializeViews(ItemModel model, final RecyclerView.ViewHolder holder, int position) {

    String imageUrl = model.getImagePath();
    if (imageUrl != null && !imageUrl.isEmpty()){
    Glide.with(context)
    .load(imageUrl)
    // .placeholder(R.drawable.i)
    .into(((ItemViewHolder)holder).imageView);

    }
    ((ItemViewHolder)holder).name.setText(model.getName());
    }

    public static class ItemViewHolder extends RecyclerView.ViewHolder {

    @BindView(R.id.name)
    TextView name;
    @BindView(R.id.imageView)
    ImageView imageView;

    public ItemViewHolder(View itemView) {
    super(itemView);
    ButterKnife.bind(this, itemView);
    }
    }
    }


    Thanks for reading this post. I hope it will understand to you.

    Multiple View Type in RecyclerView in Android

    $
    0
    0
    Today I am focusing about the multiple view type in recyclerView.  RecyclerView provides many awesome feature to build awesome app.  In one of them is multiple view type RecyclerView.

    Now the people wants app with complex layout and design with multiple view style. Users mind has changed they do not like single view recyclerView. They are like one place cover almost things in single design. So in this case multiple view type is play very important role to build this type of design and layout.

    RecyclerView adapter provides the multiple view type according to your requirement. It will inflate only those view which is required that position.  In this article I am showing the four different type of view.  Here are the details.

    1. Header View Type.
    2. One Column View Type.
    3. Two Column View Type.
    4. Footer ViewType.

    Header and footer is very common to add different View on top of Item of RecyclerView and Footer View you can add the bottom of the item of the recyclerView. In between you can change view type multiple types. Here in this example I used two different View Type One column and two column View type. Here is snap shot that helps to understand.


    Ok sounds good. Lets check how you can make your adapter multiple view type.

    build.gradle app level

    apply plugin: 'com.android.application'
    apply plugin: 'com.neenbedankt.android-apt'

    android {
    compileSdkVersion 25
    buildToolsVersion "25.0.0"
    defaultConfig {
    applicationId "com.sunil.multityperecyclerview"
    minSdkVersion 15
    targetSdkVersion 25
    versionCode 1
    versionName "1.0"
    testInstrumentationRunner "android.support.test.runner.AndroidJUnitRunner"
    }
    buildTypes {
    release {
    minifyEnabled false
    proguardFiles getDefaultProguardFile('proguard-android.txt'), 'proguard-rules.pro'
    }
    }
    }

    dependencies {
    compile fileTree(dir: 'libs', include: ['*.jar'])
    androidTestCompile('com.android.support.test.espresso:espresso-core:2.2.2', {
    exclude group: 'com.android.support', module: 'support-annotations'
    })
    compile 'com.android.support:appcompat-v7:25.0.0'
    testCompile 'junit:junit:4.12'

    compile 'com.android.support:recyclerview-v7:25.0.0'
    compile 'com.android.support:cardview-v7:25.0.0'
    compile 'com.android.support:design:25.0.0'

    compile 'com.jakewharton:butterknife:8.4.0'
    apt 'com.jakewharton:butterknife-compiler:8.4.0'

    compile 'com.github.bumptech.glide:glide:3.7.0'
    compile 'de.hdodenhof:circleimageview:2.0.0'
    compile 'com.android.support:percent:25.0.0'
    }

    MainActivity.java


    public class MainActivity extends AppCompatActivity {

    String imageUrl[] = Constant.image;
    String names[] = Constant.name;

    @BindView(R.id.recyclerView)
    RecyclerView recyclerView;


    @Override
    protected void onCreate(Bundle savedInstanceState) {
    super.onCreate(savedInstanceState);
    setContentView(R.layout.activity_main);
    ButterKnife.bind(this);

    List list = getList();
    MultiTypeRecyclerAdapter adapter = new MultiTypeRecyclerAdapter(this, list);
    recyclerView.setLayoutManager(new LinearLayoutManager(this));
    recyclerView.setAdapter(adapter);
    recyclerView.addItemDecoration(new DividerItemDecoration(this, LinearLayoutManager.VERTICAL));
    recyclerView.setAdapter(adapter);

    }

    private List getList() {
    List list = new ArrayList<>();
    for (int i = 0; i < imageUrl.length; i++) {
    ItemModel model = new ItemModel();
    model.setName(names[i]);
    model.setImagePath(imageUrl[i]);
    list.add(model);
    }
    return list;
    }
    }

    MultiTypeRecyclerAdapter.java


    public class MultiTypeRecyclerAdapter extends RecyclerView.Adapter {

    private List itemModels;
    private Context context;
    private int HEADER_TYPE =0;
    private int FOOTER_TYPE = 1;
    private int ONE_COLUMN_ROW_TYPE = 2;
    private int TWO_COLUMN_ROW_TYPE =3;

    public MultiTypeRecyclerAdapter(Context context, List wallTalls) {
    this.itemModels = wallTalls;
    this.context = context;
    }

    @Override
    public int getItemCount() {
    return itemModels.size()+2;
    }

    @Override
    public int getItemViewType(int position) {

    if (position == 0){
    return HEADER_TYPE;
    }else if (position == itemModels.size()+1){
    return FOOTER_TYPE;
    }else if (position % 2 == 0){
    return ONE_COLUMN_ROW_TYPE;
    }else{
    return TWO_COLUMN_ROW_TYPE;
    }
    }


    @Override
    public RecyclerView.ViewHolder onCreateViewHolder(ViewGroup viewGroup, int viewType) {
    View itemView = null;
    if (viewType == HEADER_TYPE){
    itemView = LayoutInflater.from(viewGroup.getContext()).inflate(R.layout.header_view, viewGroup, false);
    return new HeaderViewHolder(itemView);
    }else if (viewType == FOOTER_TYPE){
    itemView = LayoutInflater.from(viewGroup.getContext()).inflate(R.layout.footer_view, viewGroup, false);
    return new FooterViewHolder(itemView);
    }else if (viewType == ONE_COLUMN_ROW_TYPE){
    itemView = LayoutInflater.from(viewGroup.getContext()).inflate(R.layout.item_layout_one_column, viewGroup, false);
    return new OneColumnViewHolder(itemView);
    }else if (viewType == TWO_COLUMN_ROW_TYPE){
    itemView = LayoutInflater.from(viewGroup.getContext()).inflate(R.layout.item_layout_two_column, viewGroup, false);
    return new TwoColumnViewHolder(itemView);
    }else{
    // default one column row
    itemView = LayoutInflater.from(viewGroup.getContext()).inflate(R.layout.item_layout_one_column, viewGroup, false);
    return new OneColumnViewHolder(itemView);
    }
    }

    @Override
    public void onBindViewHolder(RecyclerView.ViewHolder holder, int position) {

    if (holder instanceof HeaderViewHolder){

    }else if (holder instanceof FooterViewHolder){


    }else if (holder instanceof OneColumnViewHolder){

    ItemModel model = itemModels.get(position-1);
    String imageUrl = model.getImagePath();
    if (imageUrl != null && !imageUrl.isEmpty()){
    Glide.with(context)
    .load(imageUrl)
    // .placeholder(R.drawable.i)
    .into(((OneColumnViewHolder)holder).imageView);

    }
    ((OneColumnViewHolder)holder).name.setText(model.getName());

    }else if (holder instanceof TwoColumnViewHolder){

    ItemModel model = itemModels.get(position-1);
    String imageUrl = model.getImagePath();
    if (imageUrl != null && !imageUrl.isEmpty()){
    Glide.with(context)
    .load(imageUrl)
    .into(((TwoColumnViewHolder)holder).imageView);

    Glide.with(context)
    .load(imageUrl)
    .into(((TwoColumnViewHolder)holder).imageView1);


    }
    ((TwoColumnViewHolder)holder).name.setText(model.getName());
    ((TwoColumnViewHolder)holder).name1.setText(model.getName());

    }else{

    ItemModel model = itemModels.get(position-1);
    String imageUrl = model.getImagePath();
    if (imageUrl != null && !imageUrl.isEmpty()){
    Glide.with(context)
    .load(imageUrl)
    // .placeholder(R.drawable.i)
    .into(((OneColumnViewHolder)holder).imageView);

    }
    ((OneColumnViewHolder)holder).name.setText(model.getName());
    }

    }


    public static class OneColumnViewHolder extends RecyclerView.ViewHolder {

    @BindView(R.id.name)
    TextView name;
    @BindView(R.id.imageView)
    ImageView imageView;

    public OneColumnViewHolder(View itemView) {
    super(itemView);
    ButterKnife.bind(this, itemView);
    }
    }

    public static class TwoColumnViewHolder extends RecyclerView.ViewHolder {

    @BindView(R.id.name)
    TextView name;
    @BindView(R.id.imageView)
    ImageView imageView;

    @BindView(R.id.name1)
    TextView name1;
    @BindView(R.id.imageView1)
    ImageView imageView1;

    public TwoColumnViewHolder(View itemView) {
    super(itemView);
    ButterKnife.bind(this, itemView);
    }
    }

    public static class HeaderViewHolder extends RecyclerView.ViewHolder {

    @BindView(R.id.headerView)
    TextView header;

    public HeaderViewHolder(View itemView) {
    super(itemView);
    ButterKnife.bind(this, itemView);
    }
    }


    public static class FooterViewHolder extends RecyclerView.ViewHolder {

    @BindView(R.id.footerView)
    TextView footer;

    public FooterViewHolder(View itemView) {
    super(itemView);
    ButterKnife.bind(this, itemView);
    }
    }
    }


    Thanks for reading this post. I hope it will help you to understand.

    Expandable Item In RecyclerView in Android

    $
    0
    0
    In my last articles we have learned about the basic of recyclerView. If you have not seen my last article please check those article that really helps you. Here are the link details.
    Multiple view type recyclerView and Section recyclerView.

    Now in this article I am focusing about core feature of recyclerView and major used in the current building apps that is Expandable Item in recyclerView. You can expand and collapse the item of recyclerView to see the subitems of particular item. In the old API android provides the ListViewExpandable class the provides the feature to expand and collapse item of group. But in RecyclerView there is no specific Control to handle this.

    While implementing this feature I found best library that make my work very simple. But if you want any specific expand feature you can feel free to choose any one as per your requirement.
    Here is uploaded video by me that helps you to understand, please check this video.


    Lets create the android project to implements the expandable and collapsable item in RecyclerView.
    Here are the details of Code that required to achieve this feature.


    build.gradle app level

    apply plugin: 'com.android.application'
    apply plugin: 'com.neenbedankt.android-apt'

    android {
    compileSdkVersion 25
    buildToolsVersion "25.0.0"
    defaultConfig {
    applicationId "com.sunil.expandablerecyclerview"
    minSdkVersion 16
    targetSdkVersion 25
    versionCode 1
    versionName "1.0"
    testInstrumentationRunner "android.support.test.runner.AndroidJUnitRunner"
    }
    buildTypes {
    release {
    minifyEnabled false
    proguardFiles getDefaultProguardFile('proguard-android.txt'), 'proguard-rules.pro'
    }
    }
    }

    dependencies {
    compile fileTree(dir: 'libs', include: ['*.jar'])
    androidTestCompile('com.android.support.test.espresso:espresso-core:2.2.2', {
    exclude group: 'com.android.support', module: 'support-annotations'
    })
    compile 'com.android.support:appcompat-v7:25.0.0'
    testCompile 'junit:junit:4.12'

    compile 'com.thoughtbot:expandablerecyclerview:1.0'
    compile 'com.android.support:recyclerview-v7:25.0.0'
    compile 'com.android.support:cardview-v7:25.0.0'
    compile 'com.android.support:design:25.0.0'

    compile 'com.jakewharton:butterknife:8.4.0'
    apt 'com.jakewharton:butterknife-compiler:8.4.0'

    compile 'com.github.bumptech.glide:glide:3.7.0'
    compile 'de.hdodenhof:circleimageview:2.0.0'
    }


    MainActivity.java

    public class MainActivity extends AppCompatActivity {

    String imageUrl[] = Constant.image;
    String names[] = Constant.name;
    String subNames[] = Constant.subName;

    @BindView(R.id.recyclerView)
    RecyclerView recyclerView;


    @Override
    protected void onCreate(Bundle savedInstanceState) {
    super.onCreate(savedInstanceState);
    setContentView(R.layout.activity_main);
    ButterKnife.bind(this);

    List list = getList();
    RecyclerAdapter adapter = new RecyclerAdapter(this, list);
    recyclerView.setLayoutManager(new LinearLayoutManager(this));
    recyclerView.setAdapter(adapter);
    recyclerView.addItemDecoration(new DividerItemDecoration(this, LinearLayoutManager.VERTICAL));
    recyclerView.setAdapter(adapter);

    }

    private List getList() {
    List list = new ArrayList<>();
    for (int i = 0; i < imageUrl.length; i++) {
    List subTitles = new ArrayList<>();
    for (int j = 0; j< subNames.length; j++){
    SubTitle subTitle = new SubTitle(subNames[j]);
    subTitles.add(subTitle);
    }
    Title model = new Title(names[i],subTitles, imageUrl[i]);
    list.add(model);
    }
    return list;
    }
    }

    RecyclerAdapter.java

    public class RecyclerAdapter extends ExpandableRecyclerViewAdapter {

    private Context context;
    public RecyclerAdapter(Context context, List groups) {
    super(groups);
    this.context = context;
    }

    @Override
    public TitleViewHolder onCreateGroupViewHolder(ViewGroup parent, int viewType) {
    View view = LayoutInflater.from(parent.getContext())
    .inflate(R.layout.list_item_title, parent, false);
    return new TitleViewHolder(view);
    }

    @Override
    public SubTitleViewHolder onCreateChildViewHolder(ViewGroup parent, int viewType) {
    View view = LayoutInflater.from(parent.getContext())
    .inflate(R.layout.list_item_subtitle, parent, false);
    return new SubTitleViewHolder(view);
    }

    @Override
    public void onBindChildViewHolder(SubTitleViewHolder holder, int flatPosition,
    ExpandableGroup group, int childIndex) {

    final SubTitle subTitle = ((Title) group).getItems().get(childIndex);
    holder.setSubTitletName(subTitle.getName());
    }

    @Override
    public void onBindGroupViewHolder(TitleViewHolder holder, int flatPosition, ExpandableGroup group) {
    holder.setGenreTitle(context, group);
    }
    }

    TitleViewHolder.java

    public class TitleViewHolder extends GroupViewHolder {

    private TextView titleName;
    private ImageView arrow;
    private ImageView icon;

    public TitleViewHolder(View itemView) {
    super(itemView);
    titleName = (TextView) itemView.findViewById(R.id.list_item_genre_name);
    arrow = (ImageView) itemView.findViewById(R.id.list_item_genre_arrow);
    icon = (ImageView) itemView.findViewById(R.id.list_item_genre_icon);
    }

    public void setGenreTitle(Context context, ExpandableGroup title) {
    if (title instanceof Title) {
    titleName.setText(title.getTitle());
    if (((Title) title).getImageUrl()!= null && !((Title) title).getImageUrl().isEmpty()){
    Glide.with(context)
    .load(((Title) title).getImageUrl())
    .into(icon);

    }
    }
    }

    @Override
    public void expand() {
    animateExpand();
    }

    @Override
    public void collapse() {
    animateCollapse();
    }

    private void animateExpand() {
    RotateAnimation rotate =
    new RotateAnimation(360, 180, Animation.RELATIVE_TO_SELF, 0.5f, Animation.RELATIVE_TO_SELF, 0.5f);
    rotate.setDuration(300);
    rotate.setFillAfter(true);
    arrow.setAnimation(rotate);
    }

    private void animateCollapse() {
    RotateAnimation rotate =
    new RotateAnimation(180, 360, Animation.RELATIVE_TO_SELF, 0.5f, Animation.RELATIVE_TO_SELF, 0.5f);
    rotate.setDuration(300);
    rotate.setFillAfter(true);
    arrow.setAnimation(rotate);
    }
    }

    SubTitleViewHolder.java

    public class SubTitleViewHolder extends ChildViewHolder {

    private TextView subTitleTextView;

    public SubTitleViewHolder(View itemView) {
    super(itemView);
    subTitleTextView = (TextView) itemView.findViewById(R.id.subtitle);
    }

    public void setSubTitletName(String name) {
    subTitleTextView.setText(name);
    }
    }


    Thanks for reading this post. I hope it will helps you to understand.

    Swipe to Delete Item of RecyclerView in Android

    $
    0
    0

    In the last article we have learned about how to expand and collapse item of the recyclerView. If you have not seen please check with this link Expandable item in recyclerview.

    Today I am focusing good feature about swipe to delete or add item in recyclerView because it is good user experience.  In recyclerView provide ItemHelper Class to handle this case. But it not provide good customized.

    While searching the best feature I found one library That really help me. He made our life easy, so full credit goes to him, For more details about this library Here is detail link: Itemtouchhelper-extension

    In this article We can swipe three different way to delete the item of recyclerView.

    1. Swipe with Item width Spring
    2. Swipe with Item width no Spring
    3. Swipe with Item width.

    You can see the detail in this uploaded video. It will helps you to understand the behavior.

    Lets focus about to implements this library to our android project, It very simple just add the dependency to our project to used to same class to make more customized things.


    build.gradle app level

    apply plugin: 'com.android.application'
    apply plugin: 'com.neenbedankt.android-apt'

    android {
    compileSdkVersion 25
    buildToolsVersion "25.0.0"
    defaultConfig {
    applicationId "com.sunil.swipedeleteitemrecyclervieew"
    minSdkVersion 15
    targetSdkVersion 25
    versionCode 1
    versionName "1.0"
    testInstrumentationRunner "android.support.test.runner.AndroidJUnitRunner"
    }
    buildTypes {
    release {
    minifyEnabled false
    proguardFiles getDefaultProguardFile('proguard-android.txt'), 'proguard-rules.pro'
    }
    }
    }

    dependencies {
    compile fileTree(dir: 'libs', include: ['*.jar'])
    androidTestCompile('com.android.support.test.espresso:espresso-core:2.2.2', {
    exclude group: 'com.android.support', module: 'support-annotations'
    })
    compile 'com.android.support:appcompat-v7:25.0.0'
    testCompile 'junit:junit:4.12'

    compile 'com.android.support:recyclerview-v7:25.0.0'
    compile 'com.android.support:cardview-v7:25.0.0'
    compile 'com.android.support:design:25.0.0'

    compile 'com.jakewharton:butterknife:8.4.0'
    apt 'com.jakewharton:butterknife-compiler:8.4.0'

    compile 'com.github.bumptech.glide:glide:3.7.0'
    compile 'de.hdodenhof:circleimageview:2.0.0'
    }

    ItemTouchUIUtilImpl.java

    class ItemTouchUIUtilImpl {
    static class Lollipop extends Honeycomb {
    @Override
    public void onDraw(Canvas c, RecyclerView recyclerView, View view,
    float dX, float dY, int actionState, boolean isCurrentlyActive) {
    if (isCurrentlyActive) {
    Object originalElevation = view.getTag(R.id.item_touch_helper_previous_elevation);
    if (originalElevation == null) {
    originalElevation = ViewCompat.getElevation(view);
    float newElevation = 1f + findMaxElevation(recyclerView, view);
    ViewCompat.setElevation(view, newElevation);
    view.setTag(R.id.item_touch_helper_previous_elevation, originalElevation);
    }
    }
    super.onDraw(c, recyclerView, view, dX, dY, actionState, isCurrentlyActive);
    }

    private float findMaxElevation(RecyclerView recyclerView, View itemView) {
    final int childCount = recyclerView.getChildCount();
    float max = 0;
    for (int i = 0; i < childCount; i++) {
    final View child = recyclerView.getChildAt(i);
    if (child == itemView) {
    continue;
    }
    final float elevation = ViewCompat.getElevation(child);
    if (elevation > max) {
    max = elevation;
    }
    }
    return max;
    }

    @Override
    public void clearView(View view) {
    final Object tag = view.getTag(R.id.item_touch_helper_previous_elevation);
    if (tag != null && tag instanceof Float) {
    ViewCompat.setElevation(view, (Float) tag);
    }
    view.setTag(R.id.item_touch_helper_previous_elevation, null);
    super.clearView(view);
    }
    }

    static class Honeycomb implements ItemTouchUIUtil {

    @Override
    public void clearView(View view) {
    ViewCompat.setTranslationX(view, 0f);
    ViewCompat.setTranslationY(view, 0f);
    }

    @Override
    public void onSelected(View view) {

    }

    @Override
    public void onDraw(Canvas c, RecyclerView recyclerView, View view,
    float dX, float dY, int actionState, boolean isCurrentlyActive) {
    ViewCompat.setTranslationX(view, dX);
    ViewCompat.setTranslationY(view, dY);
    }

    @Override
    public void onDrawOver(Canvas c, RecyclerView recyclerView,
    View view, float dX, float dY, int actionState, boolean isCurrentlyActive) {

    }
    }

    static class Gingerbread implements ItemTouchUIUtil {

    private void draw(Canvas c, RecyclerView parent, View view,
    float dX, float dY) {
    c.save();
    c.translate(dX, dY);
    parent.drawChild(c, view, 0);
    c.restore();
    }

    @Override
    public void clearView(View view) {
    view.setVisibility(View.VISIBLE);
    }

    @Override
    public void onSelected(View view) {
    view.setVisibility(View.INVISIBLE);
    }

    @Override
    public void onDraw(Canvas c, RecyclerView recyclerView, View view,
    float dX, float dY, int actionState, boolean isCurrentlyActive) {
    if (actionState != ItemTouchHelper.ACTION_STATE_DRAG) {
    draw(c, recyclerView, view, dX, dY);
    }
    }

    @Override
    public void onDrawOver(Canvas c, RecyclerView recyclerView,
    View view, float dX, float dY,
    int actionState, boolean isCurrentlyActive) {
    if (actionState == ItemTouchHelper.ACTION_STATE_DRAG) {
    draw(c, recyclerView, view, dX, dY);
    }
    }
    }
    }

    MainActivity.java

    import android.support.v7.app.AppCompatActivity;
    import android.os.Bundle;
    import android.support.v7.widget.DividerItemDecoration;
    import android.support.v7.widget.LinearLayoutManager;
    import android.support.v7.widget.RecyclerView;
    import android.support.v7.widget.helper.ItemTouchHelper;
    import java.util.ArrayList;
    import java.util.List;

    import butterknife.BindView;
    import butterknife.ButterKnife;

    public class MainActivity extends AppCompatActivity {

    String imageUrl[] = Constant.image;
    String names[] = Constant.name;
    RecyclerAdapter adapter;

    @BindView(R.id.recyclerView)
    RecyclerView recyclerView;

    public ItemTouchHelperExtension mItemTouchHelper;
    public ItemTouchHelperExtension.Callback mCallback;

    @Override
    protected void onCreate(Bundle savedInstanceState) {
    super.onCreate(savedInstanceState);
    setContentView(R.layout.activity_main);
    ButterKnife.bind(this);

    List list = getList();
    adapter = new RecyclerAdapter(this, list);
    recyclerView.setLayoutManager(new LinearLayoutManager(this));
    recyclerView.addItemDecoration(new DividerItemDecoration(this,LinearLayoutManager.VERTICAL));

    mCallback = new ItemTouchHelperCallback();
    mItemTouchHelper = new ItemTouchHelperExtension(mCallback);
    mItemTouchHelper.attachToRecyclerView(recyclerView);
    recyclerView.setAdapter(adapter);

    }

    private List getList() {
    List list = new ArrayList<>();
    for (int i = 0; i < imageUrl.length; i++) {
    ItemModel model = new ItemModel();
    model.setName(names[i]);
    model.setImagePath(imageUrl[i]);
    list.add(model);
    }
    return list;
    }
    }
    }

    activity_main.xml

    <?xml version="1.0" encoding="utf-8"?&gt
    <RelativeLayout xmlns:android="http://schemas.android.com/apk/res/android"
    xmlns:tools="http://schemas.android.com/tools"
    android:id="@+id/activity_main"
    android:layout_width="match_parent"
    android:layout_height="match_parent"
    android:paddingBottom="@dimen/activity_vertical_margin"
    android:paddingLeft="@dimen/activity_horizontal_margin"
    android:paddingRight="@dimen/activity_horizontal_margin"
    android:paddingTop="@dimen/activity_vertical_margin"
    tools:context="com.sunil.swipedeleteitemrecyclervieew.MainActivity">

    <android.support.v7.widget.RecyclerView
    android:id="@+id/recyclerView"
    android:layout_width="match_parent"
    android:layout_height="wrap_content"
    </android.support.v7.widget.RecyclerView>

    </RelativeLayout>

    list_item.xml

    <?xml version="1.0" encoding="utf-8"?>
    <RelativeLayout xmlns:android="http://schemas.android.com/apk/res/android"
    xmlns:tools="http://schemas.android.com/tools"
    android:orientation="vertical"
    android:id="@+id/view_list_main_content"
    android:layout_width="match_parent"
    android:layout_height="wrap_content"
    android:padding="10dp"
    android:background="@android:color/white"
    tools:showIn="@layout/list_item_main">

    <de.hdodenhof.circleimageview.CircleImageView
    android:src="@mipmap/ic_launcher"
    android:id="@+id/imageView"
    android:layout_width="70dp"
    android:layout_height="70dp" />

    <TextView
    android:id="@+id/name"
    android:text="name"
    android:textStyle="bold"
    android:layout_alignBaseline="@id/imageView"
    android:layout_margin="10dp"
    android:gravity="center_vertical"
    android:layout_width="match_parent"
    android:layout_height="60dp"
    android:layout_toRightOf="@+id/imageView"/>

    </RelativeLayout>

    list_item_main.xml

    <?xml version="1.0" encoding="utf-8"?>
    <FrameLayout
    xmlns:android="http://schemas.android.com/apk/res/android"
    android:layout_width="match_parent"
    android:layout_height="wrap_content"
    android:background="#FF4444">

    <LinearLayout
    android:id="@+id/view_list_repo_action_container"
    android:layout_width="wrap_content"
    android:layout_height="match_parent"
    android:layout_gravity="right"
    android:orientation="horizontal">

    <TextView
    android:id="@+id/view_list_repo_action_delete"
    android:layout_width="80dp"
    android:layout_height="match_parent"
    android:gravity="center"
    android:padding="12dp"
    android:text="Delete"
    android:textColor="@android:color/white"/>

    <TextView
    android:id="@+id/view_list_repo_action_update"
    android:layout_width="80dp"
    android:layout_height="match_parent"
    android:background="#8BC34A"
    android:gravity="center"
    android:padding="12dp"
    android:text="Refresh"
    android:textColor="@android:color/white"/>

    </LinearLayout&gt
    <include layout="@layout/item_layout"/>
    </FrameLayout>

    list_item_single_delete.xml

    <?xml version="1.0" encoding="utf-8">
    <FrameLayout
    xmlns:android="http://schemas.android.com/apk/res/android"
    android:layout_width="match_parent"
    android:layout_height="wrap_content">

    <LinearLayout
    android:id="@+id/view_list_repo_action_container"
    android:layout_width="match_parent"
    android:layout_height="match_parent"
    android:layout_gravity="right"
    android:background="#FF4444"
    android:orientation="horizontal">

    <TextView
    android:id="@+id/view_list_repo_action_delete"
    android:layout_width="0dp"
    android:layout_height="match_parent"
    android:layout_weight="1"
    android:gravity="center_vertical"
    android:padding="12dp"
    android:text="Delete ?"
    android:textColor="@android:color/white"/>

    <TextView
    android:id="@+id/view_list_repo_action_undo"
    android:layout_width="80dp"
    android:layout_height="match_parent"
    android:gravity="center"
    android:padding="12dp"
    android:text="Undo"
    android:textColor="@android:color/white"/>

    </LinearLayout&gt

    <include layout="@layout/item_layout"/>

    </FrameLayout>

    RecyclerAdapter.java

    import android.content.Context;
    import android.support.v7.widget.RecyclerView;
    import android.view.LayoutInflater;
    import android.view.View;
    import android.view.ViewGroup;
    import android.widget.ImageView;
    import android.widget.TextView;
    import android.widget.Toast;

    import com.bumptech.glide.Glide;

    import java.util.List;

    import butterknife.BindView;
    import butterknife.ButterKnife;

    /**
    * Created by sunil on 11/29/16.
    */

    public class RecyclerAdapter extends RecyclerView.Adapter {

    private List itemModels;
    private Context context;
    public static final int ITEM_TYPE_RECYCLER_WIDTH = 1000;
    public static final int ITEM_TYPE_ACTION_WIDTH = 1001;
    public static final int ITEM_TYPE_ACTION_WIDTH_NO_SPRING = 1002;

    public RecyclerAdapter(Context context, List wallTalls) {
    this.itemModels = wallTalls;
    this.context = context;
    }

    @Override
    public int getItemCount() {
    return itemModels.size();
    }


    @Override
    public RecyclerView.ViewHolder onCreateViewHolder(ViewGroup viewGroup, int viewType) {

    View view = LayoutInflater.from(viewGroup.getContext()).inflate(R.layout.list_item_main, viewGroup, false);
    if (viewType == ITEM_TYPE_ACTION_WIDTH)
    return new ItemSwipeWithActionWidthViewHolder(view);
    if (viewType == ITEM_TYPE_RECYCLER_WIDTH) {
    view = LayoutInflater.from(viewGroup.getContext()).inflate(R.layout.list_item_with_single_delete, viewGroup, false);
    return new ItemViewHolderWithRecyclerWidth(view);
    }
    return new ItemSwipeWithActionWidthNoSpringViewHolder(view);


    }

    @Override
    public void onBindViewHolder(final RecyclerView.ViewHolder holder, int position) {
    ItemModel model = itemModels.get(position);
    initializeViews(model, holder, position);

    if (holder instanceof ItemViewHolderWithRecyclerWidth) {
    ItemViewHolderWithRecyclerWidth viewHolder = (ItemViewHolderWithRecyclerWidth) holder;
    viewHolder.mActionViewDelete.setOnClickListener(new View.OnClickListener() {
    @Override
    public void onClick(View view) {
    doDelete(holder.getAdapterPosition());
    }
    });
    } else if (holder instanceof ItemSwipeWithActionWidthViewHolder) {
    ItemSwipeWithActionWidthViewHolder viewHolder = (ItemSwipeWithActionWidthViewHolder) holder;
    viewHolder.mActionViewRefresh.setOnClickListener(
    new View.OnClickListener() {
    @Override
    public void onClick(View view) {
    Toast.makeText(context, "Refresh Click" + holder.getAdapterPosition()
    , Toast.LENGTH_SHORT).show();
    }
    }

    );
    viewHolder.mActionViewDelete.setOnClickListener(
    new View.OnClickListener() {
    @Override
    public void onClick(View view) {
    doDelete(holder.getAdapterPosition());
    }
    }

    );
    }

    }

    private void doDelete(int adapterPosition) {
    itemModels.remove(adapterPosition);
    notifyItemRemoved(adapterPosition);
    }


    @Override
    public int getItemViewType(int position) {
    if (position == 1) {
    return ITEM_TYPE_ACTION_WIDTH_NO_SPRING;
    }
    if (position == 2) {
    return ITEM_TYPE_RECYCLER_WIDTH;
    }
    return ITEM_TYPE_ACTION_WIDTH;
    }


    private void initializeViews(ItemModel model, final RecyclerView.ViewHolder holder, int position) {

    String imageUrl = model.getImagePath();
    if (imageUrl != null && !imageUrl.isEmpty()){
    Glide.with(context)
    .load(imageUrl)
    .into(((ItemViewHolder)holder).imageView);

    }
    ((ItemViewHolder)holder).name.setText(model.getName());
    }

    class ItemViewHolder extends RecyclerView.ViewHolder {

    @BindView(R.id.name)
    TextView name;
    @BindView(R.id.imageView)
    ImageView imageView;

    @BindView(R.id.view_list_repo_action_container)
    View mActionContainer;

    @BindView(R.id.view_list_main_content)
    View mViewContent;

    public ItemViewHolder(View itemView) {
    super(itemView);
    ButterKnife.bind(this, itemView);
    }
    }


    class ItemViewHolderWithRecyclerWidth extends ItemViewHolder {

    @BindView(R.id.view_list_repo_action_delete)
    View mActionViewDelete;

    public ItemViewHolderWithRecyclerWidth(View itemView) {
    super(itemView);
    ButterKnife.bind(this, itemView);
    }

    }

    class ItemSwipeWithActionWidthViewHolder extends ItemViewHolder implements Extension {

    @BindView(R.id.view_list_repo_action_delete)
    View mActionViewDelete;
    @BindView(R.id.view_list_repo_action_update)
    View mActionViewRefresh;

    public ItemSwipeWithActionWidthViewHolder(View itemView) {
    super(itemView);
    ButterKnife.bind(this, itemView);
    }

    @Override
    public float getActionWidth() {
    return mActionContainer.getWidth();
    }
    }

    class ItemSwipeWithActionWidthNoSpringViewHolder extends ItemSwipeWithActionWidthViewHolder implements Extension {

    public ItemSwipeWithActionWidthNoSpringViewHolder(View itemView) {
    super(itemView);
    }

    @Override
    public float getActionWidth() {
    return mActionContainer.getWidth();
    }
    }
    }


    Thanks for reading this article. I hope it helps you to understand.
    Viewing all 106 articles
    Browse latest View live