Quantcast
Channel: Android point
Viewing all 106 articles
Browse latest View live

Android ViewFlipper Animation example

$
0
0
ViewFlipper is a subclass of ViewAnimator that makes it easy to animate a bunch of views that are added to it. It only displays one child view at a time and you can also set it to rotate the views automatically. Just keep in mind that if you have duration set for your animation alpha then the flipper duration should be greater than that otherwise the view will change even before it completely comes into focus.

String Resource - strings.xml


ViewFlipper
Settings

#ffe4c4
#cdc9c9
#f0fff0


Animation Resource - slide_in_left.xml


Animation Resource - slide_out_left.xml


Layout Resource for the Main Activity


Main Activity

package com.as400samplecode;

import android.os.Bundle;
import android.app.Activity;
import android.view.Menu;
import android.view.View;
import android.view.View.OnClickListener;
import android.view.animation.Animation;
import android.view.animation.AnimationUtils;
import android.widget.Button;
import android.widget.ToggleButton;
import android.widget.ViewFlipper;

public class MainActivity extends Activity implements OnClickListener{

private ToggleButton myToggleButton;
private Button previousView, nextView;
private Animation slide_in_left, slide_in_right, slide_out_left, slide_out_right;

@Override
protected void onCreate(Bundle savedInstanceState) {
super.onCreate(savedInstanceState);
setContentView(R.layout.activity_main);

//get references to our buttons and toogle button
myToggleButton = (ToggleButton) findViewById(R.id.toggleButton);
previousView = (Button) findViewById(R.id.previousView);
nextView = (Button) findViewById(R.id.nextView);

//attach onClick listeners to the buttons
myToggleButton.setOnClickListener(this);
previousView.setOnClickListener(this);
nextView.setOnClickListener(this);

//create animations
slide_in_left = AnimationUtils.loadAnimation(this, R.anim.slide_in_left);
slide_in_right = AnimationUtils.loadAnimation(this, R.anim.slide_in_right);
slide_out_left = AnimationUtils.loadAnimation(this, R.anim.slide_out_left);
slide_out_right = AnimationUtils.loadAnimation(this, R.anim.slide_out_right);

}

@Override
public boolean onCreateOptionsMenu(Menu menu) {
// Inflate the menu; this adds items to the action bar if it is present.
getMenuInflater().inflate(R.menu.activity_main, menu);
return true;
}

@Override
public void onClick(View v) {

//get reference to the view flipper
ViewFlipper myViewFlipper = (ViewFlipper) findViewById(R.id.myViewFlipper);
//set the animation for the view that enters the screen
myViewFlipper.setInAnimation(slide_in_right);
//set the animation for the view leaving th screen
myViewFlipper.setOutAnimation(slide_out_left);

switch (v.getId()) {
case R.id.nextView:
//show the next view
myViewFlipper.showNext();
break;

case R.id.previousView:
//show the next view
myViewFlipper.setInAnimation(slide_in_left);
myViewFlipper.setOutAnimation(slide_out_right);
myViewFlipper.showNext();
break;

case R.id.toggleButton:

if(myToggleButton.isChecked()){
//set flipper interval
myViewFlipper.setFlipInterval(6000);
//start flipping the views
myViewFlipper.startFlipping();
}
else{
//stop flipping the views
myViewFlipper.stopFlipping();
}
break;

}
}

}


Android ViewFlipper Animation exampleAndroid ViewFlipper new ViewAndroid ViewFlipper auto flip

Android Database Content Provider Example using SQLite Database

$
0
0
Android applications can access data directly from a SQLite database using the database helper but for other applications to get access to the same data you have to create a Content Provider. Content Providers encapsulate the data access, provide security using the Android Manifest and standardize the access via a Content URI. If the data is used only by your application there is no need to create a content provider but you can always do that in case a need that arises in the future.

The contentProvider must implement the following methods query(), insert(), update(), delete(), getType() and onCreate() to provide access to the underlying data. If you don't implement the delete method just send an exception to let the application know or if you don't get an URI match. If you have done SQLite database access using the database helper you will find there is not much difference here. All you have to do it create a provider that matches URIs and then figures out what to do with the request.

In this example we will create a simple maintenance program to maintain a list of countries. The access to the country database will be thru the Content Provider that will implement all the CRUD functions. On the screen we will display an existing list of countries and let the user add, update and delete a country. Here is the step by step process to implement the above mentioned functionality using the Content Provider.

Step 1: Create the SQLite database Object - CountriesDb.java

package com.as400samplecode;

import android.database.sqlite.SQLiteDatabase;
import android.util.Log;

public class CountriesDb {

public static final String KEY_ROWID = "_id";
public static final String KEY_CODE = "code";
public static final String KEY_NAME = "name";
public static final String KEY_CONTINENT = "continent";

private static final String LOG_TAG = "CountriesDb";
public static final String SQLITE_TABLE = "Country";

private static final String DATABASE_CREATE =
"CREATE TABLE if not exists " + SQLITE_TABLE + " (" +
KEY_ROWID + " integer PRIMARY KEY autoincrement," +
KEY_CODE + "," +
KEY_NAME + "," +
KEY_CONTINENT + "," +
" UNIQUE (" + KEY_CODE +"));";

public static void onCreate(SQLiteDatabase db) {
Log.w(LOG_TAG, DATABASE_CREATE);
db.execSQL(DATABASE_CREATE);
}

public static void onUpgrade(SQLiteDatabase db, int oldVersion, int newVersion) {
Log.w(LOG_TAG, "Upgrading database from version " + oldVersion + " to "
+ newVersion + ", which will destroy all old data");
db.execSQL("DROP TABLE IF EXISTS " + SQLITE_TABLE);
onCreate(db);
}

}

Step 2: Create the SQLite database Helper - MyDatabaseHelper.java

package com.as400samplecode;

import android.content.Context;
import android.database.sqlite.SQLiteDatabase;
import android.database.sqlite.SQLiteOpenHelper;

public class MyDatabaseHelper extends SQLiteOpenHelper {

private static final String DATABASE_NAME = "TheWorld";
private static final int DATABASE_VERSION = 1;

MyDatabaseHelper(Context context) {
super(context, DATABASE_NAME, null, DATABASE_VERSION);
}

@Override
public void onCreate(SQLiteDatabase db) {
CountriesDb.onCreate(db);
}

@Override
public void onUpgrade(SQLiteDatabase db, int oldVersion, int newVersion) {
CountriesDb.onUpgrade(db, oldVersion, newVersion);
}


}

Step 3: Create the ContentProvider - MyContentProvider.java

package com.as400samplecode;

import android.content.ContentProvider;
import android.content.ContentValues;
import android.content.UriMatcher;
import android.database.Cursor;
import android.database.sqlite.SQLiteDatabase;
import android.database.sqlite.SQLiteQueryBuilder;
import android.net.Uri;
import android.text.TextUtils;

public class MyContentProvider extends ContentProvider{

private MyDatabaseHelper dbHelper;

private static final int ALL_COUNTRIES = 1;
private static final int SINGLE_COUNTRY = 2;

// authority is the symbolic name of your provider
// To avoid conflicts with other providers, you should use
// Internet domain ownership (in reverse) as the basis of your provider authority.
private static final String AUTHORITY = "com.as400samplecode.contentprovider";

// create content URIs from the authority by appending path to database table
public static final Uri CONTENT_URI =
Uri.parse("content://" + AUTHORITY + "/countries");

// a content URI pattern matches content URIs using wildcard characters:
// *: Matches a string of any valid characters of any length.
// #: Matches a string of numeric characters of any length.
private static final UriMatcher uriMatcher;
static {
uriMatcher = new UriMatcher(UriMatcher.NO_MATCH);
uriMatcher.addURI(AUTHORITY, "countries", ALL_COUNTRIES);
uriMatcher.addURI(AUTHORITY, "countries/#", SINGLE_COUNTRY);
}

// system calls onCreate() when it starts up the provider.
@Override
public boolean onCreate() {
// get access to the database helper
dbHelper = new MyDatabaseHelper(getContext());
return false;
}

//Return the MIME type corresponding to a content URI
@Override
public String getType(Uri uri) {

switch (uriMatcher.match(uri)) {
case ALL_COUNTRIES:
return "vnd.android.cursor.dir/vnd.com.as400samplecode.contentprovider.countries";
case SINGLE_COUNTRY:
return "vnd.android.cursor.item/vnd.com.as400samplecode.contentprovider.countries";
default:
throw new IllegalArgumentException("Unsupported URI: " + uri);
}
}

// The insert() method adds a new row to the appropriate table, using the values
// in the ContentValues argument. If a column name is not in the ContentValues argument,
// you may want to provide a default value for it either in your provider code or in
// your database schema.
@Override
public Uri insert(Uri uri, ContentValues values) {

SQLiteDatabase db = dbHelper.getWritableDatabase();
switch (uriMatcher.match(uri)) {
case ALL_COUNTRIES:
//do nothing
break;
default:
throw new IllegalArgumentException("Unsupported URI: " + uri);
}
long id = db.insert(CountriesDb.SQLITE_TABLE, null, values);
getContext().getContentResolver().notifyChange(uri, null);
return Uri.parse(CONTENT_URI + "/" + id);
}

// The query() method must return a Cursor object, or if it fails,
// throw an Exception. If you are using an SQLite database as your data storage,
// you can simply return the Cursor returned by one of the query() methods of the
// SQLiteDatabase class. If the query does not match any rows, you should return a
// Cursor instance whose getCount() method returns 0. You should return null only
// if an internal error occurred during the query process.
@Override
public Cursor query(Uri uri, String[] projection, String selection,
String[] selectionArgs, String sortOrder) {

SQLiteDatabase db = dbHelper.getWritableDatabase();
SQLiteQueryBuilder queryBuilder = new SQLiteQueryBuilder();
queryBuilder.setTables(CountriesDb.SQLITE_TABLE);

switch (uriMatcher.match(uri)) {
case ALL_COUNTRIES:
//do nothing
break;
case SINGLE_COUNTRY:
String id = uri.getPathSegments().get(1);
queryBuilder.appendWhere(CountriesDb.KEY_ROWID + "=" + id);
break;
default:
throw new IllegalArgumentException("Unsupported URI: " + uri);
}

Cursor cursor = queryBuilder.query(db, projection, selection,
selectionArgs, null, null, sortOrder);
return cursor;

}

// The delete() method deletes rows based on the seletion or if an id is
// provided then it deleted a single row. The methods returns the numbers
// of records delete from the database. If you choose not to delete the data
// physically then just update a flag here.
@Override
public int delete(Uri uri, String selection, String[] selectionArgs) {

SQLiteDatabase db = dbHelper.getWritableDatabase();
switch (uriMatcher.match(uri)) {
case ALL_COUNTRIES:
//do nothing
break;
case SINGLE_COUNTRY:
String id = uri.getPathSegments().get(1);
selection = CountriesDb.KEY_ROWID + "=" + id
+ (!TextUtils.isEmpty(selection) ?
" AND (" + selection + ')' : "");
break;
default:
throw new IllegalArgumentException("Unsupported URI: " + uri);
}
int deleteCount = db.delete(CountriesDb.SQLITE_TABLE, selection, selectionArgs);
getContext().getContentResolver().notifyChange(uri, null);
return deleteCount;
}

// The update method() is same as delete() which updates multiple rows
// based on the selection or a single row if the row id is provided. The
// update method returns the number of updated rows.
@Override
public int update(Uri uri, ContentValues values, String selection,
String[] selectionArgs) {
SQLiteDatabase db = dbHelper.getWritableDatabase();
switch (uriMatcher.match(uri)) {
case ALL_COUNTRIES:
//do nothing
break;
case SINGLE_COUNTRY:
String id = uri.getPathSegments().get(1);
selection = CountriesDb.KEY_ROWID + "=" + id
+ (!TextUtils.isEmpty(selection) ?
" AND (" + selection + ')' : "");
break;
default:
throw new IllegalArgumentException("Unsupported URI: " + uri);
}
int updateCount = db.update(CountriesDb.SQLITE_TABLE, values, selection, selectionArgs);
getContext().getContentResolver().notifyChange(uri, null);
return updateCount;
}

}

Step 4: Row Layout for Country Display - country_info.xml


Step 5: Main Layout with ListView - activity_main.xml


Step 6: Main Activity using LoaderManager for Country List - MainActivity.java

The list of countries is displayed in a ListView using the CursorLoader that queries the ContentResolver and returns a Cursor. This class implements the Loader protocol in a standard way for querying cursors, building on AsyncTaskLoader to perform the cursor query on a background thread so that it does not block the application's UI. After the loader has finished its loading just swap the new cursor from the Content Provider and return the old Cursor.
package com.as400samplecode;

import android.os.Bundle;
import android.app.Activity;
import android.content.CursorLoader;
import android.content.Intent;
import android.content.Loader;
import android.database.Cursor;
import android.view.Menu;
import android.view.View;
import android.view.View.OnClickListener;
import android.widget.AdapterView;
import android.widget.AdapterView.OnItemClickListener;
import android.widget.Button;
import android.widget.ListView;
import android.widget.SimpleCursorAdapter;
import android.widget.Toast;
import android.app.LoaderManager;

public class MainActivity extends Activity implements
LoaderManager.LoaderCallbacks{

private SimpleCursorAdapter dataAdapter;

@Override
public void onCreate(Bundle savedInstanceState) {
super.onCreate(savedInstanceState);
setContentView(R.layout.activity_main);

displayListView();

Button add = (Button) findViewById(R.id.add);
add.setOnClickListener(new OnClickListener() {

public void onClick(View v) {
// starts a new Intent to add a Country
Intent countryEdit = new Intent(getBaseContext(), CountryEdit.class);
Bundle bundle = new Bundle();
bundle.putString("mode", "add");
countryEdit.putExtras(bundle);
startActivity(countryEdit);
}
});

}

@Override
protected void onResume() {
super.onResume();
//Starts a new or restarts an existing Loader in this manager
getLoaderManager().restartLoader(0, null, this);
}

private void displayListView() {


// The desired columns to be bound
String[] columns = new String[] {
CountriesDb.KEY_CODE,
CountriesDb.KEY_NAME,
CountriesDb.KEY_CONTINENT
};

// the XML defined views which the data will be bound to
int[] to = new int[] {
R.id.code,
R.id.name,
R.id.continent,
};

// create an adapter from the SimpleCursorAdapter
dataAdapter = new SimpleCursorAdapter(
this,
R.layout.country_info,
null,
columns,
to,
0);

// get reference to the ListView
ListView listView = (ListView) findViewById(R.id.countryList);
// Assign adapter to ListView
listView.setAdapter(dataAdapter);
//Ensures a loader is initialized and active.
getLoaderManager().initLoader(0, null, this);


listView.setOnItemClickListener(new OnItemClickListener() {
@Override
public void onItemClick(AdapterView listView, View view,
int position, long id) {
// Get the cursor, positioned to the corresponding row in the result set
Cursor cursor = (Cursor) listView.getItemAtPosition(position);

// display the selected country
String countryCode =
cursor.getString(cursor.getColumnIndexOrThrow(CountriesDb.KEY_CODE));
Toast.makeText(getApplicationContext(),
countryCode, Toast.LENGTH_SHORT).show();

String rowId =
cursor.getString(cursor.getColumnIndexOrThrow(CountriesDb.KEY_ROWID));

// starts a new Intent to update/delete a Country
// pass in row Id to create the Content URI for a single row
Intent countryEdit = new Intent(getBaseContext(), CountryEdit.class);
Bundle bundle = new Bundle();
bundle.putString("mode", "update");
bundle.putString("rowId", rowId);
countryEdit.putExtras(bundle);
startActivity(countryEdit);

}
});

}

// This is called when a new Loader needs to be created.
@Override
public Loader onCreateLoader(int id, Bundle args) {
String[] projection = {
CountriesDb.KEY_ROWID,
CountriesDb.KEY_CODE,
CountriesDb.KEY_NAME,
CountriesDb.KEY_CONTINENT};
CursorLoader cursorLoader = new CursorLoader(this,
MyContentProvider.CONTENT_URI, projection, null, null, null);
return cursorLoader;
}

@Override
public void onLoadFinished(Loader loader, Cursor data) {
// Swap the new cursor in. (The framework will take care of closing the
// old cursor once we return.)
dataAdapter.swapCursor(data);
}

@Override
public void onLoaderReset(Loader loader) {
// This is called when the last Cursor provided to onLoadFinished()
// above is about to be closed. We need to make sure we are no
// longer using it.
dataAdapter.swapCursor(null);
}

@Override
public boolean onCreateOptionsMenu(Menu menu) {
getMenuInflater().inflate(R.menu.activity_main, menu);
return true;
}
}

Step 7: Detail Layout for Insert,Update and Delete - detail_page.xml


Step 8: Detail Activity implementing CRUD operations - CountryEdit.java

package com.as400samplecode;

import android.app.Activity;
import android.content.ContentValues;
import android.database.Cursor;
import android.net.Uri;
import android.os.Bundle;
import android.view.View;
import android.view.View.OnClickListener;
import android.widget.ArrayAdapter;
import android.widget.Button;
import android.widget.EditText;
import android.widget.Spinner;
import android.widget.Toast;

public class CountryEdit extends Activity implements OnClickListener{

private Spinner continentList;
private Button save, delete;
private String mode;
private EditText code, name;
private String id;

@Override
public void onCreate(Bundle savedInstanceState) {
super.onCreate(savedInstanceState);
setContentView(R.layout.detail_page);

// get the values passed to the activity from the calling activity
// determine the mode - add, update or delete
if (this.getIntent().getExtras() != null){
Bundle bundle = this.getIntent().getExtras();
mode = bundle.getString("mode");
}

// get references to the buttons and attach listeners
save = (Button) findViewById(R.id.save);
save.setOnClickListener(this);
delete = (Button) findViewById(R.id.delete);
delete.setOnClickListener(this);

code = (EditText) findViewById(R.id.code);
name = (EditText) findViewById(R.id.name);


// create a dropdown for users to select various continents
continentList = (Spinner) findViewById(R.id.continentList);
ArrayAdapter adapter = ArrayAdapter.createFromResource(this,
R.array.continent_array, android.R.layout.simple_spinner_item);
adapter.setDropDownViewResource(android.R.layout.simple_spinner_dropdown_item);
continentList.setAdapter(adapter);

// if in add mode disable the delete option
if(mode.trim().equalsIgnoreCase("add")){
delete.setEnabled(false);
}
// get the rowId for the specific country
else{
Bundle bundle = this.getIntent().getExtras();
id = bundle.getString("rowId");
loadCountryInfo();
}

}

public void onClick(View v) {

// get values from the spinner and the input text fields
String myContinent = continentList.getSelectedItem().toString();
String myCode = code.getText().toString();
String myName = name.getText().toString();

// check for blanks
if(myCode.trim().equalsIgnoreCase("")){
Toast.makeText(getBaseContext(), "Please ENTER country code", Toast.LENGTH_LONG).show();
return;
}

// check for blanks
if(myName.trim().equalsIgnoreCase("")){
Toast.makeText(getBaseContext(), "Please ENTER country name", Toast.LENGTH_LONG).show();
return;
}


switch (v.getId()) {
case R.id.save:
ContentValues values = new ContentValues();
values.put(CountriesDb.KEY_CODE, myCode);
values.put(CountriesDb.KEY_NAME, myName);
values.put(CountriesDb.KEY_CONTINENT, myContinent);

// insert a record
if(mode.trim().equalsIgnoreCase("add")){
getContentResolver().insert(MyContentProvider.CONTENT_URI, values);
}
// update a record
else {
Uri uri = Uri.parse(MyContentProvider.CONTENT_URI + "/" + id);
getContentResolver().update(uri, values, null, null);
}
finish();
break;

case R.id.delete:
// delete a record
Uri uri = Uri.parse(MyContentProvider.CONTENT_URI + "/" + id);
getContentResolver().delete(uri, null, null);
finish();
break;

// More buttons go here (if any) ...

}
}

// based on the rowId get all information from the Content Provider
// about that country
private void loadCountryInfo(){

String[] projection = {
CountriesDb.KEY_ROWID,
CountriesDb.KEY_CODE,
CountriesDb.KEY_NAME,
CountriesDb.KEY_CONTINENT};
Uri uri = Uri.parse(MyContentProvider.CONTENT_URI + "/" + id);
Cursor cursor = getContentResolver().query(uri, projection, null, null,
null);
if (cursor != null) {
cursor.moveToFirst();
String myCode = cursor.getString(cursor.getColumnIndexOrThrow(CountriesDb.KEY_CODE));
String myName = cursor.getString(cursor.getColumnIndexOrThrow(CountriesDb.KEY_NAME));
String myContinent = cursor.getString(cursor.getColumnIndexOrThrow(CountriesDb.KEY_CONTINENT));
code.setText(myCode);
name.setText(myName);
continentList.setSelection(getIndex(continentList, myContinent));
}


}

Step 9: Define Strings and Arrays - strings.xml


SQLite Database Content Provider
Settings

Add a new Country
Country Information
Code
Name
Save
Delete
Choose Continent


Africa
Antartica
Asia
Europe
North America
Oceania
South America


Step 10: Define Android Manifest file


Android Database Content Provider Example
Android Database Content Provider Insert Record
Android ListView using CursorLoader and Content Provider

jQuery AJAX request and response example - Java Servlets, MySQL and JSON

$
0
0
Why not make AJAX request using plain JavaScript. Well guess what it's not programmer friendly, that's where all these JavaScript frameworks such as jQuery, ExtJs, Dojo etc. are good at. They encapsulate a lot of the underlying technology and provide us programmers with clean API's that has lot of config options and event triggers to handle anything from a simple form submit to something more complicated.


The method for AJAX request is jQuery.ajax( url [, settings] )

The $.ajax() method returns the jqXHR object. URL is a string containing the URL to which the request is sent and settings are a set of key/value pairs that configure the Ajax request. All settings are optional.


In this tutorial we are going to cover the following topics ...

  • Capture form data and send that to the Server using AJAX request
  • Intercept the request before it was sent and add some extra parameters
  • Check if our request to server was successful or not
  • Display the JSON response from the Server
  • Setup connection to MySQL from Tomcat Server
  • Create Java Servlets to process our AJAX request and access MySQL database 

jQuery AJAX request and response tutorial using Java Servlets
We have created a form that takes a country code and then makes an AJAX request to get more information about the country if the country code is valid. Also we intercept the request using beforeSend config to add some dummy data to the request and disable the SUBMIT button until we receive a response from the server. After we receive the response we display the results inside the ajaxResponse DIV tag.


Application HTML file - index.html


jQuery Ajax POST data Request and Response Example


jQuery Ajax Form data Submit Request


Response from jQuery Ajax Request


Application JavaScript file using jQuery - apps.js

$(document).ready(function() {

//Stops the submit request
$("#myAjaxRequestForm").submit(function(e){
e.preventDefault();
});

//checks for the button click event
$("#myButton").click(function(e){

//get the form data and then serialize that
dataString = $("#myAjaxRequestForm").serialize();

//get the form data using another method
var countryCode = $("input#countryCode").val();
dataString = "countryCode=" + countryCode;

//make the AJAX request, dataType is set to json
//meaning we are expecting JSON data in response from the server
$.ajax({
type: "POST",
url: "CountryInformation",
data: dataString,
dataType: "json",

//if received a response from the server
success: function( data, textStatus, jqXHR) {
//our country code was correct so we have some information to display
if(data.success){
$("#ajaxResponse").html("");
$("#ajaxResponse").append("Country Code: " + data.countryInfo.code + "
");
$("#ajaxResponse").append("Country Name: " + data.countryInfo.name + "
");
$("#ajaxResponse").append("Continent: " + data.countryInfo.continent + "
");
$("#ajaxResponse").append("Region: " + data.countryInfo.region + "
");
$("#ajaxResponse").append("Life Expectancy: " + data.countryInfo.lifeExpectancy + "
");
$("#ajaxResponse").append("GNP: " + data.countryInfo.gnp + "
");
}
//display error message
else {
$("#ajaxResponse").html("

Country code in Invalid!

");
}
},

//If there was no resonse from the server
error: function(jqXHR, textStatus, errorThrown){
console.log("Something really bad happened " + textStatus);
$("#ajaxResponse").html(jqXHR.responseText);
},

//capture the request before it was sent to server
beforeSend: function(jqXHR, settings){
//adding some Dummy data to the request
settings.data += "&dummyData=whatever";
//disable the button until we get the response
$('#myButton').attr("disabled", true);
},

//this is called after the response or error functions are finsihed
//so that we can take some action
complete: function(jqXHR, textStatus){
//enable the button
$('#myButton').attr("disabled", false);
}

});
});

});

Application config file - web.xml


jQuery_Ajax_Request

index.html
index.htm
index.jsp
default.html
default.htm
default.jsp


Get Information about Country - jQuery Ajax Request
CountryInformation
CountryInformation
com.as400samplecode.CountryInformation


CountryInformation
/CountryInformation


jQuery AJAX request and response tutorial using Java Servlets

Application context file for MySQL connection - context.xml


name="jdbc/mysql"
type="javax.sql.DataSource"
driverClassName="com.mysql.jdbc.Driver"
url="jdbc:mysql://localhost:3306/world"
username="root"
password="mysql"
maxIdle="10"
maxActive="200"
maxWait="5"
removeAbandoned="true"
removeAbandonedTimeout="1200"
/>

Java bean containing Country Information - Country.java


package com.as400samplecode;

public class Country {

String code = null;
String name = null;
String continent = null;
String region = null;
Double lifeExpectancy = null;
Double gnp = null;

public String getCode() {
return code;
}
public void setCode(String code) {
this.code = code;
}
public String getName() {
return name;
}
public void setName(String name) {
this.name = name;
}
public String getContinent() {
return continent;
}
public void setContinent(String continent) {
this.continent = continent;
}
public String getRegion() {
return region;
}
public void setRegion(String region) {
this.region = region;
}
public Double getLifeExpectancy() {
return lifeExpectancy;
}
public void setLifeExpectancy(Double lifeExpectancy) {
this.lifeExpectancy = lifeExpectancy;
}
public Double getGnp() {
return gnp;
}
public void setGnp(Double gnp) {
this.gnp = gnp;
}


}

Java Servlet processing jQuery AJAX request - CountryInformation.java


package com.as400samplecode;

import java.io.IOException;
import java.io.PrintWriter;
import java.sql.Connection;
import java.sql.PreparedStatement;
import java.sql.ResultSet;
import java.sql.SQLException;

import javax.naming.Context;
import javax.naming.InitialContext;
import javax.servlet.ServletException;
import javax.servlet.http.HttpServlet;
import javax.servlet.http.HttpServletRequest;
import javax.servlet.http.HttpServletResponse;
import javax.sql.DataSource;

import com.google.gson.Gson;
import com.google.gson.JsonElement;
import com.google.gson.JsonObject;

public class CountryInformation extends HttpServlet {

private static final long serialVersionUID = 1L;

public CountryInformation() {
super();
}

protected void doGet(HttpServletRequest request, HttpServletResponse response) throws ServletException, IOException {
doPost(request,response);
}

protected void doPost(HttpServletRequest request, HttpServletResponse response) throws ServletException, IOException {

String countryCode = request.getParameter("countryCode");

PrintWriter out = response.getWriter();
response.setContentType("text/html");
response.setHeader("Cache-control", "no-cache, no-store");
response.setHeader("Pragma", "no-cache");
response.setHeader("Expires", "-1");

response.setHeader("Access-Control-Allow-Origin", "*");
response.setHeader("Access-Control-Allow-Methods", "POST");
response.setHeader("Access-Control-Allow-Headers", "Content-Type");
response.setHeader("Access-Control-Max-Age", "86400");

Gson gson = new Gson();
JsonObject myObj = new JsonObject();

Country countryInfo = getInfo(countryCode);
JsonElement countryObj = gson.toJsonTree(countryInfo);
if(countryInfo.getName() == null){
myObj.addProperty("success", false);
}
else {
myObj.addProperty("success", true);
}
myObj.add("countryInfo", countryObj);
out.println(myObj.toString());

out.close();

}

//Get Country Information
private Country getInfo(String countryCode) {

Country country = new Country();
Connection conn = null;
PreparedStatement stmt = null;
String sql = null;

try {
Context ctx = (Context) new InitialContext().lookup("java:comp/env");
conn = ((DataSource) ctx.lookup("jdbc/mysql")).getConnection();

sql = "Select * from COUNTRY where code = ?";
stmt = conn.prepareStatement(sql);
stmt.setString(1, countryCode.trim());
ResultSet rs = stmt.executeQuery();

while(rs.next()){
country.setCode(rs.getString("code").trim());
country.setName(rs.getString("name").trim());
country.setContinent(rs.getString("continent").trim());
country.setRegion(rs.getString("region").trim());
country.setLifeExpectancy(rs.getString("lifeExpectancy") == null ? new Double(0) : Double.parseDouble(rs.getString("lifeExpectancy").trim()));
country.setGnp(rs.getString("gnp") == null ? new Double(0) : Double.parseDouble(rs.getString("gnp").trim()));
}

rs.close();
stmt.close();
stmt = null;


conn.close();
conn = null;

}
catch(Exception e){System.out.println(e);}

finally {

if (stmt != null) {
try {
stmt.close();
} catch (SQLException sqlex) {
// ignore -- as we can't do anything about it here
}

stmt = null;
}

if (conn != null) {
try {
conn.close();
} catch (SQLException sqlex) {
// ignore -- as we can't do anything about it here
}

conn = null;
}
}

return country;

}

}

Android automatically detect internet connection status

$
0
0
If you have an android application that needs to sync data with a backend server but doesn't need the internet to be available all the time for it to work then you must know at all times whether your app has access to internet or not. As soon as you have internet connection you can get latest data from the server or post any changes saved in your app using HTTP service. In this example we extend the BroadcastReceiver to listen for any changes in network status and then find out whether the app has internet at that time. Please note that you have to specify the ACCESS_NETWORK_STATE in your android manifest permissions for this to work otherwise you will get java.lang.SecurityException: ConnectivityService: Neither user XXXXX nor current process has android.permission.ACCESS_NETWORK_STATE.

Android Application Manifest


Android Application Layout


Android Application Main Activity

package com.samplecode;

import android.net.ConnectivityManager;
import android.net.NetworkInfo;
import android.os.Bundle;
import android.app.Activity;
import android.content.BroadcastReceiver;
import android.content.Context;
import android.content.Intent;
import android.content.IntentFilter;
import android.util.Log;
import android.view.Menu;
import android.widget.TextView;

public class MainActivity extends Activity {

private static final String LOG_TAG = "CheckNetworkStatus";
private NetworkChangeReceiver receiver;
private boolean isConnected = false;
private TextView networkStatus;

@Override
protected void onCreate(Bundle savedInstanceState) {
super.onCreate(savedInstanceState);
setContentView(R.layout.activity_main);

IntentFilter filter = new IntentFilter(ConnectivityManager.CONNECTIVITY_ACTION);
receiver = new NetworkChangeReceiver();
registerReceiver(receiver, filter);

networkStatus = (TextView) findViewById(R.id.networkStatus);
}

@Override
public boolean onCreateOptionsMenu(Menu menu) {
// Inflate the menu; this adds items to the action bar if it is present.
getMenuInflater().inflate(R.menu.activity_main, menu);
return true;
}

@Override
protected void onDestroy() {
Log.v(LOG_TAG, "onDestory");
super.onDestroy();

unregisterReceiver(receiver);

}


public class NetworkChangeReceiver extends BroadcastReceiver {

@Override
public void onReceive(final Context context, final Intent intent) {

Log.v(LOG_TAG, "Receieved notification about network status");
isNetworkAvailable(context);

}


private boolean isNetworkAvailable(Context context) {
ConnectivityManager connectivity = (ConnectivityManager)
context.getSystemService(Context.CONNECTIVITY_SERVICE);
if (connectivity != null) {
NetworkInfo[] info = connectivity.getAllNetworkInfo();
if (info != null) {
for (int i = 0; i < info.length; i++) {
if (info[i].getState() == NetworkInfo.State.CONNECTED) {
if(!isConnected){
Log.v(LOG_TAG, "Now you are connected to Internet!");
networkStatus.setText("Now you are connected to Internet!");
isConnected = true;
//do your processing here ---
//if you need to post any data to the server or get status
//update from the server
}
return true;
}
}
}
}
Log.v(LOG_TAG, "You are not connected to Internet!");
networkStatus.setText("You are not connected to Internet!");
isConnected = false;
return false;
}
}


}


Android automatically detect internet connection statusAndroid Internet connection status

GCM in Android

$
0
0
Today I am going to share very Important code for GCM(Google Cloud Messaging) for Android. I worked with  php  for back end .
My article have 3 category-

1)Creating a Google API Project
2)PHP Back-end
3)Android Front-end


                                                         Part-A  Google API Project

1)Open Google API console from here
2)If you have not created any project create new project for your application-
3)See your browser URL and note your project ID from above some thing like that-1080127563513
https://code.google.com/apis/console/#project:1080127563513
4)In the main Google APIs Console page, select Services.
5)Turn the Google Cloud Messaging toggle to ON.
6)In the Terms of Service page, accept the terms.
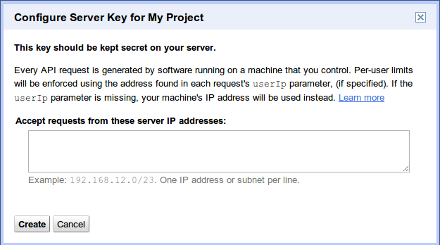
7)get API Key from main Google APIs Console page, select API Access. You will see a screen that resembles the following and click on Create new Server Key:

8)Now from below window choose create button:

9)From below window note your project id and api key:


Part-B PHP Back-end Side


Just copy below file and put into your  php server inside ws folder-

1)GCM.php

'HI Sunil');
$url='https://android.googleapis.com/gcm/send';
$fields=array
(
'registration_ids'=>$registatoin_ids,
'data'=>$msg
);
$headers=array
(
'Authorization: key=AIzaSyA46UE7bBWXCpHSD5sbNxbRwI1MAKVI-jg',
'Content-Type: application/json'
);
$ch=curl_init();
curl_setopt($ch,CURLOPT_URL,$url);
curl_setopt($ch,CURLOPT_POST,true);
curl_setopt($ch,CURLOPT_HTTPHEADER,$headers);
curl_setopt($ch,CURLOPT_RETURNTRANSFER,true);
curl_setopt($ch,CURLOPT_SSL_VERIFYPEER,false);
curl_setopt($ch,CURLOPT_POSTFIELDS,json_encode($fields));
$result=curl_exec($ch);
curl_close($ch);
echo $result;
?>

Part-C Android side

1)MainActivity.java


package com.sunil.gcm.push;

import static com.sunil.gcm.push.CommonUtilities.SENDER_ID;

import java.io.BufferedReader;
import java.io.InputStreamReader;

import org.apache.http.HttpResponse;
import org.apache.http.client.HttpClient;
import org.apache.http.client.methods.HttpGet;
import org.apache.http.impl.client.DefaultHttpClient;
import org.apache.http.params.BasicHttpParams;
import org.apache.http.params.HttpParams;

import android.annotation.TargetApi;
import android.app.Activity;
import android.app.ProgressDialog;
import android.os.AsyncTask;
import android.os.Build;
import android.os.Bundle;
import android.util.Log;
import android.widget.TextView;

import com.google.android.gcm.GCMRegistrar;

@TargetApi(Build.VERSION_CODES.GINGERBREAD)
public class MainActivity extends Activity {

private String TAG = "** GCMPushDEMOAndroid**";
private TextView mDisplay;
String regId = "";

@Override
public void onCreate(Bundle savedInstanceState) {
super.onCreate(savedInstanceState);
setContentView(R.layout.activity_main);
checkNotNull(SENDER_ID, "SENDER_ID");
GCMRegistrar.checkDevice(this);
GCMRegistrar.checkManifest(this);

mDisplay = (TextView) findViewById(R.id.textView1);

regId = GCMRegistrar.getRegistrationId(this);

if (regId.equals("")) {
GCMRegistrar.register(this, SENDER_ID);
} else {
Log.v(TAG, "Already registered");
}
/**
* call asYnc Task
*/
new sendIdOnOverServer().execute();
mDisplay.setText("RegId=" + regId);
}

private void checkNotNull(Object reference, String name) {
if (reference == null) {
throw new NullPointerException(getString(R.string.error_config,
name));
}

}

@Override
protected void onPause() {
super.onPause();
GCMRegistrar.unregister(this);
}

public class sendIdOnOverServer extends AsyncTask {

ProgressDialog pd = null;

@Override
protected void onPreExecute() {
pd = ProgressDialog.show(MainActivity.this, "Please wait",
"Loading please wait..", true);
pd.setCancelable(true);

}

@Override
protected String doInBackground(String... params) {
try {
HttpResponse response = null;
HttpParams httpParameters = new BasicHttpParams();
HttpClient client = new DefaultHttpClient(httpParameters);
String url = "http://10.0.0.30//parsing/GCM.php?" + "®ID="
+ regId;
Log.i("Send URL:", url);
HttpGet request = new HttpGet(url);

response = client.execute(request);

BufferedReader rd = new BufferedReader(new InputStreamReader(
response.getEntity().getContent()));

String webServiceInfo = "";
while ((webServiceInfo = rd.readLine()) != null) {
Log.d("****Status Log***", "Webservice: " + webServiceInfo);

}
} catch (Exception e) {
e.printStackTrace();
}
return null;

}

@Override
protected void onPostExecute(String result) {
pd.dismiss();

}

}

}

2)GCMIntentService.java


package com.sunil.gcm.push;

import static com.sunil.gcm.push.CommonUtilities.SENDER_ID;
import android.app.Notification;
import android.app.NotificationManager;
import android.app.PendingIntent;
import android.content.Context;
import android.content.Intent;
import android.util.Log;

import com.google.android.gcm.GCMBaseIntentService;

public class GCMIntentService extends GCMBaseIntentService {

public GCMIntentService() {
super(SENDER_ID);
}

private static final String TAG = "===GCMIntentService===";

@Override
protected void onRegistered(Context arg0, String registrationId) {
Log.i(TAG, "Device registered: regId = " + registrationId);
}

@Override
protected void onUnregistered(Context arg0, String arg1) {
Log.i(TAG, "unregistered = " + arg1);
}

@Override
protected void onMessage(Context context, Intent intent) {
Log.i(TAG, "new message= ");
String message = intent.getExtras().getString("message");
generateNotification(context, message);
}

@Override
protected void onError(Context arg0, String errorId) {
Log.i(TAG, "Received error: " + errorId);
}

@Override
protected boolean onRecoverableError(Context context, String errorId) {
return super.onRecoverableError(context, errorId);
}

/**
* Issues a notification to inform the user that server has sent a message.
*/
private static void generateNotification(Context context, String message) {
int icon = R.drawable.ic_launcher;
long when = System.currentTimeMillis();
NotificationManager notificationManager = (NotificationManager) context
.getSystemService(Context.NOTIFICATION_SERVICE);
Notification notification = new Notification(icon, message, when);
String title = context.getString(R.string.app_name);
Intent notificationIntent = new Intent(context, MainActivity.class);
notificationIntent.setFlags(Intent.FLAG_ACTIVITY_CLEAR_TOP
| Intent.FLAG_ACTIVITY_SINGLE_TOP);
PendingIntent intent = PendingIntent.getActivity(context, 0,
notificationIntent, 0);
notification.setLatestEventInfo(context, title, message, intent);
notification.flags |= Notification.FLAG_AUTO_CANCEL;
notificationManager.notify(0, notification);
}
}

3)CommonUtilities .java


package com.sunil.gcm.push;

public final class CommonUtilities {
//put here your sender Id
static final String SENDER_ID = "311451115764";

}

4)activity_main.xml


5)manifest.xml


Read file from Assets

$
0
0
Problem: How to read files (Images or text files) from Assets folder?
Description:
First of all, let me give you a link: AssetManager, through this class we can easily access any files lying inside the Assets directory of android application. (or any sub-folders inside the Assets directory).
Now, we can have an object of AssetManager class by using getAssets() method:

AssetManager assetManager = getAssets();

And the rest of the procedure i have given and described by making comments in the example so now go through the full solutions provided below with the output snap.

Solution: ReadFileAssetsActivity.java

package com.sunil.readfileasset;

import java.io.IOException;
import java.io.InputStream;

import android.app.Activity;
import android.content.res.AssetManager;
import android.graphics.drawable.Drawable;
import android.os.Bundle;
import android.widget.ImageView;
import android.widget.TextView;

/**
* @author sunil
* @Website http://www.technotalkative.com
*/
public class ReadFileAssetsActivity extends Activity {

/** Called when the activity is first created. */

@Override
public void onCreate(Bundle savedInstanceState) {

super.onCreate(savedInstanceState);
setContentView(R.layout.main);

TextView txtContent = (TextView) findViewById(R.id.txtContent);
TextView txtFileName = (TextView) findViewById(R.id.txtFileName);
ImageView imgAssets = (ImageView) findViewById(R.id.imgAssets);

AssetManager assetManager = getAssets();

// To get names of all files inside the "Files" folder
try {
String[] files = assetManager.list("Files");
            loop till files.length
            {
                txtFileName.append("\n File :"+i+" Name => "+files[i]);
            }

} catch (IOException e1) {
// TODO Auto-generated catch block
e1.printStackTrace();
}

// To load text file
InputStream input;
try {
input = assetManager.open("helloworld.txt");

int size = input.available();
byte[] buffer = new byte[size];
input.read(buffer);
input.close();

// byte buffer into a string
String text = new String(buffer);

txtContent.setText(text);
} catch (IOException e) {
// TODO Auto-generated catch block
e.printStackTrace();
}

// To load image
try {
// get input stream
InputStream ims = assetManager.open("android_logo_small.jpg");

// create drawable from stream
Drawable d = Drawable.createFromStream(ims, null);

// set the drawable to imageview
imgAssets.setImageDrawable(d);
}
catch(IOException ex) {
return;
}
}
}

main.xml


TechnoTalkative - Read from Assets
 Cheers Guys!!

Image Switcher View

$
0
0
Today i going to share the code the of image switcher. Image will move from one by one through Gallery.

Main.xml


ImageSwitcherView.java

package com.android.switcher;

import android.app.Activity;
import android.content.Context;
import android.os.Bundle;
import android.view.View;
import android.view.ViewGroup;
import android.view.ViewGroup.LayoutParams;
import android.view.animation.AnimationUtils;
import android.widget.AdapterView;
import android.widget.BaseAdapter;
import android.widget.Gallery;
import android.widget.ImageSwitcher;
import android.widget.ImageView;
import android.widget.AdapterView.OnItemClickListener;
import android.widget.ViewSwitcher.ViewFactory;

public class ImageSwitcherView extends Activity implements ViewFactory {

Integer pics[] = { R.drawable.a, R.drawable.b, R.drawable.c, R.drawable.d,
R.drawable.e };

ImageSwitcher iSwitcher;

/** Called when the activity is first created. */
@Override
public void onCreate(Bundle savedInstanceState) {
super.onCreate(savedInstanceState);
setContentView(R.layout.main);

iSwitcher = (ImageSwitcher) findViewById(R.id.ImageSwitcher01);
iSwitcher.setFactory(this);
iSwitcher.setInAnimation(AnimationUtils.loadAnimation(this,
android.R.anim.fade_in));
iSwitcher.setOutAnimation(AnimationUtils.loadAnimation(this,
android.R.anim.fade_out));

Gallery gallery = (Gallery) findViewById(R.id.Gallery01);
gallery.setAdapter(new ImageAdapter(this));
gallery.setOnItemClickListener(new OnItemClickListener() {

@Override
public void onItemClick(AdapterView arg0, View arg1, int arg2,
long arg3) {
iSwitcher.setImageResource(pics[arg2]);
}
});
}

public class ImageAdapter extends BaseAdapter {

private Context ctx;

public ImageAdapter(Context c) {
ctx = c;
}

@Override
public int getCount() {

return pics.length;
}

@Override
public Object getItem(int arg0) {

return arg0;
}

@Override
public long getItemId(int arg0) {

return arg0;
}

@Override
public View getView(int arg0, View arg1, ViewGroup arg2) {

ImageView iView = new ImageView(ctx);
iView.setImageResource(pics[arg0]);
iView.setScaleType(ImageView.ScaleType.FIT_XY);
iView.setLayoutParams(new Gallery.LayoutParams(150, 150));
return iView;
}

}

@Override
public View makeView() {
ImageView iView = new ImageView(this);
iView.setScaleType(ImageView.ScaleType.FIT_CENTER);
iView.setLayoutParams(new ImageSwitcher.LayoutParams(
LayoutParams.FILL_PARENT, LayoutParams.FILL_PARENT));
iView.setBackgroundColor(0xFF000000);
return iView;
}
}


Screen Shot


Gallery View

$
0
0
Hey Guys, Today I am going to share code with you Gallery. This code to say how to move image from gallery and show on Image View. In that case we are using the adapter.

GalleryView.java

package com.android.gallery;

import android.app.Activity;
import android.content.Context;
import android.content.res.TypedArray;
import android.os.Bundle;
import android.view.View;
import android.view.ViewGroup;
import android.widget.AdapterView;
import android.widget.BaseAdapter;
import android.widget.Gallery;
import android.widget.ImageView;
import android.widget.Toast;
import android.widget.AdapterView.OnItemClickListener;

public class GalleryView extends Activity {
Integer[] pics = {
R.drawable.antartica1,
R.drawable.antartica2,
R.drawable.antartica3,
R.drawable.antartica4,
R.drawable.antartica5,
R.drawable.antartica6,
R.drawable.antartica7,
R.drawable.antartica8,
R.drawable.antartica9,
R.drawable.antartica10
};
ImageView imageView;

/** Called when the activity is first created. */
@Override
public void onCreate(Bundle savedInstanceState) {
super.onCreate(savedInstanceState);
setContentView(R.layout.main);

Gallery ga = (Gallery)findViewById(R.id.Gallery01);
ga.setAdapter(new ImageAdapter(this));

imageView = (ImageView)findViewById(R.id.ImageView01);
ga.setOnItemClickListener(new OnItemClickListener() {

@Override
public void onItemClick(AdapterView arg0, View arg1, int arg2,
long arg3) {
Toast.makeText(getBaseContext(),
"You have selected picture " + (arg2+1) + " of Antartica",
Toast.LENGTH_SHORT).show();
imageView.setImageResource(pics[arg2]);

}

});

}


public class ImageAdapter extends BaseAdapter {

private Context ctx;
int imageBackground;

public ImageAdapter(Context c) {
ctx = c;
TypedArray ta = obtainStyledAttributes(R.styleable.Gallery1);
imageBackground = ta.getResourceId(R.styleable.Gallery1_android_galleryItemBackground, 1);
ta.recycle();
}

@Override
public int getCount() {

return pics.length;
}

@Override
public Object getItem(int arg0) {

return arg0;
}

@Override
public long getItemId(int arg0) {

return arg0;
}

@Override
public View getView(int arg0, View arg1, ViewGroup arg2) {
ImageView iv = new ImageView(ctx);
iv.setImageResource(pics[arg0]);
iv.setScaleType(ImageView.ScaleType.FIT_XY);
iv.setLayoutParams(new Gallery.LayoutParams(150,120));
iv.setBackgroundResource(imageBackground);
return iv;
}

}
}

main.xml


Screen Shot


Android Question Part1

$
0
0
What is android?


Android is a software stack for mobile devices which has Operating
System, middleware and some key applications. The application executes
within its own process and its own instance of Dalvik Virtual Machine.
Many Virtual Machines run efficiently by a DVM device.
DVM executes Java language?s byte code which later transforms into .dex
format files.


What are the advantages of Android?

The following are the advantages of Android:

* Features like weather details, live RSS feeds, opening screen, icon on the opening screen can be customized
* The customer will be benefited from wide range of mobile applications to choose, since the monopoly of wireless carriers like AT&T and Orange will be broken by Google Android.

* Innovative products like the location-aware services, location of a nearby convenience store etc., are some of the additive facilities inAndroid.
Components can be reused and replaced by the application framework.
*Optimized DVM for mobile devices
*SQLite enables to store the data in a structured manner.
*Supports GSM telephone and Bluetooth, WiFi, 3G and EDGE technologies
*The development is a combination of a device emulator, debugging tools, memory profiling and plug-in for Eclipse IDE.
Features of Android :

Application framework enabling reuse and replacement of components
 Dalvik virtual machine optimized for mobile devices
 Integrated browser based on the open source WebKit engine
 Optimized graphics powered by a custom 2D graphics library; 3Dgraphics based on the OpenGL ES 1.0 specification (hardware acceleration optional)
 SQLite for structured data storage
 Media support for common audio, video, and still image formats (MPEG4, H.264, MP3, AAC, AMR, JPG, PNG, GIF)
 GSM Telephony (hardware dependent)
 Bluetooth, EDGE, 3G, and WiFi (hardware dependent)
 Camera, GPS, compass, and accelerometer (hardware dependent)
 Rich development environment including a device emulator, tools for  debugging, memory and performance profiling, and a plugin for the Eclipse IDE.
Explain about the Android Exceptions ?
The following are the exceptions that are supported by Android

* InflateException : When an error conditions are occurred, this exception is thrown

* Surface.OutOfResourceException: When a surface is not created or resized, this exception is thrown

* SurfaceHolder.BadSurfaceTypeException: This exception is thrown from the lockCanvas() method, when invoked on a Surface whose is SURFACE_TYPE_PUSH_BUFFERS

* WindowManager.BadTokenException:
 This exception is thrown at the time of trying to add view an  invalid WindowManager.LayoutParamstoken.

Describe the APK format ?

The APK file is compressed the AndroidManifest.xml file, application code (.dex files), resource files, and other files.  A project is compiled into a single .apk file.

What is .apk extension?

The extension for an Android package file, which typically contains all of the files related to a single Android application. The file itself is a compressed collection of an AndroidManifest.xml file, application code (.dex files), resource files, and other files. A project is compiled into a single .apk file.


What is .dex extension ?

Android programs are compiled into .dex (Dalvik Executable) files, which are in turn zipped into a single .apk file on the device. .dex files can be created by automatically translating compiled applications written in the Java programming language


What is an adb ?

Android Debug Bridge, a command-line debugging application shipped with the SDK. It provides tools to browse the device, copy tools on the device, and forward ports for debugging.

What is an Application ?

A collection of one or more activities, services, listeners, and intent receivers. An application has a single
 manifest, and is compiled into a single .apk file on the device.


What is a Content Provider ?

A class built on ContentProvider that handles content query strings of a specific format to return data in a specific format. See Reading and writing data to a content provider for information on using content providers.


What is a Dalvik ?

The name of Android’s virtual machine. The Dalvik Virtual Machine is  an interpreter-only virtual machine that executes files in the Dalvik Executable (.dex) format, a format that is optimized for efficient storage and memory-mappable execution. The virtual machine is register-based, and it can run classes compiled by a Java language compiler that have been transformed into its native format using the included “dx” tool.
The Virtual Machine runs on top of Posix-compliant operating systems, which it relies on for underlying functionality (such as threading and low level memory management). The Dalvik core class library is intended to provide a familiar development base for those used to programming with Java Standard Edition, but it is geared specifically to the needs of a small mobile device.


What is  DDMS ?

Dalvik Debug Monitor Service, a GUI debugging application shipped with the Software Development Kit. It provides screen capture, log dump, and process examination capabilities.


What is Drawable?


A compiled visual resource that can be used as a background, title, or other part of the screen. It is compiled into an android.graphics.drawable subclass.


What is an Intent?

A class (Intent) that contains several fields describing what a caller would like to do. The caller sends this intent to Android’s intent resolver,which looks through the intent filters of all applications to find the activity
 most suited to handle this intent. Intent fields include the desired action, a category, a data string, the MIME type of the data, a handling class, and other restrictions.


What is an Intent Filter ?


Activities and intent receivers include one or more filters in their manifest to describe what kinds of intents or messages they can handle or want to receive. An intent filter lists a set of requirements, such as data type, action requested, and URI format, that the Intent or message must fulfill. For Activities, Android
searches for the Activity with the most closely matching valid match between the Intent and the activity filter. For messages, Android will forward a message to all receivers with matching intent filters.


What is an Intent Receiver?

An application class that listens for messages broadcast by calling Context.broadcastIntent


What is a Layout resource?

An XML file that describes the layout of an Activity screen.


What is a Manifest ?

An XML file associated with each Application that describes the various activies, intent filters, services, and other items that it exposes.


What is a Resource ?

A user-supplied XML, bitmap, or other file, entered into an application build process, which can later be loaded from code. Android can accept resources of many types; see Resources for a full description. Application-defined resources should be stored in the res/ subfolders.


What is a Service ?

A class that runs in the background to perform various persistent actions, such as playing music or monitoring network activity.


What is a Theme ?

A set of properties (text size, background color, and so on) bundled together to define various default display settings. Android provides a few standard themes, listed in R.style (starting with “Theme_”).


What is an URIs?

Android uses URI strings both for requesting data (e.g., a list of contacts) and for requesting actions (e.g., opening a Web page in a browser). Both are valid URI strings, but have different values. All requests for data must start with the string “content://”. Action strings are valid URIs that can be handled appropriately by applications on the device; for example, a URI starting with “http://” will be handled by the browser.


Can I write code for Android using C/C++?

Yes, but need to use NDK

Android applications are written using the Java programming language. Android includes a set of core libraries that provides most of the functionality available in the core libraries of the Java programminglanguage.
Every Android application runs in its own process, with its own instance of the Dalvik virtual machine. Dalvik has been written so that a device can run multiple VMs efficiently. The Dalvik VM executes files in the Dalvik Executable (.dex) format which is optimized for minimal memory footprint. The VM is register-based, and runs classes compiled by a Java language compiler that have been transformed into the .dex format by the included “dx” tool.
Android only supports applications written using the Java programming language at this time.


What is an action?

A description of something that an Intent sender desires.


What is activity?

A single screen in an application, with supporting Java code.


What is intent?

A class (Intent) describes what a caller desires to do. The caller sends this intent to Android’s intent resolver, which finds the most suitable activity for the intent. E.g. opening a PDF file is an intent, and the Adobe Reader is the suitable activity for this intent.


How is nine-patch image different from a regular bitmap?

It is a resizable bitmap resource that can be used for backgrounds or other images on the device. The NinePatch class permits drawing a bitmap in nine sections. The four corners are unscaled; the four edges are scaled in one axis, and the middle is scaled in both axes.


What languages does Android support for application development?

Android applications are written using the Java programming language.


What is a resource?

A user-supplied XML, bitmap, or other file, injected into the application build process, which can later be loaded from code.


How will you record a phone call in Android? How to get a handle on Audio Stream for a call in Android?

Permissions.PROCESS_OUTGOING_CALLS: Allows an application to monitor, modify, or abort outgoing calls.

Alarm demo

$
0
0
Hello guys, Today I am going to share the knowledge about Alarm coding in java. There is class in Android API that manage the Alarm that is AlarmManager .And need to registered the broadcast Register, that one time it automatically trigger.

Main.xml


AlarmActivity.java

package app.test;

import java.util.Calendar;

import android.app.Activity;
import android.app.AlarmManager;
import android.app.PendingIntent;
import android.content.Context;
import android.content.Intent;
import android.os.Bundle;
import android.os.SystemClock;
import android.view.View;
import android.widget.Toast;

public class AlarmActivity extends Activity implements View.OnClickListener {

private PendingIntent mAlarmIntent;

@Override
public void onCreate(Bundle savedInstanceState) {
super.onCreate(savedInstanceState);
setContentView(R.layout.main);
findViewById(R.id.start).setOnClickListener(this);
findViewById(R.id.stop).setOnClickListener(this);
Intent launchIntent = new Intent(this, AlarmReceiver.class);
mAlarmIntent = PendingIntent.getBroadcast(this, 0, launchIntent, 0);
}

@Override
public void onClick(View v) {
AlarmManager manager = (AlarmManager)getSystemService(Context.ALARM_SERVICE);
long interval = 5*1000; //5 seconds

switch(v.getId()) {
case R.id.start:
Toast.makeText(this, "Scheduled", Toast.LENGTH_SHORT).show();
manager.setRepeating(AlarmManager.ELAPSED_REALTIME,
SystemClock.elapsedRealtime()+interval,
interval,
mAlarmIntent);
break;
case R.id.stop:
Toast.makeText(this, "Canceled", Toast.LENGTH_SHORT).show();
manager.cancel(mAlarmIntent);
break;
default:
break;
}
}

private long nextStartTime() {
long oneDay = 24*3600*1000; //24 hours
//Set the time to 09:00:00
Calendar startTime = Calendar.getInstance();
startTime.set(Calendar.HOUR_OF_DAY, 9);
startTime.set(Calendar.MINUTE, 0);
startTime.set(Calendar.SECOND, 0);

Calendar now = Calendar.getInstance();
if(now.before(startTime)) {
return startTime.getTimeInMillis();
} else {
startTime.add(Calendar.DATE, 1);
return startTime.getTimeInMillis();
}
}
}

AlarmReceiver.java

package app.test;

import java.text.DateFormat;
import java.text.SimpleDateFormat;
import java.util.Calendar;

import android.content.BroadcastReceiver;
import android.content.Context;
import android.content.Intent;
import android.widget.Toast;

public class AlarmReceiver extends BroadcastReceiver {
@Override
public void onReceive(Context context, Intent intent) {
Calendar now = Calendar.getInstance();
DateFormat formatter = SimpleDateFormat.getTimeInstance();
Toast.makeText(context, formatter.format(now.getTime()), Toast.LENGTH_SHORT).show();
}
}

Open & Read File from Assets

$
0
0
Hey Guys, Today I am going to share the important code of Assets. How to open the file and read the file from assets folder. In that Scenario, There is a class in Android API AssetManager.

Open file with AssetManager


package app.test;

import java.io.FileNotFoundException;
import java.io.IOException;
import java.io.InputStream;
import java.util.ArrayList;
import java.util.StringTokenizer;

import android.app.Activity;
import android.content.res.AssetManager;
import android.os.Bundle;
import android.widget.TextView;

public class Test extends Activity {

@Override
public void onCreate(Bundle savedInstanceState) {
super.onCreate(savedInstanceState);
TextView tv = new TextView(this);
setContentView(tv);
try {
AssetManager manager = getAssets();
InputStream mInput = manager.open("data.csv");
byte[] data = new byte[128];
mInput.read(data);
mInput.close();

} catch (FileNotFoundException e) {
e.printStackTrace();
} catch (IOException e) {
e.printStackTrace();
}

}

}

Read Asset Files


package app.test;

import java.io.ByteArrayOutputStream;
import java.io.IOException;
import java.io.InputStream;

import android.app.Activity;
import android.content.res.AssetManager;
import android.os.Bundle;
import android.widget.TextView;

public class Test extends Activity {
@Override
public void onCreate(Bundle savedInstanceState) {
super.onCreate(savedInstanceState);
TextView textView = new TextView(this);
setContentView(textView);
AssetManager assetManager = getAssets();
InputStream inputStream = null;
try {
inputStream = assetManager.open("/text.txt");
String text = loadTextFile(inputStream);
textView.setText(text);
} catch (IOException e) {
textView.setText("Couldn't load file");
} finally {
if (inputStream != null)
try {
inputStream.close();
} catch (IOException e) {
textView.setText("Couldn't close file");
}
}
}

public String loadTextFile(InputStream inputStream) throws IOException {
ByteArrayOutputStream byteStream = new ByteArrayOutputStream();
byte[] bytes = new byte[4096];
int len = 0;
while ((len = inputStream.read(bytes)) > 0)
byteStream.write(bytes, 0, len);
return new String(byteStream.toByteArray(), "UTF8");
}
}

Cheers! Guys

Animation Fade-In/Out

$
0
0
Hello Guys!
It’s difficult to find time these days. However, I always try and make sure that the learning never stops! In this tutorial, I will talk about creating an animation using the Animation resources offered by Android.

Android includes an Animation class using which an animation can be applied to Views, Surfaces or other objects. There are basically two main types of Animations:
1. Property Animation ( android.animation)
The property animation system allows developers to animate object properties of any type, for example, int, float. One can also specify keyframes, group animations and even control the behavior of animations.
2. View Animation ( android.view.animation )
Unlike property animation, View animation is used to create simple animations such as tweened animation and frame by frame animation. Tweened animation creates an animation by performing a series of transformations on a single image where as frame by frame animation creates an animation by showing a sequence of images.
Once the above concepts are clear, we can now proceed towards creating a simple fade in/fade out animation in Android.

Expand your Project under the Package explorer window. You will find a folder named res. Inside the res folder, create a new folder named anim


res/anim/anim_fade_in.xml


res/anim/anim_fade_out.xml


activity_main.xml


MainActivity.java

package com.sunil.animation;

import android.app.Activity;
import android.os.Bundle;
import android.view.View;
import android.view.animation.Animation;
import android.view.animation.AnimationUtils;
import android.widget.Button;
import android.widget.ImageView;

public class MainActivity extends Activity
{

private ImageView image;
private Animation animFadeIn;
private Animation animFadeOut;
private Button btnFadeIn;
private Button btnFadeOut;

@Override
public void onCreate(Bundle savedInstanceState) {
super.onCreate(savedInstanceState);
setContentView(R.layout.main);

btnFadeIn = (Button)findViewById(R.id.btn_fadein);
btnFadeOut = (Button)findViewById(R.id.btn_fadeout);
image = (ImageView)findViewById(R.id.my_image);

animFadeIn = AnimationUtils.loadAnimation(this, R.anim.anim_fade_in);
btnFadeIn.setOnClickListener(new Button.OnClickListener(){

@Override
public void onClick(View arg0) {
// TODO Auto-generated method stub
image.startAnimation(animFadeIn);
}});

animFadeOut = AnimationUtils.loadAnimation(this, R.anim.anim_fade_out);
btnFadeOut.setOnClickListener(new Button.OnClickListener(){

@Override
public void onClick(View arg0) {
// TODO Auto-generated method stub
image.startAnimation(animFadeOut);
}});
}
}

Cheers Guys!

Password MD5 and SHA1 in Android

$
0
0
In this tutorial, I will demonstrate how to go about hashing a password using SHA1 and MD5 hashing techniques!

Security plays an important role especially in applications where in you need to connect to the Internet. Hashes are useful in such cases since they help to ensure that the transmitted messages are not altered by any means. In general, a hash value or a hash, also known as message digest is a number generated from a string of text. Android provides us with the MessageDigest class that enables developers to create and use hashes while comparing user credentials.

MessageDigest class
As mentioned in the Android docs, the class uses a one-way hash function to turn an arbitrary number of bytes into a fixed-length byte sequence. The original arbitrary-length sequence is the message, and the fixed-length byte sequence is the digest or message digest.

1. SHA1
 
SHA stands for secure hashing algorithm. SHA-1 produces a 160-bit message digest and is considered to be more secure than MD5. However, when compared to SHA256 it is not that secure.

2. MD5
 
It is widely used cryptographic hash function that produces a 128 bit (16 byte) hash value. It is represented in the form of a 32 digit hexadecimal number and cannot not decrypted. The downside of the algorithm is the fact that it has been broken as mentioned over here.

Now, let’s create an Android application project to implement SHA-1 and MD5.

activity_main.xml


strings.xml


AndroidHashDemo
Settings
Android Hash Demo!
enter your username!
enter your password!


MainActivity.java

package com.sunil.password;

import java.io.IOException;
import android.util.Base64;
import java.io.UnsupportedEncodingException;
import java.security.MessageDigest;
import java.security.NoSuchAlgorithmException;

import com.example.R;

import android.os.Bundle;
import android.app.Activity;
import android.util.Log;
import android.view.Menu;
import android.view.View;
import android.widget.Button;
import android.widget.EditText;
import android.widget.TextView;
import android.widget.Toast;

public class MainActivity extends Activity {

private TextView result;
private Button computeSha,computeMD5;
private EditText userName, passWord;
private String username,passwd;
private String SHAHash;
public static int NO_OPTIONS=0;

@Override
protected void onCreate(Bundle savedInstanceState)
{
super.onCreate(savedInstanceState);
setContentView(R.layout.activity_main);

userName=(EditText)findViewById(R.id.userName);
passWord=(EditText)findViewById(R.id.passWord);

computeSha=(Button)findViewById(R.id.btn1);
computeMD5=(Button)findViewById(R.id.btn2);

result= (TextView)findViewById(R.id.textView2);

//get username and password entered
username= userName.getText().toString();
passwd= passWord.getText().toString();

//check if username or passwd is not null

if( (username != null && username.equals("") ) || (passwd !=null && passwd.equals("")) )
{
computeSha.setOnClickListener(new View.OnClickListener() {
@Override
public void onClick(View v)
{
// TODO Auto-generated method stub
//call method to compute SHA hash
computeSHAHash(passwd);
}
});

computeMD5.setOnClickListener(new View.OnClickListener() {
@Override
public void onClick(View v)
{
// TODO Auto-generated method stub
//call method to compute SHA hash
computeMD5Hash(passwd);
}
});

}
else
{
Toast.makeText(getApplicationContext(), "Enter your credentials..", Toast.LENGTH_LONG).show();
}

} //end onCreate()

private static String convertToHex(byte[] data) throws java.io.IOException
{
StringBuffer sb = new StringBuffer();
String hex=null;
hex=Base64.encodeToString(data, 0, data.length, NO_OPTIONS);
sb.append(hex);
return sb.toString();
}


public void computeSHAHash(String password)
{
MessageDigest mdSha1 = null;
try
{
mdSha1 = MessageDigest.getInstance("SHA-1");
} catch (NoSuchAlgorithmException e1) {
Log.e("myapp", "Error initializing SHA1 message digest");
}
try {
mdSha1.update(password.getBytes("ASCII"));
} catch (UnsupportedEncodingException e) {
// TODO Auto-generated catch block
e.printStackTrace();
}
byte[] data = mdSha1.digest();
try {
SHAHash=convertToHex(data);
} catch (IOException e) {
// TODO Auto-generated catch block
e.printStackTrace();
}

result.setText("SHA-1 hash generated is: " + " " + SHAHash);
}


public void computeMD5Hash(String password)
{

try {
// Create MD5 Hash
MessageDigest digest = java.security.MessageDigest.getInstance("MD5");
digest.update(password.getBytes());
byte messageDigest[] = digest.digest();

StringBuffer MD5Hash = new StringBuffer();
for (int i = 0; i < messageDigest.length; i++)
{
String h = Integer.toHexString(0xFF & messageDigest[i]);
while (h.length() < 2)
h = "0" + h;
MD5Hash.append(h);
}

result.setText("MD5 hash generated is: " + " " + MD5Hash);

}
catch (NoSuchAlgorithmException e)
{
e.printStackTrace();
}

}
}


Cheers guys!

Content Provider in Android

$
0
0
Content provider 

A content provider manages access to a central repository of data. A provider is part of an Android application, which often provides its own UI for working with the data. However, content providers are primarily intended to be used by other applications, which access the provider using a provider client object.

Content URIs

A content URI is a URI that identifies data in a provider. Content URIs include the symbolic name of the entire provider (its authority) and a name that points to a table (a path). When you call a client method to access a table in a provider, the content URI for the table is one of the arguments.

Today I am sharing the code on the basis of content provider and content uri. That means we have to add contact in contact list and view our added contact and modify our contact and delete our contact.


main.xml


values/string.xml


This example is the working of a native content provider - here the contacts list
ContentProviderNewExample
View Contacts
Add Contact
Modify Contact
Delete Contact

ContentProviderNewExample.java

package com.sunil.contact;
import java.util.ArrayList;
import android.app.Activity;
import android.content.ContentProviderOperation;
import android.content.ContentResolver;
import android.content.OperationApplicationException;
import android.database.Cursor;

import android.os.Bundle;
import android.os.RemoteException;
import android.provider.ContactsContract;

import android.util.Log;
import android.view.View;
import android.view.View.OnClickListener;
import android.widget.Button;
import android.widget.Toast;

public class ContentProviderNewExample extends Activity {


/** Called when the activity is first created. */
@Override
public void onCreate(Bundle savedInstanceState) {
super.onCreate(savedInstanceState);
setContentView(R.layout.main);

Button view = (Button)findViewById(R.id.viewButton);
Button add = (Button)findViewById(R.id.createButton);
Button modify = (Button)findViewById(R.id.updateButton);
Button delete = (Button)findViewById(R.id.deleteButton);


view.setOnClickListener(new OnClickListener() {
public void onClick(View v){
displayContacts();
Log.i("NativeContentProvider", "Completed Displaying Contact list");
}
});

add.setOnClickListener(new OnClickListener() {
public void onClick(View v){
createContact("Example Name", "123456789");
Log.i("NativeContentProvider", "Created a new contact, of course hard-coded");
}
});

modify.setOnClickListener(new OnClickListener() {
public void onClick(View v) {
updateContact("Example Name", "987604321");
Log.i("NativeContentProvider", "Completed updating the email id, if applicable");
}
});

delete.setOnClickListener(new OnClickListener() {
public void onClick(View v) {
deleteContact("Example Name");
Log.i("NativeContentProvider", "Deleted the just created contact");
}
});
}

private void displayContacts() {

ContentResolver cr = getContentResolver();
Cursor cur = cr.query(ContactsContract.Contacts.CONTENT_URI,
null, null, null, null);
if (cur.getCount() > 0) {
while (cur.moveToNext()) {
String id = cur.getString(cur.getColumnIndex(ContactsContract.Contacts._ID));
String name = cur.getString(cur.getColumnIndex(ContactsContract.Contacts.DISPLAY_NAME));
if (Integer.parseInt(cur.getString(
cur.getColumnIndex(ContactsContract.Contacts.HAS_PHONE_NUMBER))) > 0) {
Cursor pCur = cr.query(
ContactsContract.CommonDataKinds.Phone.CONTENT_URI,
null,
ContactsContract.CommonDataKinds.Phone.CONTACT_ID +" = ?",
new String[]{id}, null);
while (pCur.moveToNext()) {
String phoneNo = pCur.getString(pCur.getColumnIndex(ContactsContract.CommonDataKinds.Phone.NUMBER));
Toast.makeText(ContentProviderNewExample.this, "Name: " + name + ", Phone No: " + phoneNo, Toast.LENGTH_SHORT).show();
}
pCur.close();
}
}
}
}

private void createContact(String name, String phone) {
ContentResolver cr = getContentResolver();

Cursor cur = cr.query(ContactsContract.Contacts.CONTENT_URI,
null, null, null, null);

if (cur.getCount() > 0) {
while (cur.moveToNext()) {
String existName = cur.getString(cur.getColumnIndex(ContactsContract.Contacts.DISPLAY_NAME));
if (existName.contains(name)) {
Toast.makeText(ContentProviderNewExample.this,"The contact name: " + name + " already exists", Toast.LENGTH_SHORT).show();
return;
}
}
}

ArrayList ops = new ArrayList();
ops.add(ContentProviderOperation.newInsert(ContactsContract.RawContacts.CONTENT_URI)
.withValue(ContactsContract.RawContacts.ACCOUNT_TYPE, "accountname@gmail.com")
.withValue(ContactsContract.RawContacts.ACCOUNT_NAME, "com.google")
.build());
ops.add(ContentProviderOperation.newInsert(ContactsContract.Data.CONTENT_URI)
.withValueBackReference(ContactsContract.Data.RAW_CONTACT_ID, 0)
.withValue(ContactsContract.Data.MIMETYPE,
ContactsContract.CommonDataKinds.StructuredName.CONTENT_ITEM_TYPE)
.withValue(ContactsContract.CommonDataKinds.StructuredName.DISPLAY_NAME, name)
.build());
ops.add(ContentProviderOperation.newInsert(ContactsContract.Data.CONTENT_URI)
.withValueBackReference(ContactsContract.Data.RAW_CONTACT_ID, 0)
.withValue(ContactsContract.Data.MIMETYPE,
ContactsContract.CommonDataKinds.Phone.CONTENT_ITEM_TYPE)
.withValue(ContactsContract.CommonDataKinds.Phone.NUMBER, phone)
.withValue(ContactsContract.CommonDataKinds.Phone.TYPE, ContactsContract.CommonDataKinds.Phone.TYPE_HOME)
.build());


try {
cr.applyBatch(ContactsContract.AUTHORITY, ops);
} catch (RemoteException e) {
// TODO Auto-generated catch block
e.printStackTrace();
} catch (OperationApplicationException e) {
// TODO Auto-generated catch block
e.printStackTrace();
}

Toast.makeText(ContentProviderNewExample.this, "Created a new contact with name: " + name + " and Phone No: " + phone, Toast.LENGTH_SHORT).show();

}

private void updateContact(String name, String phone) {
ContentResolver cr = getContentResolver();

String where = ContactsContract.Data.DISPLAY_NAME + " = ? AND " +
ContactsContract.Data.MIMETYPE + " = ? AND " +
String.valueOf(ContactsContract.CommonDataKinds.Phone.TYPE) + " = ? ";
String[] params = new String[] {name,
ContactsContract.CommonDataKinds.Phone.CONTENT_ITEM_TYPE,
String.valueOf(ContactsContract.CommonDataKinds.Phone.TYPE_HOME)};

Cursor phoneCur = managedQuery(ContactsContract.Data.CONTENT_URI, null, where, params, null);

ArrayList ops = new ArrayList();

if ( (null == phoneCur) ) {
createContact(name, phone);
} else {
ops.add(ContentProviderOperation.newUpdate(ContactsContract.Data.CONTENT_URI)
.withSelection(where, params)
.withValue(ContactsContract.CommonDataKinds.Phone.DATA, phone)
.build());
}

phoneCur.close();

try {
cr.applyBatch(ContactsContract.AUTHORITY, ops);
} catch (RemoteException e) {
// TODO Auto-generated catch block
e.printStackTrace();
} catch (OperationApplicationException e) {
// TODO Auto-generated catch block
e.printStackTrace();
}

Toast.makeText(ContentProviderNewExample.this, "Updated the phone number of 'Example Name' to: " + phone, Toast.LENGTH_SHORT).show();
}

private void deleteContact(String name) {

ContentResolver cr = getContentResolver();
String where = ContactsContract.Data.DISPLAY_NAME + " = ? ";
String[] params = new String[] {name};

ArrayList ops = new ArrayList();
ops.add(ContentProviderOperation.newDelete(ContactsContract.RawContacts.CONTENT_URI)
.withSelection(where, params)
.build());
try {
cr.applyBatch(ContactsContract.AUTHORITY, ops);
} catch (RemoteException e) {
// TODO Auto-generated catch block
e.printStackTrace();
} catch (OperationApplicationException e) {
// TODO Auto-generated catch block
e.printStackTrace();
}

Toast.makeText(ContentProviderNewExample.this, "Deleted the contact with name '" + name +"'", Toast.LENGTH_SHORT).show();

}
}

Menifest.xml


Cheers guys!

PDF Generate in Android

$
0
0
Hi guys!
Today I am going to share pdf generate in Android tutorial. This tutorial will help you generate your own PDF file in Android. Sometimes, you need to create certain applications where in you want to output the details in the form of a PDF file so that it could printed or used in some other way.

In order to generate PDF we are going to use an external library called Droidtext which is used for PDF creation. It comes with a desktop version and an Android version, the differences between the two can be found over here. For this tutorial, I will be using the Android version.

Add Droidtext .jar file to Android project inside the libs folder and make a java build path.

activity_main.xml


MainActivity.java

package com.example;

import java.io.ByteArrayOutputStream;
import java.io.File;
import java.io.FileOutputStream;
import java.io.IOException;

import android.app.Activity;
import android.graphics.Bitmap;
import android.graphics.BitmapFactory;
import android.graphics.Color;
import android.os.Bundle;
import android.os.Environment;
import android.util.Log;
import android.view.View;
import android.widget.Button;

import com.lowagie.text.Document;
import com.lowagie.text.DocumentException;
import com.lowagie.text.Font;
import com.lowagie.text.HeaderFooter;
import com.lowagie.text.Image;
import com.lowagie.text.Paragraph;
import com.lowagie.text.Phrase;
import com.lowagie.text.pdf.PdfWriter;

public class MainActivity extends Activity {


private Button b;

@Override
protected void onCreate(Bundle savedInstanceState)
{
super.onCreate(savedInstanceState);
setContentView(R.layout.activity_main);

b= (Button)findViewById(R.id.button1);
b.setOnClickListener(new View.OnClickListener() {
@Override
public void onClick(View v) {
// TODO Auto-generated method stub
createPDF();

}
});

}


public void createPDF()
{
Document doc = new Document();


try {
String path = Environment.getExternalStorageDirectory().getAbsolutePath() + "/droidText";

File dir = new File(path);
if(!dir.exists())
dir.mkdirs();

Log.d("PDFCreator", "PDF Path: " + path);


File file = new File(dir, "sample.pdf");
FileOutputStream fOut = new FileOutputStream(file);

PdfWriter.getInstance(doc, fOut);

//open the document
doc.open();


Paragraph p1 = new Paragraph("Hi! I am generating my first PDF using DroidText");
Font paraFont= new Font(Font.COURIER);
p1.setAlignment(Paragraph.ALIGN_CENTER);
p1.setFont(paraFont);

//add paragraph to document
doc.add(p1);

Paragraph p2 = new Paragraph("This is an example of a simple paragraph");
Font paraFont2= new Font(Font.COURIER,14.0f,Color.GREEN);
p2.setAlignment(Paragraph.ALIGN_CENTER);
p2.setFont(paraFont2);

doc.add(p2);

ByteArrayOutputStream stream = new ByteArrayOutputStream();
Bitmap bitmap = BitmapFactory.decodeResource(getBaseContext().getResources(), R.drawable.android);
bitmap.compress(Bitmap.CompressFormat.JPEG, 100 , stream);
Image myImg = Image.getInstance(stream.toByteArray());
myImg.setAlignment(Image.MIDDLE);

//add image to document
doc.add(myImg);

//set footer
Phrase footerText = new Phrase("This is an example of a footer");
HeaderFooter pdfFooter = new HeaderFooter(footerText, false);
doc.setFooter(pdfFooter);


} catch (DocumentException de) {
Log.e("PDFCreator", "DocumentException:" + de);
} catch (IOException e) {
Log.e("PDFCreator", "ioException:" + e);
}
finally
{
doc.close();
}

}
}

Menifest.xml


Cheers Guys!

Download Image From Server

$
0
0
Hi Guys!
Today i going to share the code to download the image from server. This is a sample activity which shows how to get image files from the web and display them using the ImageView view.

main.xml


DownloadImageActivity.java

package com.sunil.download;

import java.io.IOException;
import java.io.InputStream;
import java.net.HttpURLConnection;
import java.net.URL;
import java.net.URLConnection;
import android.app.Activity;
import android.graphics.Bitmap;
import android.graphics.BitmapFactory;
import android.os.Bundle;
import android.widget.ImageView;

public class DownloadImageActivity extends Activity {
/** Called when the activity is first created. */
@Override
public void onCreate(Bundle savedInstanceState) {
super.onCreate(savedInstanceState);
setContentView(R.layout.main);

Bitmap bitmap = DownloadImage(
"http://www.allindiaflorist.com/imgs/arrangemen4.jpg");
ImageView img = (ImageView) findViewById(R.id.img);
img.setImageBitmap(bitmap);
}

private InputStream OpenHttpConnection(String urlString)
throws IOException
{
InputStream in = null;
int response = -1;

URL url = new URL(urlString);
URLConnection conn = url.openConnection();

if (!(conn instanceof HttpURLConnection))
throw new IOException("Not an HTTP connection");

try{
HttpURLConnection httpConn = (HttpURLConnection) conn;
httpConn.setAllowUserInteraction(false);
httpConn.setInstanceFollowRedirects(true);
httpConn.setRequestMethod("GET");
httpConn.connect();

response = httpConn.getResponseCode();
if (response == HttpURLConnection.HTTP_OK) {
in = httpConn.getInputStream();
}
}
catch (Exception ex)
{
throw new IOException("Error connecting");
}
return in;
}
private Bitmap DownloadImage(String URL)
{
Bitmap bitmap = null;
InputStream in = null;
try {
in = OpenHttpConnection(URL);
bitmap = BitmapFactory.decodeStream(in);
in.close();
} catch (IOException e1) {
// TODO Auto-generated catch block
e1.printStackTrace();
}
return bitmap;
}
}

menifest.xml


Cheers guys!

Phone Dialer In Android

$
0
0
Hi Guys!
Today i am going to share the code of Action dial in android.
Phone dialer is an activity available with Android operating system to call a number. In this article, we will create an application which invokes the dialer on a button click.  Android system provides a standard action name called “ACTION_DIAL” to invoke the dialer. We will make use this action to invoke the the dialer from our application.

Main.xml


MainActivity.java

package com.sunil.dial;

import android.app.Activity;
import android.content.Intent;
import android.os.Bundle;
import android.view.View;
import android.view.View.OnClickListener;
import android.widget.Button;

public class MainActivity extends Activity {
/** Called when the activity is first created. */
@Override
public void onCreate(Bundle savedInstanceState) {
super.onCreate(savedInstanceState);
setContentView(R.layout.main);

Button btn = (Button) findViewById(R.id.btn);

OnClickListener listener = new OnClickListener() {
@Override
public void onClick(View v) {
Intent intent = new Intent("android.intent.action.DIAL");
startActivity(intent);
}
};

btn.setOnClickListener(listener);
}
}


Cheers Guys!

Dial Number In Android Phone

$
0
0
Hi Guys!
Today I am sharing the code for dial a number to call any guys from android device.
In this article we will create an application which can call a telephone number directly from the application. In order to call a number we will make use the standard action called ACTION_CALL. An application can  call a number directly if  and only if  the necessary permission is explicitly granted. For this we need to provide CALL_PHONE permission to the application.

Main.xml


MainActivity.java

package com.sunil.call;


import android.app.Activity;
import android.content.Intent;
import android.net.Uri;
import android.os.Bundle;
import android.view.View;
import android.view.View.OnClickListener;
import android.widget.Button;
import android.widget.EditText;

public class MainActivity extends Activity implements OnClickListener{
/** Called when the activity is first created. */
@Override
public void onCreate(Bundle savedInstanceState) {
super.onCreate(savedInstanceState);
setContentView(R.layout.main);

Button btn = (Button) findViewById(R.id.btnCall);
btn.setOnClickListener(this);

}

@Override
public void onClick(View v) {

EditText telNo = (EditText) findViewById(R.id.telNo);
String strTelNo = telNo.getText().toString();
Intent intent = new Intent("android.intent.action.CALL");

Uri data = Uri.parse("tel:"+ strTelNo );

intent.setData(data);
startActivity(intent);

}
}

Menifest.xml


Cheers Guys!

Web browser by Action View

$
0
0
Hi Guys!

Today I am going to share the code for open web browser by action view in android.
In this article we will create an application which will open a user input website in a web browser. In order to open a web browser, we will create an intent object with ACTION_VIEW as action and data with “http” in the url. Since http request is invoked by the external browser, no explicit permission is needed for this application.

activity_main.xml


MainActivity.java

package com.sunil.browserview;

import android.app.Activity;
import android.content.Intent;
import android.net.Uri;
import android.os.Bundle;
import android.view.View;
import android.view.View.OnClickListener;
import android.widget.Button;
import android.widget.EditText;

public class MainActivity extends Activity implements OnClickListener{

@Override
public void onCreate(Bundle savedInstanceState) {
super.onCreate(savedInstanceState);
setContentView(R.layout.activity_main);

Button btn = (Button) findViewById(R.id.btn_browse);
btn.setOnClickListener(this);
}
@Override
public void onClick(View v) {
EditText txt = (EditText) findViewById(R.id.te_url);

Intent intent = new Intent("android.intent.action.VIEW");

Uri data = Uri.parse("http://"+txt.getText().toString());

intent.setData(data);

startActivity(intent);

}
}


View Pager In Android

$
0
0
Hi Guys!


Today I am going to share the code to make a view pager in android. In the new API- 17 gallery is debricated  now. So android developer suggest that please use the view pager or horizontal scroll veiw in place of Gallery.

Viewpager  is  the best way to switching among view. It provide a way to swipe views from left to right and right to left. Viewpager provide strong way to swipe any views but here i have taken ImageView to swipe left and right.
Here the the link, you can see the ViewPager in android API.

Add the support library while you are creating project because Viewpager does not support in lower android version.

miain.xml


PageIndicatorActivity.java

package com.sunil.viewpager;

import android.app.Activity;
import android.os.Bundle;
import android.support.v4.view.ViewPager;
import android.view.Menu;

public class PageIndicatorActivity extends Activity {

@Override
public void onCreate(Bundle savedInstanceState) {
super.onCreate(savedInstanceState);
setContentView(R.layout.main);
ViewPagerAdapter adapter = new ViewPagerAdapter(this, imageArra);
ViewPager myPager = (ViewPager) findViewById(R.id.myfivepanelpager);
myPager.setAdapter(adapter);
myPager.setCurrentItem(0);
}

private int imageArra[] = { R.drawable.sunn, R.drawable.sunnew,
R.drawable.sunn, R.drawable.sunnew,
R.drawable.sunn, R.drawable.sunnew, };


}

ViewPagerAdapter.java

package com.sunil.viewpager;

import android.app.Activity;
import android.os.Parcelable;
import android.support.v4.view.PagerAdapter;
import android.support.v4.view.ViewPager;
import android.view.View;
import android.view.ViewGroup.LayoutParams;
import android.widget.ImageView;
import android.widget.ImageView.ScaleType;

public class ViewPagerAdapter extends PagerAdapter {

Activity activity;
int imageArray[];

public ViewPagerAdapter(Activity act, int[] imgArra) {
imageArray = imgArra;
activity = act;
}

public int getCount() {
return imageArray.length;
}

public Object instantiateItem(View collection, int position) {
ImageView view = new ImageView(activity);
view.setLayoutParams(new LayoutParams(LayoutParams.MATCH_PARENT, LayoutParams.MATCH_PARENT));
view.setScaleType(ScaleType.FIT_XY);
view.setBackgroundResource(imageArray[position]);
((ViewPager) collection).addView(view, 0);
return view;
}

@Override
public void destroyItem(View arg0, int arg1, Object arg2) {
((ViewPager) arg0).removeView((View) arg2);
}

@Override
public boolean isViewFromObject(View arg0, Object arg1) {
return arg0 == ((View) arg1);
}

@Override
public Parcelable saveState() {
return null;
}
}


Cheers Guys!
Viewing all 106 articles
Browse latest View live